802.11ax Uplink OFDMA Multinode System-Level Simulation
This example shows how to simulate a WLAN multinode uplink (UL) orthogonal frequency-division multiple access (OFDMA) network consisting of an IEEE® 802.11ax™ (Wi-Fi® 6) [1] access point (AP) and four stations (STAs).
Using this example, you can:
Create and configure a WLAN multinode scenario consisting of an AP and four STAs.
Configure and add On-Off application traffic from the STAs to the AP.
Add the channel model, and simulate UL OFDMA communication from the STAs initiated by the AP.
Capture the application layer (APP), medium access control layer (MAC) and physical layer (PHY) statistics for each node.
The simulation results show performance metrics such as MAC throughput, MAC packet loss, and application packet latency captured at each node.
Additionally, you can further explore the example by performing these tasks.
UL OFDMA Multinode 802.11ax Scenario
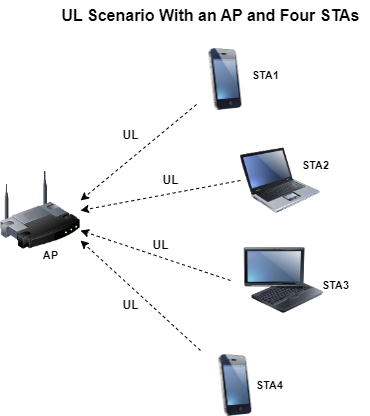
This example creates, configures, and simulates this 802.11ax system-level scenario, consisting of one AP and four associated STAs.

In this figure:
The AP transmits a basic trigger frame to solicit UL data frames from all the STAs simultaneously.
Each STA responds with UL data frames.
The AP transmits a multi-STA block ack frame in response to UL data frames.
Check for Support Package Installation
Check if the Communications Toolbox™ Wireless Network Simulation Library support package is installed. If the support package is not installed, MATLAB® returns an error with a link to download and install the support package.
wirelessnetworkSupportPackageCheck
Configure Simulation Parameters
Set the seed for the random number generator to 1. The seed value controls the pattern of random number generation. The random number generated by the seed value impacts several processes within the simulation, including backoff counter selection at the MAC layer and predicting packet reception success at the PHY. To improve the accuracy of your simulation results, change the seed value, run the simulation again, and average the results over multiple simulations.
rng(1,"combRecursive")Specify the simulation time in seconds. To visualize a live state transition plot for all of the nodes, set the enablePacketVisualization variable to true. To view the node performance visualization, set the enableNodePerformancePlot variable to true.
simulationTime =0.1; enablePacketVisualization =
true; enableNodePerformancePlot =
true;
This example uses abstracted MAC and PHY at each WLAN node because WLAN node supports UL OFDMA for only abstracted MAC and PHY. To enable abstracted PHY at each node, set the phyabstraction variable to either "tgax-evaluation-methodology" or "tgax-mac-calibration". For more information about abstracted MAC and PHY, see the Get Started with WLAN System-Level Simulation in MATLAB example.
phyabstraction =  "tgax-evaluation-methodology";
Configure WLAN Scenario
Initialize the wireless network simulator by creating a wirelessNetworkSimulator object.
networkSimulator = wirelessNetworkSimulator.init;
Nodes
Specify the number of nodes in the network. The example scenario consists of one AP and four associated STAs.
numNodes = 5;
numSTAs = numNodes-1;
Specify the positions of the AP and STA nodes. The apPosition and staPositions vectors specify the Cartesian coordinates of the AP and STAs, respectively, in the -, -, and - axes. Units are in meters.
apPosition = [0 0 0];
staPositions = [((30/numSTAs).*(1:numSTAs))' ((30/numSTAs).*(numSTAs:-1:1))' zeros(numSTAs,1)];
To model the scenario, create an AP and four STAs using wlanNode and wlanDeviceConfig objects. Create two WLAN device configuration objects, one for the AP and the other for the STAs. You can use the same device configuration object to configure all the STAs.
To configure an AP and a STA, set the Mode property of one wlanDeviceConfig object to "AP" and the other to "STA". Specify the configuration parameters for the AP and STAs by using the wlanDeviceConfig object. To enable the UL OFDMA functionality, set the EnableUplinkOFDMA property of the AP device configuration object to true.
The example simulates this UL OFDMA frame exchange sequence — Basic trigger frames from the AP followed by UL multiuser (MU) frames from multiple scheduled STAs, and then a multi-STA block ack frame from the AP.
Optionally, you can enable the MU request-to-send (RTS)/clear-to-send (CTS) exchanges in the sequence by specifying the DisableRTS property of the wlanDeviceConfig object for the AP as false.
For information about how to run a DL OFDMA multinode simulation, see the 802.11ax Downlink OFDMA Multinode System-Level Simulation example.
The AP performs these steps in the round-robin scheduling strategy and selects the STAs for each UL MU transmission:
Schedule the STAs with nonzero queue sizes.
If the number of users does not reach the maximum that can be scheduled for a given bandwidth in the first step, the AP selects the STAs with unknown queue sizes.
The AP does not schedule the STAs with zero queue sizes.
The AP uses fixed assignment of resource units (RUs) for a given number of users and amount of bandwidth. The AP allocates equal-sized RUs to the scheduled STAs. For a given number of scheduled STAs, if the AP cannot perform equal-sized RU allocation, it assigns the RUs so as to minimize the difference between RU sizes.
accessPointCfg = wlanDeviceConfig(Mode="AP", ...   % AP device configuration
    TransmissionFormat="HE-MU-OFDMA", ...
    EnableUplinkOFDMA=true, ...
    DisableRTS=true, ...
    MPDUAggregationLimit=1, ...
    MCS=11, ...
    TransmitPower=20);
stationCfg = wlanDeviceConfig(Mode="STA", ...      % STAs device configuration
    DisableRTS=true, ...
    MPDUAggregationLimit=1, ...
    MCS=11, ...
    TransmitPower=20);
To create one AP and four STA nodes from the specified configuration, use wlanNode objects. Specify the node names, node positions, and device configuration objects. To create multiple nodes at a time, specify multiple node positions to the same wlanNode object. Specify the PHY abstraction method used by the AP and STAs. To indicate that the WLAN nodes abstract the MAC frames, enable the MACFrameAbstraction property.
accessPoint = wlanNode(Name="AP", ...
    Position=apPosition, ...
    DeviceConfig=accessPointCfg,...
    PHYAbstractionMethod=phyabstraction, ...
    MACFrameAbstraction=true);

stations = wlanNode(Name="STA"+(1:numSTAs), ...
    Position=staPositions, ...
    DeviceConfig=stationCfg, ...
    PHYAbstractionMethod=phyabstraction, ...
    MACFrameAbstraction=true);

nodes = [accessPoint stations];
To ensure all the nodes are configured properly, use the hCheckWLANNodesConfiguration helper function.
hCheckWLANNodesConfiguration(nodes)
Association
Associate all the STAs to the AP by using the associateStations object function of the wlanNode object.
associateStations(accessPoint,stations)
Application Traffic
Create four networkTrafficOnOff objects, one for each AP-STA pair, to generate an On-Off application traffic pattern. Configure the On-Off application traffic by specifying the application data rate, packet size, On time, and Off time. The number of objects created equals the number of AP-STA pairs that have uplink traffic exchange in the example. Add application traffic from each STA node to the AP node by using the addTrafficSource object function.
for staIdx=1:numNodes-1
    trafficSource(staIdx) = networkTrafficOnOff(DataRate=20000,PacketSize=100,OnTime=inf,OffTime=0);         %#ok<SAGROW>
    addTrafficSource(stations(staIdx),trafficSource(staIdx),DestinationNode=accessPoint,AccessCategory=0)
end
Wireless Channel
To add a random TGax fading channel between each node, this example uses the hSLSTGaxMultiFrequencySystemChannel helper function. When you model a fading channel, the probability of packet transmission success depends on these major factors.
Quality of the channel between a STA and an AP for the selected RU
Modulation and coding scheme (MCS)
In this example, the RU allocation strategy does not consider the quality of the channel between each STA and the AP. Therefore, if the channel quality between a STA and an AP is poor and the selected MCS is high, you are likely to experience packet loss.
Add the channel model to the wireless network simulator by using the addChannelModel object function of the wirelessNetworkSimulator object.
channel = hSLSTGaxMultiFrequencySystemChannel(nodes);
addChannelModel(networkSimulator,channel.ChannelFcn)
Simulation and Results
Add the nodes to the wireless network simulator.
addNodes(networkSimulator,nodes)
To view the state transition plot, use the helperPlotPacketTransitions helper object. To disable the packet communication over frequency subplot, set the FrequencyPlotFlag property of helperPlotPacketTransitions helper object to false.
if enablePacketVisualization
    packetVisObj = helperPlotPacketTransitions(nodes,simulationTime,FrequencyPlotFlag=false);
end
To view the node performance visualization, use the helperPerformanceViewer helper object.
perfViewerObj = helperPerformanceViewer(nodes,simulationTime);
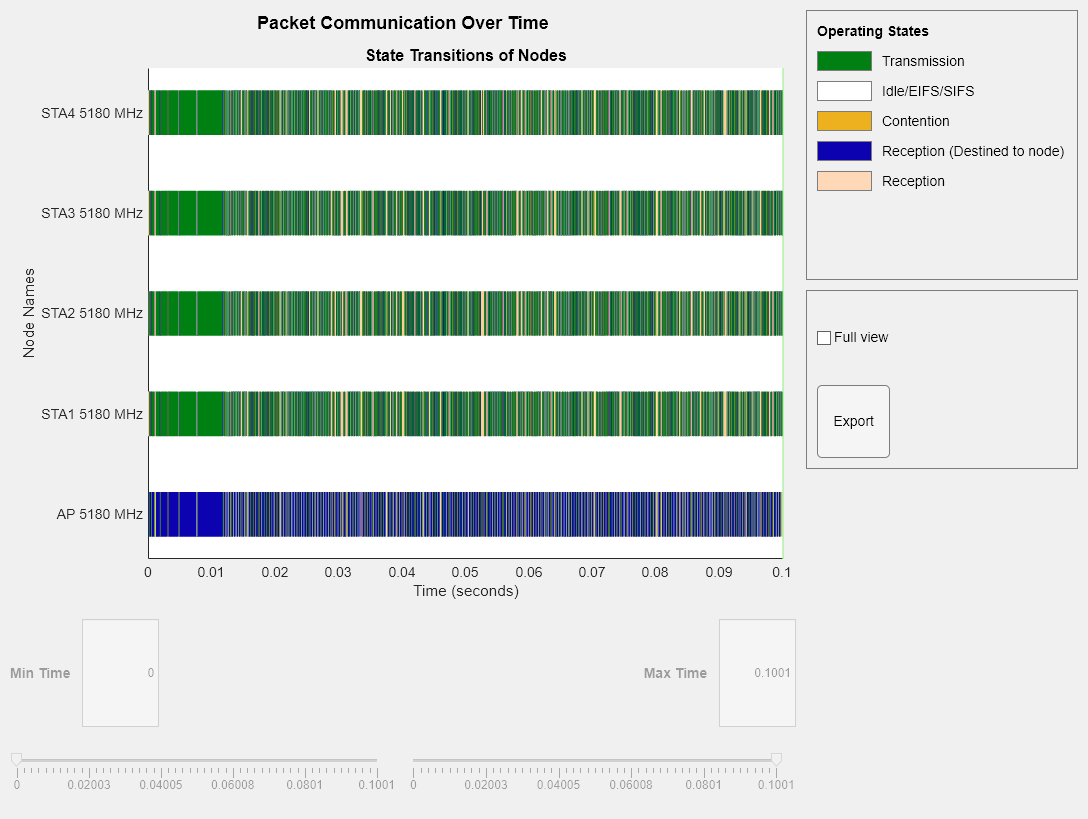
Run the network simulation for the specified simulation time. The runtime visualization shows the time spent by the AP and the STAs in Idle, Contention, Transmission, and Reception states.
run(networkSimulator,simulationTime)

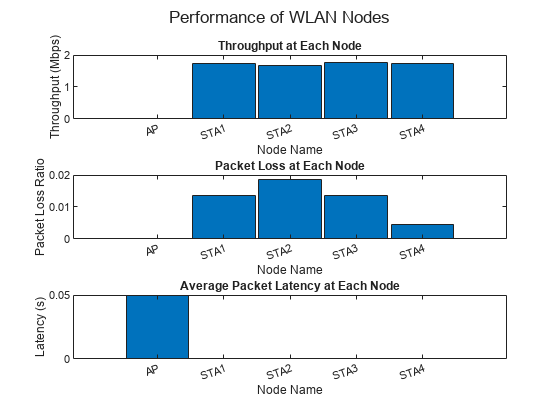
The plotNetworkStats object function displays these simulation plots.
MAC throughput (in Mbps) at each transmitter (STA).
MAC packet loss ratio — Ratio of unsuccessful data transmissions to the total data transmissions at each transmitter (STA).
Average application packet latency — Average latency incurred by the receiver (AP) to receive uplink traffic from the STAs.
if enableNodePerformancePlot
    plotNetworkStats(perfViewerObj);
end

Retrieve the APP, MAC, and PHY statistics at each node by using the statistics object function of the wlanNode object. For more information about the statistics, see WLAN System-Level Simulation Statistics.
stats = statistics(nodes);
Further Exploration
You can use this example to further explore these capabilities.
Throughput Comparison of OFDM and UL OFDMA
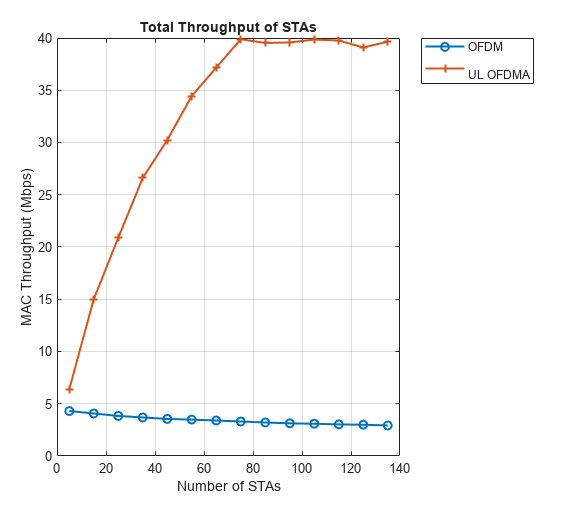
Generate the MAC throughput results of these OFDM and UL OFDMA transmission scenarios by using the hCompareOFDMvsULOFDMAThroughputs helper function.
An AP serving a maximum of 135 STAs with an OFDM configuration.
An AP serving a maximum of 135 STAs in a UL OFDMA configuration.
Plot the throughput results as a function of the number of STAs. By default, the hCompareOFDMvsULOFDMAThroughputs helper function plots the stored throughput values. To simulate the preceding scenarios again and reproduce the results, set plotStoredThroughputValues to false.
plotStoredThroughputValues = true;
hCompareOFDMvsULOFDMAThroughputs(plotStoredThroughputValues)
The preceding plot shows the MAC throughput comparison of OFDM and UL OFDMA. Note that, because of the simultaneous transmissions from multiple users, the throughput obtained by using UL OFDMA transmission is greater than the throughput obtained by using OFDM transmission.
Faster Execution Using Parallel Simulation Runs
If you want to run multiple simulations, you can speed up the simulations by enabling parallel computing using the parfor loop. The parfor loop is an alternative to the for loop that enables you to execute multiple simulation runs in parallel, thereby reducing the total execution time. To use parfor, you must have a license for Parallel Computing Toolbox™. For more information about how to run multiple simulations using a parfor loop, see the hCompareOFDMvsULOFDMAThroughputs helper function.
Appendix
The example uses these helpers:
hCheckWLANNodesConfiguration— Check if the node parameters are configured correctlyhSLSTGaxMultiFrequencySystemChannel— Return a system channel object, and set the path loss modelhSLSTGaxAbstractSystemChannel— Return a channel object for an abstracted PHY layerhSLSTGaxSystemChannel— Return a channel object for a full PHY layerhSLSTGaxSystemChannelBase— Return the base channel objecthCompareOFDMvsULOFDMAThroughputs— Retrieve MAC throughput results for OFDM and UL OFDMA transmission scenarioshelperPlotPacketTransitions— Plot the state transition figurehelperPerformanceViewer
References
[1] "IEEE Standard for Information Technology--Telecommunications and Information Exchange between Systems Local and Metropolitan Area Networks--Specific Requirements Part 11: Wireless LAN Medium Access Control (MAC) and Physical Layer (PHY) Specifications Amendment 1: Enhancements for High-Efficiency WLAN.” IEEE. https://doi.org/10.1109/IEEESTD.2021.9442429.
[2] "IEEE Standard for Information Technology--Telecommunications and Information Exchange between Systems - Local and Metropolitan Area Networks--Specific Requirements - Part 11: Wireless LAN Medium Access Control (MAC) and Physical Layer (PHY) Specifications.” IEEE. https://doi.org/10.1109/IEEESTD.2021.9363693.