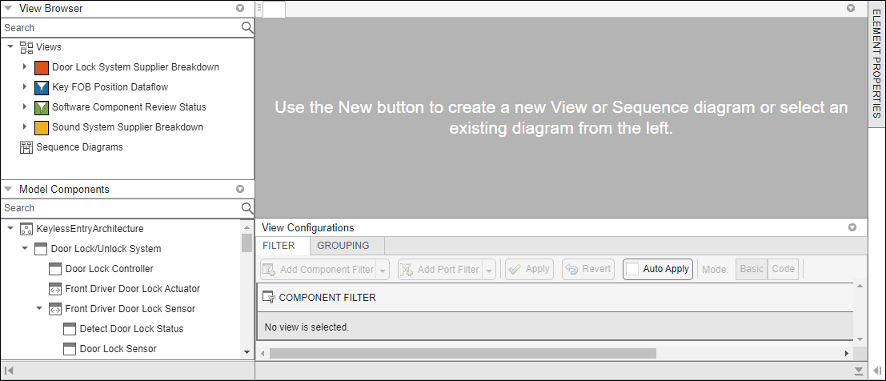
Create Architecture Views Interactively
The structural hierarchy of a system typically differs from the hierarchy of the functional requirements of a system. With views in System Composer™, you can view a system based on different hierarchies.
For a roadmap of the views topics, see Create Custom Views Using Architecture Views Gallery.
A view shows a customizable subset of elements in a model. Views can be filtered based on stereotypes or names of components, ports, and interfaces, along with the name, type, or units of an interface element. Create views by adding elements manually. Views create a simplified way to work with complex architectures by focusing on certain parts of the architectural design. You can use different types of views to represent the system. Switch between a component diagram, component hierarchy, or architecture hierarchy. For software architectures, you can switch to a class diagram view. A viewpoint represents a stakeholder perspective that specifies the contents of the view.
For more information on the keyless entry architecture, see Modeling System Architecture of Keyless Entry System.
For more information on authoring architecture models from the Architecture Views Gallery, see Author Architecture Models Through Component Diagram Views.
Tip
To learn more about how System Composer concepts apply to systems engineering design, see System Composer Concepts.
Create Views with Component Filters and Port Filters
Create views with component filters to choose a collection of components to display in your view. Use port filters to further simplify your view and show only relevant ports and connections.
Create View in Architecture Views Gallery
In the MATLAB® Command Window, enter this command.
The architecture model opens in System Composer.scKeylessEntrySystem
Navigate to Modeling > Architecture Views to open the Architecture Views Gallery.
Select New > View to create a new view.
In View Properties on the right pane, in the Name text box, enter a name for this view, for example,
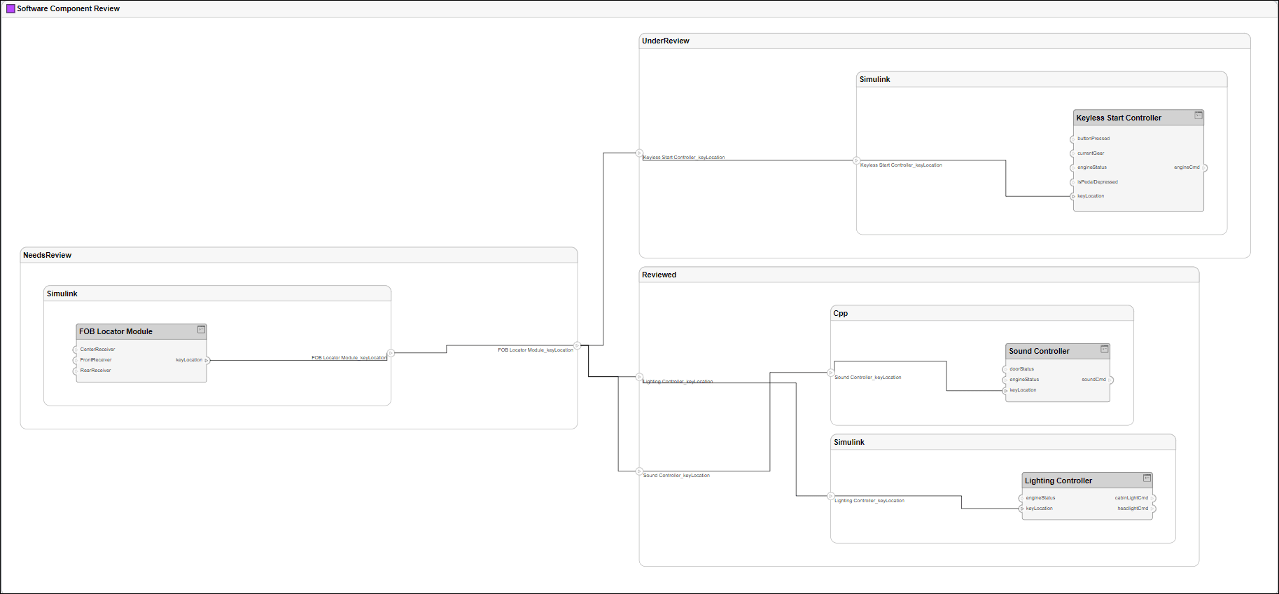
Software Component Review. Choose a color and enter a description, if necessary.
Add Component Filters and Group Ports
In the View Configurations pane, on the Filter tab, click Add Component Filter to add new form-based criterion to a component filter.
From the Select list, select
Components. From the Where list, selectStereotype. Select isa. In the text box, selectAutoProfile.SoftwareComponent.
Click Apply
 .
.System Composer creates a view using the query in the Component Filter box. The view filter selects all components with the
AutoProfile.SoftwareComponentstereotype applied.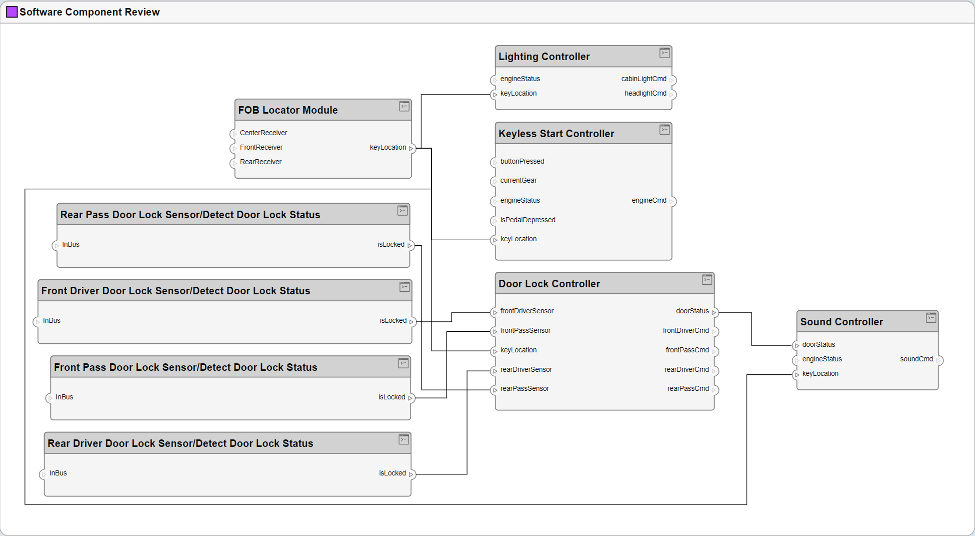
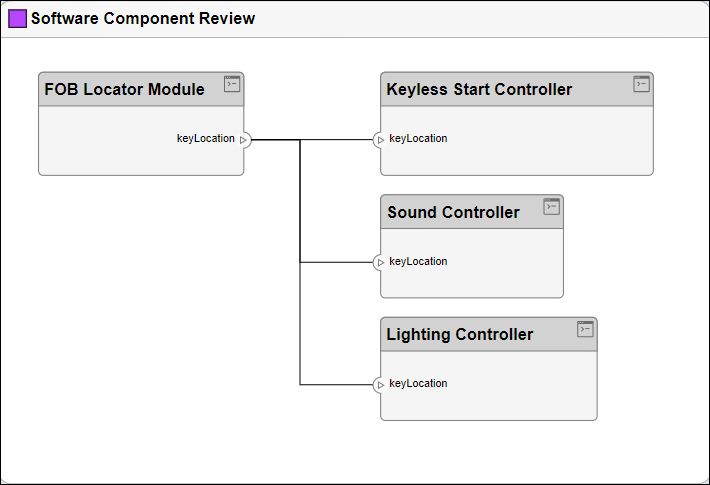
You can select Group Ports in the Architecture Views Gallery toolstrip to simplify complex networks of connections and ports.
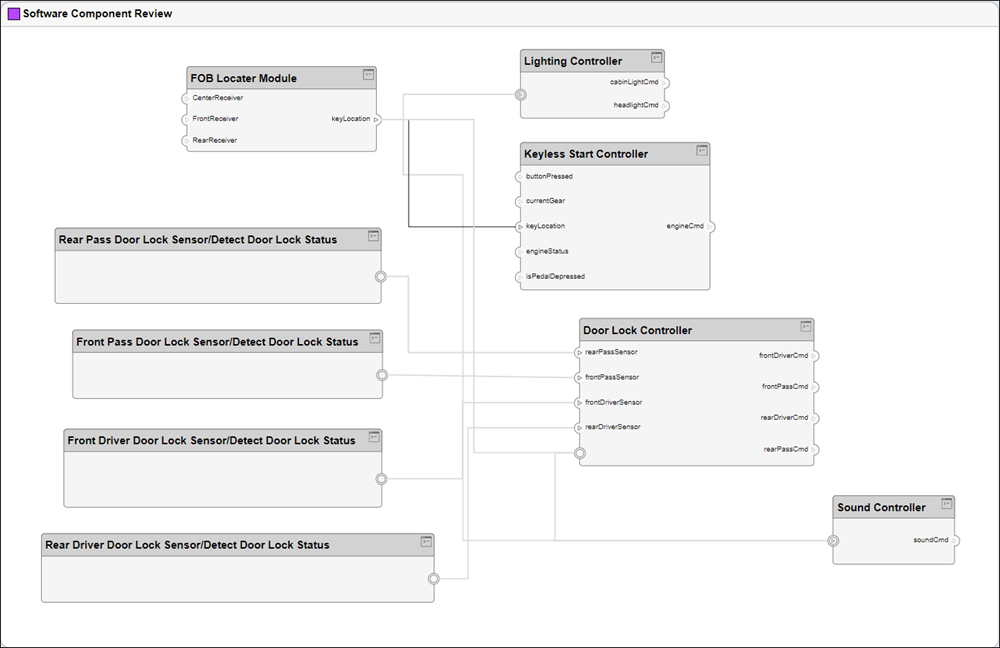
Each grouped set of ports connects to a common set of components. In this example, the view does not group port
AtoBbecause the port group containing componentsAandBbelongs to a different component set from the port group containing componentsA,B, andC.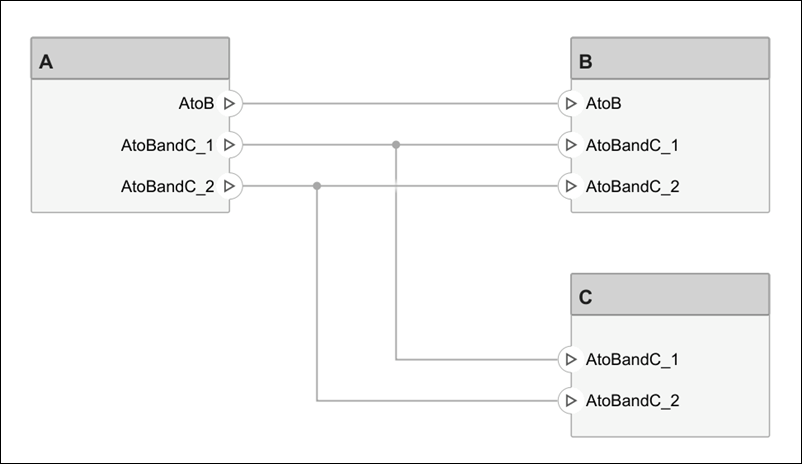
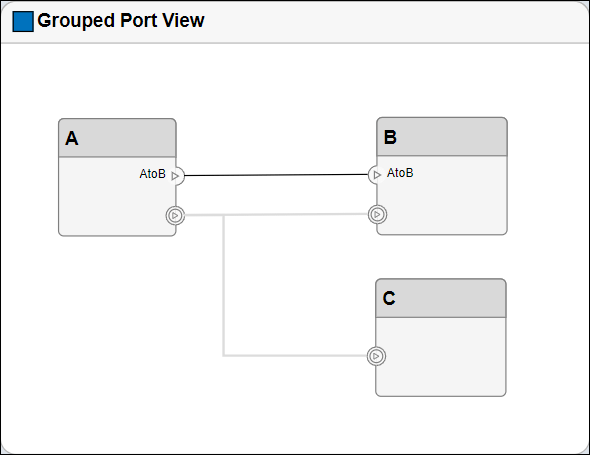
To revert to the original component diagram view, clear Group Ports. For more information, see Group Ports in Component Diagram Views.
Select Add Component Filter. From the Select list, select
Components. From the Where list, selectName. Select ~contains. In the text box, enter"Door Lock". Select the Auto Apply check box to apply future changes without selecting Apply.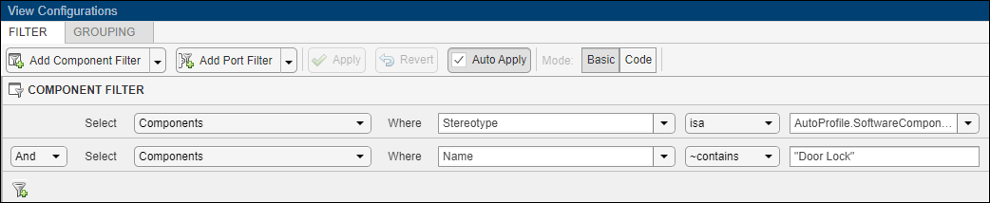
An architecture view is created using the additional query in the Component Filter box. The view is filtered to select all components not named
"Door Lock".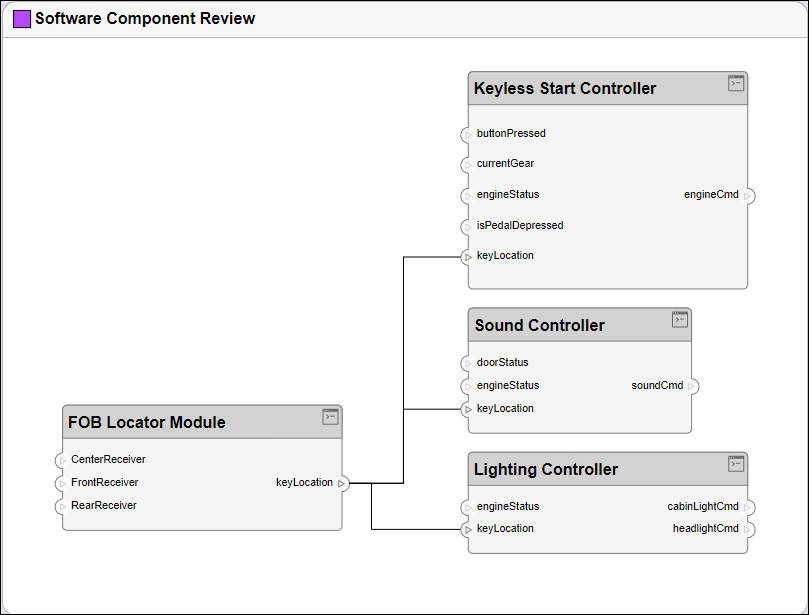
Add Port Filters
Since R2021b
From the Add Port Filter list, select the option
Hide Unconnected Ports.
An architecture view is created using the additional query in the Port Filter box. The view is filtered to hide unconnected ports.
Delete the port filter. Pause on the constraint and select the Delete
 button.
Add Group By Criteria to Views
In the View Configurations pane, select Grouping.
To choose a property enumeration for grouping, click Add Group By.
From the list, select
AutoProfile.BaseComponent.ReviewStatus.Click Add Group By again.
From the list, select
AutoProfile.SoftwareComponent.ImplementationLanguage.Click Apply.
Edit Views Interactively
With the Architecture Views Gallery tool, you can edit and rearrange your view layout interactively.
Click and drag components anywhere inside or outside the views canvas. Resize components inside and outside the views canvas. The views canvas expands to accommodate the moves.
Move and resize a parent component with its children. Rearrange child components inside a parent component. After moving a child component, the parent component expands to accommodate the change.
When a moved or resized component partially overlaps another component, the system is highlighted to indicate an incorrect final state.
Click and drag around a region to select multiple components and manipulate them together.
Double-click a component on the Model Components browser to add the component to the diagram. Right-click a component on the Model Components browser for additional options.
Undo or redo interactive edits on the views canvas.
You can also use the Interface Editor tool from within the Architecture Views Gallery to add, edit, and delete interface definitions and interface data dictionaries. For more information, see Use Interface Editor in Views.
Follow these steps to add or delete elements from a view using the Model Components browser.
To add more components to the view, drag and drop components from Model Components. Drag and drop the
Lighting
                        System
component to theSoftware Component Reviewview. Alternatively, click Add on the toolstrip. You can also press Ctrl+I to add component instantiations to your view when you select them.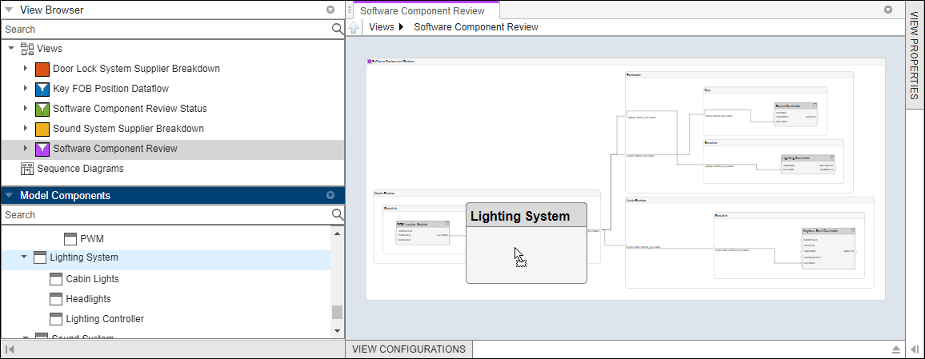
To delete components from the view, select your component. On the Architecture Views Gallery toolstrip, from the Components menu, click Remove.
Observe that the
Lighting Systemcomponent has been added to the view.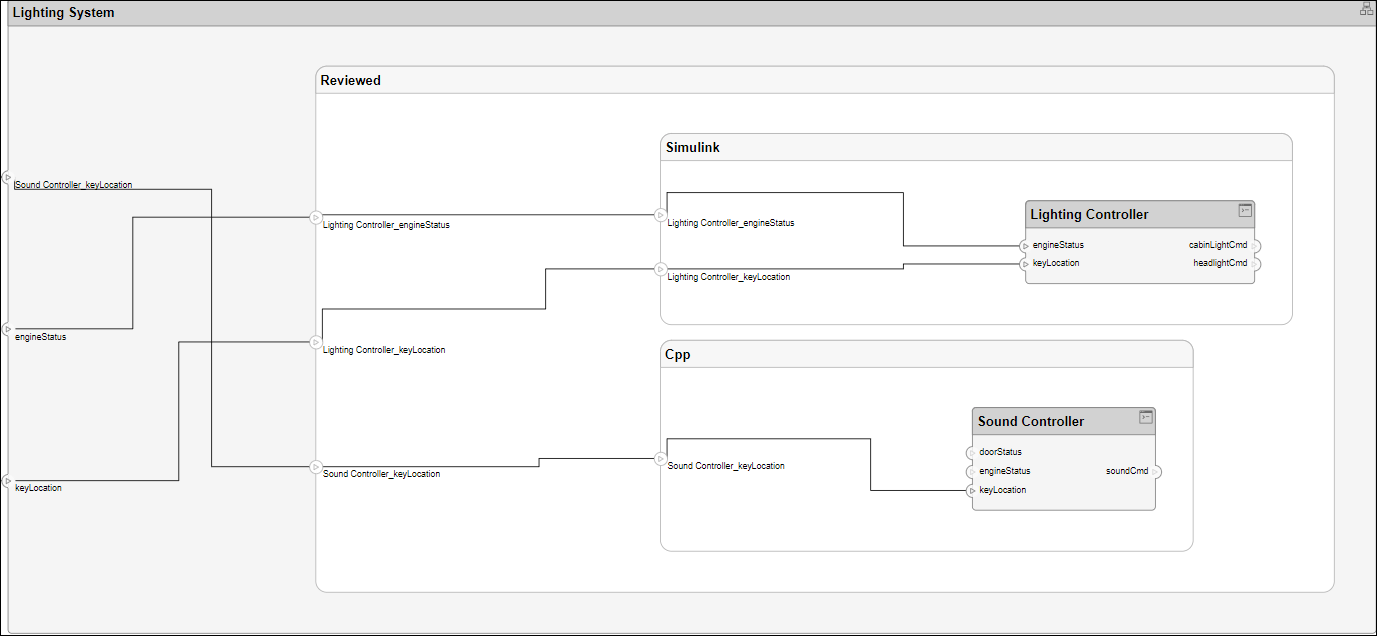
You can add or remove components manually in views without deleting your initial filter because the filter is augmented to reflect your manual edits to the view.
To remove a component from your view, use the keyboard shortcut Backspace on Windows or Delete on a Mac. To delete a component from the model when using the component diagram view canvas, use the keyboard shortcut CTRL+Backspace on Windows or Command+Delete on a Mac.
Add or Remove Requirements Links from Views
Navigate to Requirement > Requirements Manager. A Requirements Toolbox™ license is required. The Requirement Links tab appears at the bottom of the
Software Component Reviewview.Select the
Lighting Controllercomponent and observe the linked requirementAutomatically turn off headlights.
Select the requirement
Automatically turn off headlightsto open the Requirements Editor to view or modify requirement links.In the Architecture Views Gallery, navigate to Requirement > Open Requirements Editor if the Requirements Editor is not open already.
Select the
Should unlock doorrequirement.Return to the Architecture Views Gallery. In the
Software Component
                        Review
view, select theLighting Controllercomponent.Navigate to Requirement > Link to selected requirement. The new requirement
Should unlock dooris added.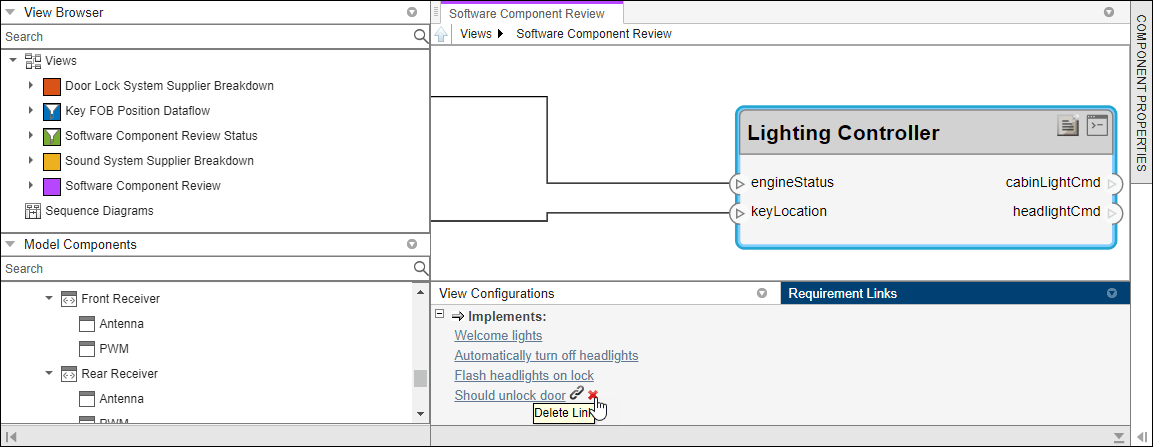
To remove a requirement link, select
 and confirm deletion.
Add Custom Clauses to Component Filters and Port Filters
Select New > View to create a new view.
In View Properties on the right pane, in the Name box, enter a name for this view, for example,
Hardware Component View. Choose a Color and enter a Description, if necessary.In the bottom pane on View Configurations, from the Filter tab, select from the list Add Component Filter > Add Custom Component Filter to enter a constraint by which to filter. In the box, enter
contains(Property('Name'),'Dashboard').In the bottom pane on View Configurations, from the Filter tab, select from the list Add Port Filter > Add Custom Port Filter to enter a constraint by which to filter. In the box, enter
contains(Property('Name'),'sound').Select Apply
.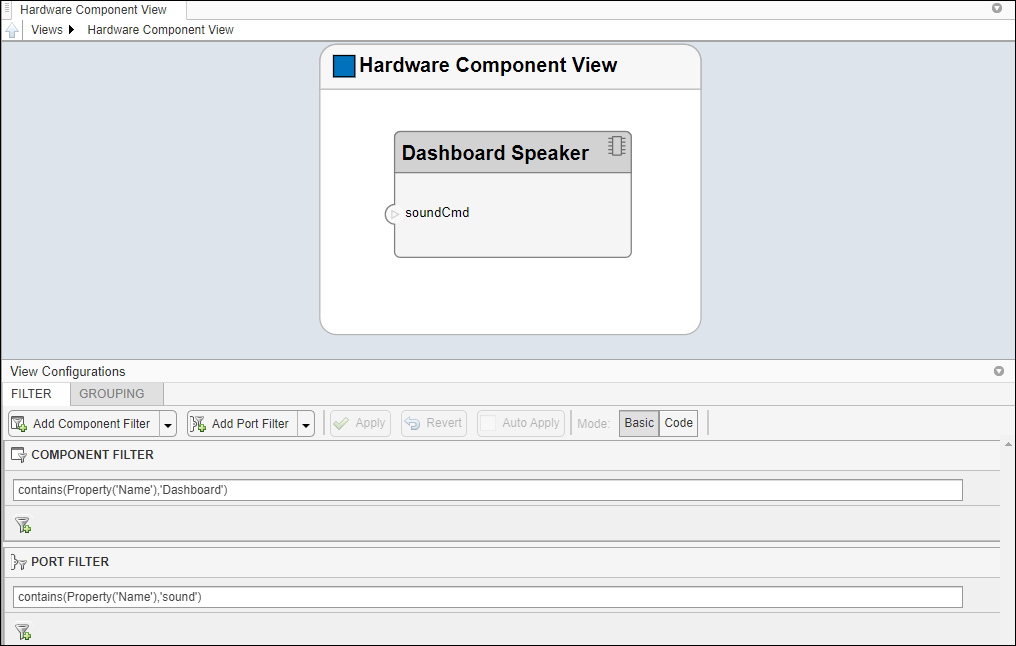
The view is filtered using the constraints in the custom filters. For more information on structuring constraints, see
systemcomposer.query.Constraint.
See Also
Tools
- Architecture Views Gallery | Interface Editor | Requirements Editor (Requirements Toolbox) | Requirements Manager (Requirements Toolbox)
Functions
openViews|createView|getView|deleteView|modifyQuery|setPortQuery|runQuery|removeQuery|addElement|removeElement|getQualifiedName|createSubGroup|getSubGroup|deleteSubGroup|getQualifiedName|lookup
Objects
systemcomposer.view.View|systemcomposer.view.ElementGroup|systemcomposer.query.Constraint|systemcomposer.interface.DataInterface|systemcomposer.interface.DataElement