이 페이지는 기계 번역을 사용하여 번역되었습니다. 영어 원문을 보려면 여기를 클릭하십시오.
CARLA로 내보내기
CARLA 내보내기 개요
RoadRunner는 장면을 CARLA 시뮬레이터로 내보낼 수 있습니다. CARLA 내보내기는 두 가지 옵션을 제공합니다.
CARLA: Unreal® Datasmith(
.udatasmith) 파일과 ASAM OpenDRIVE®(.xodr) 파일을 내보냅니다.CARLA Filmbox : Filmbox(
.fbx) 파일, 일부 메타데이터용 XML 및 ASAM OpenDRIVE(.xodr) 파일을 내보냅니다. XML 파일은 장면의 재질에 대한 데이터를 보유합니다.
CARLA 또는 Unreal 측에서는 RoadRunner에서 내보낸 장면을 가져오는 데 도움이 되는 플러그인이 제공됩니다.
CARLA 플러그인을 사용하여 내보낸 장면의 경우 Unreal 측에 제공된 플러그인이 다음을 처리합니다.
재질 설정
재질 데이터는 Datasmith(
.udatasmith) 파일에서 읽어온 후 해당 데이터를 플러그인에 포함된 기본 재질 중 하나의 새 인스턴스에 매핑합니다.투명 재질은 확산 색상의 투명도를 기준으로 반투명 및 마스크 블렌드 모드 중에서 선택합니다.
가져온 정적 메시의 충돌체 조정
가져오는 동안 새로 생성된 정적 메시 에셋에는 "충돌 복잡도" 옵션이 "복잡한 충돌을 단순으로 사용"으로 설정되어 있습니다.
교통 신호 영상 설정
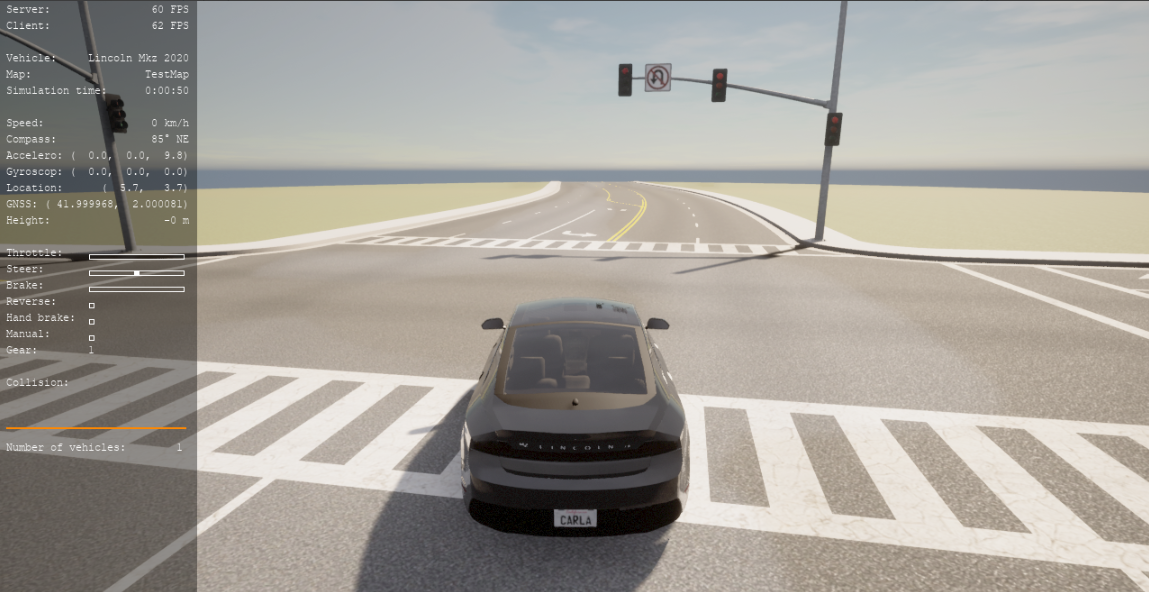
교통 신호 로직은 시뮬레이터에 연결됩니다.
소프트웨어 요구사항
CARLA 0.9.13
CARLA Filmbox 플러그인을 사용하여 내보낸 장면의 경우 Unreal 측에서 제공되는 플러그인을 사용하면 XML 파일에 저장된 정보를 사용하여 FBX® 파일을 가져올 수 있습니다. 플러그인은 다음을 처리합니다.
재질 설정
재질 데이터는 XML 파일에서 읽어온 후 해당 데이터를 플러그인에 포함된 기본 재질 중 하나의 새 인스턴스에 매핑합니다.
특정 재질은 CARLA 재질 중 하나에서 인스턴스화됩니다.
투명 재질은 확산 색상의 투명도를 기준으로 반투명 및 마스크 블렌드 모드 중에서 선택합니다.
가져온 정적 메시의 충돌체 조정
가져오는 동안 새로 생성된 정적 메시 에셋에는 "충돌 복잡도" 옵션이 "복잡한 충돌을 단순으로 사용"으로 설정되어 있습니다.
교통 신호 영상 설정
교통 신호 논리는 시뮬레이터에 연결되어 있지 않습니다.
소프트웨어 요구사항
CARLA 0.9.13
플러그인 설치
Unreal 플러그인을 설치하려면 이 섹션의 지침을 따르세요.
소스에서 CARLA를 빌드하세요. 자세한 내용은 CARLA 빌드 지침의 Windows® 빌드 페이지를 참조하세요.
최신 버전의 플러그인을 다운로드하는 방법은 플러그인 다운로드 항목을 참조하세요.
RoadRunner 플러그인 zip 파일을 추출하고 "Unreal/Plugins" 아래에서
RoadRunnerImporter,RoadRunnerCarlaIntegration,RoadRunnerRuntime,RoadRunnerDatasmith,RoadRunnerCarlaDatasmith및RoadRunnerMaterials폴더를 찾으세요.RoadRunnerImporter,RoadRunnerCarlaIntegration,RoadRunnerRuntime,RoadRunnerDatasmith,RoadRunnerCarlaDatasmith및RoadRunnerMaterials폴더를CarlaUE4프로젝트 디렉터리 아래<carla>/Unreal/CarlaUE4/Plugins(Carla폴더 옆)에 있는Plugins폴더에 복사합니다.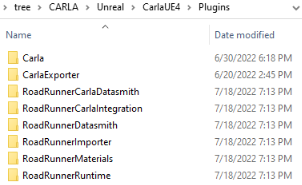
플러그인을 다시 빌드하세요. 먼저 프로젝트 파일을 생성합니다.
Windows에 있는 경우
.uproject파일을 마우스 오른쪽 버튼으로 클릭하고Generate Visual Studio project files를 선택합니다.Linux®에 있는 경우 명령줄에서 다음 코드를 실행하세요.
$UE4_ROOT/GenerateProjectFiles.sh -project="<CarlaFolderPath>/Unreal/CarlaUE4/CarlaUE4.uproject" -game -engine
UE4_ROOT를 Unreal Engine® 설치 디렉터리로 설정하세요.
그런 다음 프로젝트를 열고 플러그인을 빌드합니다. Windows를 사용하는 경우 VS 2019용 x64 기본 도구 명령 프롬프트에서 "make launch"를 실행하여 플러그인을 컴파일하고 편집기를 시작하세요.
플러그인은 Edit > Plugins 아래에 표시됩니다. 해당 메뉴에 나타나지 않으면 Enabled 확인란이 켜져 있는지 확인하세요.
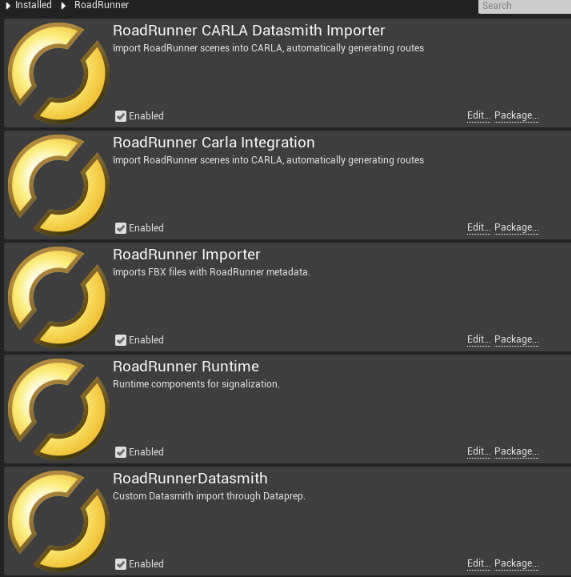
플러그인 콘텐츠
RoadRunnerImporter 모듈:
메타데이터 파일이 있는 경우 기본 FBX 가져오기 도구를 재정의합니다.
메타데이터 파일을 사용하여 기본 재질을 새 재질로 덮어쓰는 옵션
신호 데이터 및 타이밍 가져오기
RoadRunnerRuntime 모듈:
교통 신호 영상을 제어하는 컴포넌트가 포함되어 있습니다.
RoadRunnerCarla통합 모듈:
새 맵을 생성하고 FBX를 레벨로 가져옵니다.
분할 유형에 따라 정적 메시 에셋을 이동합니다.
날씨 효과를 위해 CARLA 재질에서 인스턴스화된 재질을 만듭니다.
ASAM OpenDRIVE 파일에서 경로를 생성합니다.
RoadRunnerMaterials 플러그인:
인스턴스를 생성할 기본 재질
RoadRunnerDatasmith 플러그인:
메타데이터 후처리를 처리하는 Dataprep 에셋
신호 데이터 및 타이밍 가져오기
RoadRunnerCARLADatasmith 플러그인:
RoadRunner 장면을 CARLA로 가져와 자동으로 교통 신호를 설정합니다.
RoadRunner에서 CARLA로 내보내기
CARLA 플러그인을 사용하여 내보내기
CARLA 플러그인(.udatasmith + .xodr). CARLA로 내보내는 데 권장되는 방법입니다. CARLA(.udatasmith + .xodr) 플러그인을 사용하여 RoadRunner 장면을 CARLA로 내보내면 Datasmith 파일과 함께 ASAM OpenDRIVE 데이터를 내보내고 Datasmith 내보내기에 메타데이터를 추가할 수도 있습니다. 메타데이터는 신호 및 ASAM OpenDRIVE ID를 저장합니다. CARLA 내보내기 옵션은 상당히 큰 장면을 CARLA로 가져오는 시간을 줄여줍니다.
CARLA(.udatasmith + .xodr)를 사용하여 장면을 RoadRunner에서 Unreal로 내보내려면 다음 단계를 따르세요.
RoadRunner에서 장면을 엽니다.
CARLA(
.udatasmith+.xodr) 옵션을 사용하여 장면을 내보냅니다. 메뉴 표시줄에서 File > Export > CARLA (.udatasmith, .xodr)를 선택하세요.CARLA Road 내보내기 대화 상자에서 메시 병합 및 타일링 옵션을 설정한 다음 Export를 클릭합니다.
Browse를 선택하여 파일 대화 상자를 열고 내보낸 파일의 이름과 경로를 설정합니다. Datasmith 파일을 지정된 폴더로 내보냅니다.
분할 유형별로 메시를 분할할 수 있습니다. 메시의 이름에는
<segmentation type>Node가 추가됩니다.Export To Tiles 옵션을 선택하면 메시가 타일별로 분할됩니다. 소품은 해당 타일에 따라 그룹화됩니다.
기본적으로 하나의 파일만 내보내집니다. 타일은 별도의 노드에 저장됩니다.
Export Individual Tiles가 활성화되면 각 타일은 자체 Datasmith 파일에 저장됩니다.
CARLA Filmbox를 사용하여 내보내기
이전 파이프라인을 사용하여 내보내기를 사용하려면 CARLA 플러그인(.fbx + .rrdata.xml + .xodr) 옵션을 사용하세요. CARLA Filmbox 플러그인(.fbx + .rrdata.xml + .xodr) 옵션을 사용하여 RoadRunner에서 CARLA로 장면을 내보내려면 아래 단계를 따르세요.
RoadRunner에서 장면을 엽니다.
CARLA 옵션을 사용하여 장면을 내보냅니다. 메뉴 표시줄에서 File > Export > CARLA Filmbox (.fbx, .xodr, .rrdata.xml)를 선택하세요.
CARLA 내보내기 대화 상자에서 필요에 따라 FBX 탭의 메시 타일링과 OpenDRIVE 탭의 ASAM OpenDRIVE 옵션을 설정합니다. 그런 다음 Export를 클릭하세요.
내보낸 파일의 이름과 경로를 설정하려면 파일 대화 상자를 찾아서 엽니다. FBX, 텍스처, XML 및 ASAM OpenDRIVE 파일은 동일한 폴더로 내보내집니다.
메시는 분할 유형에 따라 분할될 수 있습니다. 메시에는 이름에 "<분할 유형>노드"가 추가됩니다.
Export To Tiles 옵션을 선택하면 메시가 타일별로 분할되고 소품은 타일별로 그룹화됩니다.
기본적으로 하나의 파일만 내보내집니다. 타일은 별도의 노드에 저장됩니다.
Export Individual Tiles가 활성화되면 각 타일은 자체 FBX 파일에 저장됩니다.
참고
플러그인은 Export Individual Tiles 옵션을 완전히 지원하지 않습니다.
CARLA로 가져오기
CARLA로 가져오기
CARLA(.udatasmith + .xodr) 옵션을 사용하여 RoadRunner 장면을 내보낸 경우 다음 단계에 따라 장면을 CARLA로 가져옵니다.
BaseMap의 복사본을 만들어
Maps폴더에 저장하세요. 새 지도의 이름을 바꿉니다.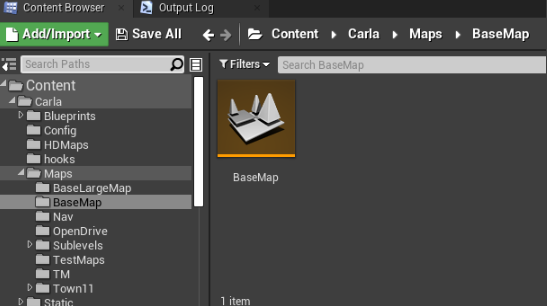
이전 단계에서 생성한 새 맵을 엽니다.
Unreal의 Content Browser 창을 마우스 오른쪽 버튼으로 클릭하세요. 메뉴에서 Show Plugin Content를 선택하세요.
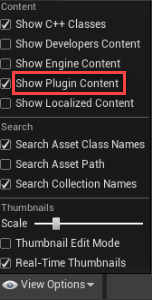
CARLA 에서 Datasmith FBX Importer 및 Datasmith Importer 플러그인을 활성화합니다.
RoadRunner CARLADatasmith 콘텐츠를 클릭하세요. RRCARLADataprep Asset를 더블 클릭합니다. 그러면 Datasmith를 사용한 가져오기 및 모든 후처리 단계를 처리하는 새 편집기가 열립니다.

Import 버튼을 클릭하여 장면을 Unreal로 가져옵니다. 예를 들어 이 이미지는 RoadRunner 프로젝트의
Scenes폴더에 있는 장면 중 하나인FourWaySignal장면 파일을 불러옵니다.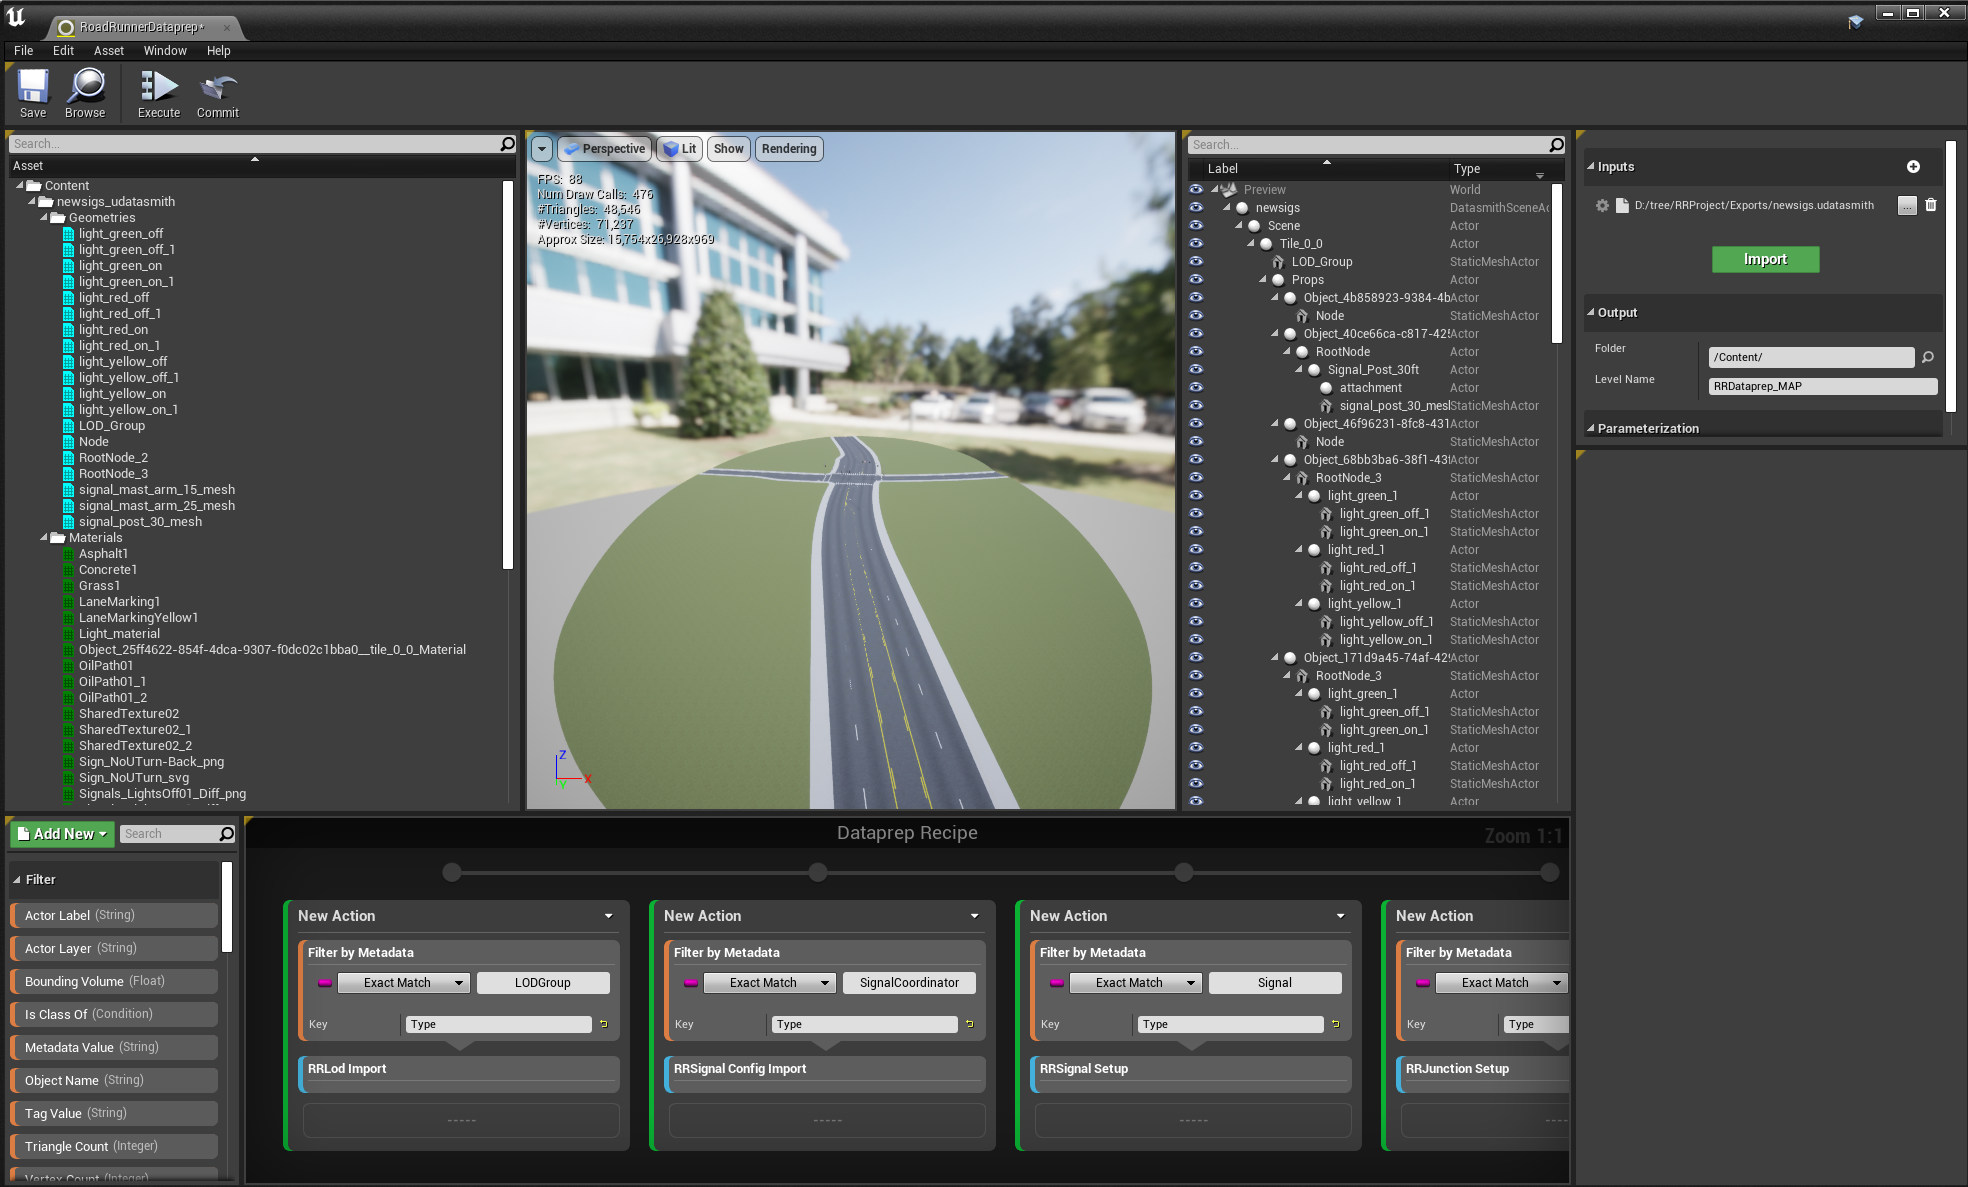
가져온 장면에 대한 후처리 단계를 실행하려면 편집기 툴스트립에서 Execute를 클릭하세요.
편집기 툴스트립에서 Commit를 클릭하여 이러한 변경 사항을 장면에 적용합니다.
이제 장면을 가져오고 시뮬레이션할 준비가 되었습니다.
CARLA(Filmbox)로 가져오기
RoadRunner 장면을 내보내는 동안 CARLA Filmbox 플러그인을 사용한 경우 다음 단계를 따르세요.
파일을 콘텐츠 브라우저로 드래그하세요.
"가져오기" 버튼을 사용하고 FBX 파일을 선택하세요.
플러그인은 가져온 파일과 연결된 RoadRunner XML 파일이 있는지 확인하고, 해당 XML 파일이 없으면 정상적으로 가져옵니다.
File > Import Into Level를 선택하면 내보낸 RoadRunner XML을 사용하지 않고 대신 Unreal 가져오기 도구를 사용합니다.
RoadRunner 가져오기 옵션 대화 상자가 열릴 때
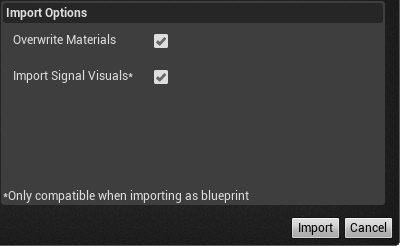
재질 덮어쓰기
기본 재질 가져오기를 재정의합니다. 도로와 나뭇잎에 대한 CARLA 재질의 인스턴스입니다.
다음 대화 상자에서 재질을 Use Existing로 설정하려면 선택을 해제해야 합니다.
신호 영상 가져오기
다음 대화 상자에서 "하나의 블루프린트 에셋 생성" 옵션을 선택한 경우에만 작동합니다.
참고
신호 영상 가져오기 옵션은 교통 시뮬레이션에 아무런 영향을 미치지 않습니다.
FBX 장면 가져오기 옵션 대화 상자가 열릴 때
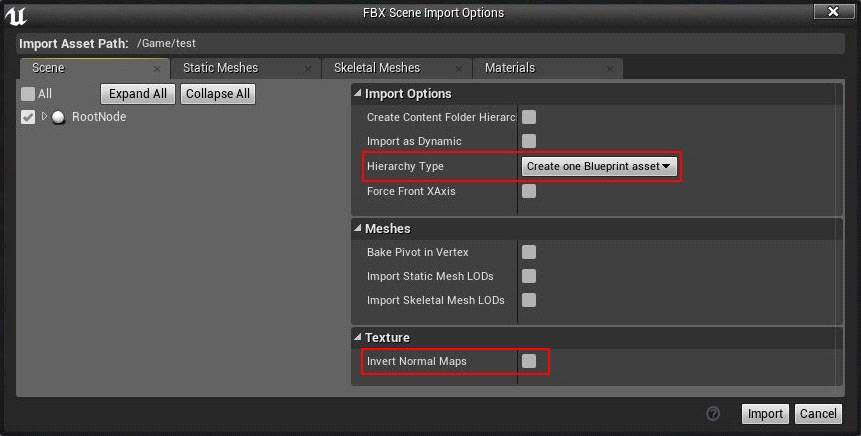
Scene > Hierarchy Type을 "하나의 블루프린트 에셋 생성"으로 설정합니다(기본적으로 선택됨).
참고
"하나의 블루프린트 에셋 생성" 가져오기 옵션만 재질, 신호 및 투명도 정렬에 작동합니다. "컴포넌트로 액터 하나 생성" 및 "레벨 액터 생성" 옵션은 재질만 가져옵니다.
필요한 경우 Invert Normal Maps를 선택하세요.
Static Meshes > Normal Import Method를 Import Normals로 설정합니다.
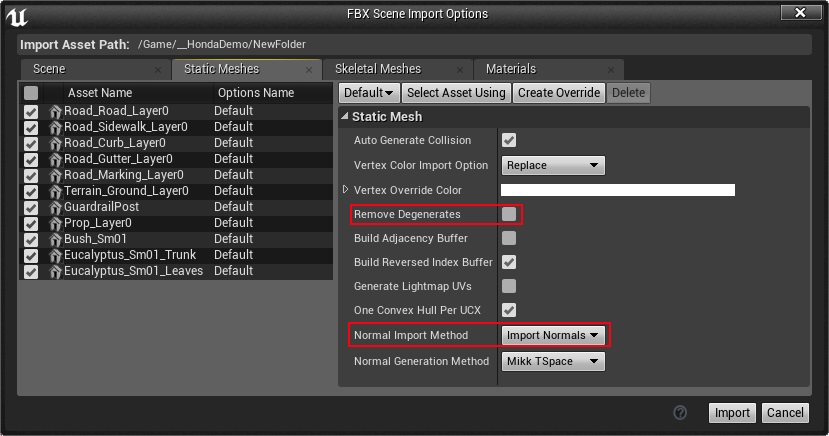
(선택 사항) Remove Degenerates를 선택 취소하면 더 큰 규모로 생성된 일부 소품에 도움이 될 수 있습니다.
Import를 클릭하세요.
Unreal로 교통 신호 가져오기 정보. RoadRunner에 교통 신호가 설정된 경우 RoadRunnerTrafficJunction 컴포넌트로 Unreal에 가져옵니다. 이러한 컨트롤러는 가져오는 동안 자동으로 생성되며 생성된 청사진에 포함됩니다.
RoadRunnerTrafficJunction 컴포넌트는 신호 상태 간 전환을 위한 논리를 처리합니다. UUID는 장면의 특정 게임 객체와 일치하는 데 사용됩니다.
FBX 세부정보. FBX 파일은 다음으로 인해 분할 및 투명도 정렬 레이어를 기준으로 메시를 자동으로 분할합니다.
분할: CARLA는 정적 메시 에셋별로 분할을 결정합니다.
투명도 정렬: Unreal는 정적 메시 컴포넌트에 "반투명 정렬 우선 순위" 값을 저장합니다.
지도 테스트
편집기에서 Play를 클릭하세요(처음 Play를 클릭하면 지도를 만드는 데 시간이 더 걸립니다).
예제 Python® 스크립트를 실행하세요.
