날짜/시간 플로팅하기
이 예제에서는 datetime형 배열과 duration형 배열로 저장된 날짜/시간을 사용하여 선 플롯을 만드는 방법을 보여줍니다. datetime 데이터형은 특정 시점(예: 2020년 8월 24일, 오전 10시 50분 30초)을 나타내며 duration 데이터형은 시간의 길이(예: 12시간 30분)를 나타냅니다. 대부분의 플로팅 함수는 datetime형 배열과 duration형 배열을 x, y, z 좌표로 받으며, 적절한 날짜/시간 단위를 사용하여 눈금 값을 표시합니다. datetime형 값과 duration형 값을 사용하여 원하는 방식으로 좌표축 제한과 눈금 값을 지정할 수 있습니다. 또한, 눈금 값의 형식을 변경하여 선택한 단위로 날짜/시간을 표시할 수도 있습니다. 데이터팁은 플롯의 커서 위치에 해당하는 datetime 값과 duration 값을 표시하며, 이 값을 작업 공간 변수로 내보낼 수 있습니다. 스프레드시트 또는 쉼표로 구분된 값(CSV) 파일에서 데이터를 읽어올 때 날짜/시간 데이터를 플롯에 포함할 수 있습니다.
날짜/시간 데이터 플로팅하기
datetime형 배열과 duration형 배열을 숫자형 배열로 변환하지 않고 플로팅할 수 있습니다. 대부분의 플로팅 함수는 datetime형 배열과 duration형 배열을 입력 인수로 받습니다.
예를 들어, x축에 datetime형 값이 있고 y축에 숫자형 값이 있는 데이터 세트를 플로팅해 보겠습니다. x 좌표는 2021년 6월과 7월의 모든 날짜를 나타내는 datetime형 값입니다. 플롯은 적합한 형식의 눈금 값을 x축에 자동으로 표시합니다. 이 경우의 적합한 형식은 월 이름과 일 숫자가 연도와 함께 표시되는 것입니다.
XDates = [datetime(2021,6,1:30) datetime(2021,7,1:31)];
YNumsForXDates = sin(0:0.1:6);
plot(XDates,YNumsForXDates)
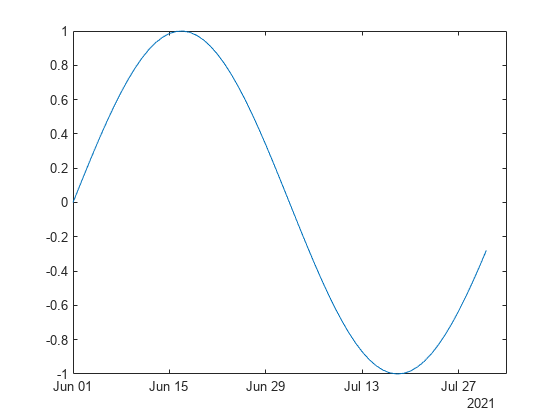
마찬가지로, x축에 duration형 값이 있는 데이터 세트를 플로팅해보겠습니다. 초 단위로 duration형 배열을 만들려면 seconds 함수를 사용하십시오.
XTimes = seconds(0:120);
YNumsForXTimes = cos(0:0.05:6);
plot(XTimes,YNumsForXTimes)

좌표축 제한 지정하기
플롯에 지정된 제한을 변경하면 datetime형 값과 duration형 값에 대해 표시되는 눈금 값이 자동으로 업데이트됩니다. 대화형 방식으로 제한을 업데이트하거나, 해당 축에 대해 xlim, ylim 또는 zlim 함수를 호출하여 제한을 업데이트할 수 있습니다. 새 제한을 datetime형 배열 또는 duration형 배열로 지정하십시오. 제한을 변경하여 충분히 확대되거나 축소되면 새로운 눈금 값뿐만 아니라 다른 날짜/시간 성분까지 눈금 값으로 표시될 수 있습니다.
예를 들어, XDates 배열과 YNumsForXDates 배열을 플로팅합니다. 그런 다음, xlim을 사용하여 x축 제한을 2021년 6월 20일과 2021년 7월 7일로 변경합니다. 플롯에서 새 눈금 값이 표시됩니다.
plot(XDates,YNumsForXDates)
xlim([datetime("2021-06-20") datetime("2021-07-07")])

x축 제한을 2021년 6월 20일과 2021년 6월 22일로 변경합니다. 플롯이 x축에 더 작은 시간 단위를 표시할 수 있을 만큼 충분히 확대되었기 때문에 hh:mm 형식의 시간과 분이 눈금 값으로 표시됩니다.
xlim([datetime("2021-06-20") datetime("2021-06-22")])

눈금 값 지정하기
눈금 값을 변경하기 위해 좌표축 제한을 변경할 필요는 없습니다. 대신, xticks, yticks 또는 zticks 함수를 사용하여 x축, y축, z축에 원하는 눈금 값을 지정하면 됩니다. 눈금 값을 datetime형 배열 또는 duration형 배열로 지정하십시오.
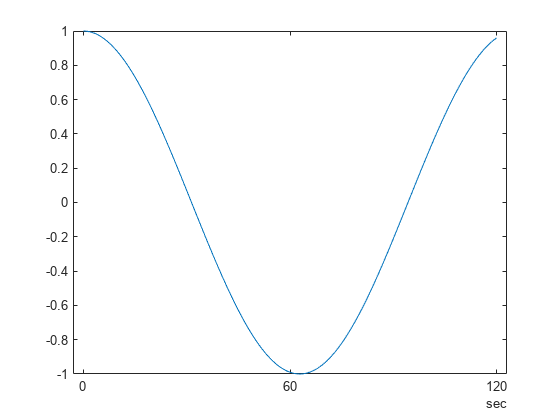
예를 들어, XTimes 배열과 YNumsForXTimes 배열을 플로팅합니다. 그런 다음, xticks를 사용하여 눈금 값을 0, 60, 120초로 지정합니다.
plot(XTimes,YNumsForXTimes)
xticks(seconds([0 60 120]))
눈금 형식 지정하기
플로팅 함수는 디폴트 형식을 사용하여 datetime형 값과 duration형 값을 눈금 값으로 표시합니다. 좌표축의 눈금 값 형식을 재정의하려면 xtickformat, ytickformat 또는 ztickformat 함수를 사용하십시오.
예를 들어, XDates와 YNumsForXDates를 플로팅해 보겠습니다. xtickformat을 사용하여 연도, 월, 일 숫자를 표시하는 눈금 값 형식을 지정합니다.
plot(XDates,YNumsForXDates)
xtickformat("yyyy-MM-dd")
다른 방법으로, DatetimeTickFormat 또는 DurationTickFormat 이름-값 인수를 사용하여 plot을 호출할 수도 있습니다. 예를 들어, plot 함수를 다음과 같이 호출하면 동일한 플롯을 만듭니다.
plot(XDates,YNumsForXDates,"DatetimeTickFormat","yyyy-MM-dd")
하지만, 이러한 이름-값 인수는 plot 함수에만 사용할 수 있습니다. xtickformat 같은 함수는 scatter, stem, stairs 등 모든 플로팅 함수를 호출한 후에 사용할 수 있습니다.
날짜/시간을 저장하는 좌표축 속성
선 플롯에서 좌표축 제한, 눈금 레이블 위치 및 datetime형 배열과 duration형 배열의 x축, y축, z축 값은 Axes 객체의 속성으로도 저장됩니다. 아래의 속성은 선 플롯의 특성을 나타냅니다.
XLim,YLim,ZLimXTick,YTick,ZTickXData,YData,ZData
예를 들어, XDates, YNumsForXDates 플롯과 연결된 XLim, XTick 속성은 datetime형 값을 저장합니다. 플롯의 Axes 객체를 가져와서 이러한 속성을 표시합니다.
ax = gca;
ax.XLim
ans = 1×2 datetime
   2021-06-01   2021-08-03
ax.XTick
ans = 1×5 datetime
   2021-06-01   2021-06-15   2021-06-29   2021-07-13   2021-07-27
데이터팁 값 내보내기 및 변환하기
플롯을 클릭하면 해당 커서 위치에 x, y 좌표를 표시하는 데이터팁이 생성됩니다. 데이터팁은 datetime형 값과 duration형 값뿐만 아니라 숫자형 값도 표시합니다. 하지만, 이 커서 데이터를 작업 공간으로 내보내면 좌표가 숫자형 값의 쌍으로 저장됩니다. 내보낸 커서 데이터를 datetime형 값이나 duration형 값으로 변환하려면 num2ruler 함수를 사용하십시오.
예를 들어, XDates와 YNumsForXDates를 플로팅해 보겠습니다. 그런 다음, 플롯을 클릭하여 데이터팁을 만듭니다.
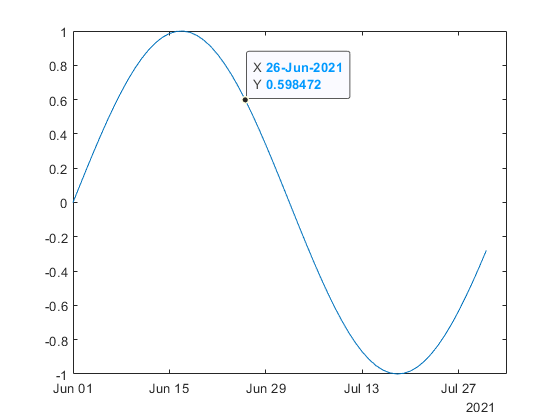
커서 데이터를 작업 공간으로 내보내려면 데이터팁을 마우스 오른쪽 버튼으로 클릭하고 커서 데이터를 작업 공간으로 내보내기를 선택하십시오. 이 동작은 커서 데이터를 작업 공간에 구조체로 내보냅니다.
cursor_info =

  struct with fields:

       Target: [1×1 Line]
     Position: [25 0.5985]
    DataIndex: 26
cursor_info.Position 필드는 커서 데이터를 숫자형 값의 쌍으로 나타냅니다. 플롯에 연결된 Axes 객체는 x 좌표의 숫자형 값을 datetime형 값으로 변환하는 데 필요한 정보를 가지고 있습니다. 플롯의 Axes 객체를 가져옵니다. 그런 다음, Axes 객체의 숫자형 x 좌표와 x축을 num2ruler로 전달합니다.
ax = gca;
datetimePosition = num2ruler(cursor_info.Position(1),ax.XAxis)

datetimePosition =

  datetime

   26-Jun-2021
이 플롯에서 y 값은 숫자형이므로 숫자형 y 좌표 cursor_info.Position(2)는 변환할 필요가 없습니다.
파일의 날짜/시간 플로팅하기
스프레드시트 및 CSV 파일과 같은 데이터 파일은 날짜/시간을 서식 지정된 텍스트로 저장하는 경우가 많습니다. 이러한 파일에서 데이터를 읽어오는 경우 날짜/시간을 나타내는 텍스트를 datetime형 배열 또는 duration형 배열로 변환할 수 있습니다. 그런 다음, 데이터의 플롯을 생성하면 됩니다.
예를 들어, outages.csv라는 예제 데이터 파일의 데이터로 플롯을 만들어 보겠습니다. 이 CSV 파일에는 6개 열의 데이터가 포함되어 있습니다. 두 개의 열은 날짜/시간을 나타내는 텍스트를 포함합니다.
Region,OutageTime,Loss,Customers,RestorationTime,Cause
SouthWest,2002-02-01 12:18,458.9772218,1820159.482,2002-02-07 16:50,winter storm
SouthEast,2003-01-23 00:49,530.1399497,212035.3001,,winter storm
SouthEast,2003-02-07 21:15,289.4035493,142938.6282,2003-02-17 08:14,winter storm
...
CSV 파일에서 데이터를 읽어오려면 readtable 함수를 사용하는 것이 좋습니다. 이 함수는 파일에서 데이터를 읽어오고 테이블 형식으로 반환합니다.
outages.csv 파일을 읽어옵니다. readtable 함수는 OutageTime 열과 RestorationTime 열의 텍스트를 datetime형 배열로 자동 변환합니다. 숫자를 나타내는 열(Loss, Customers)은 숫자형 배열로 읽어옵니다. 나머지 열은 string형으로 읽어옵니다. 이 테이블은 outages.csv 파일의 데이터 열을 동일한 이름의 테이블 변수에 저장합니다. 마지막으로 sortrows 함수를 사용하여 OutageTime 열의 날짜/시간을 기준으로 T의 행을 정렬합니다. 테이블이 시간순으로 정렬되어 있지 않은 경우에는 데이터를 플로팅하거나 분석하기 전에 테이블을 시간순으로 정렬하는 것이 좋습니다.
T = readtable("outages.csv","TextType","string");
T = sortrows(T,"OutageTime")
T=1468×6 table
      Region          OutageTime        Loss     Customers     RestorationTime           Cause
    ___________    ________________    ______    __________    ________________    __________________

    "SouthWest"    2002-02-01 12:18    458.98    1.8202e+06    2002-02-07 16:50    "winter storm"
    "MidWest"      2002-03-05 17:53    96.563    2.8666e+05    2002-03-10 14:41    "wind"
    "MidWest"      2002-03-16 06:18    186.44    2.1275e+05    2002-03-18 23:23    "severe storm"
    "MidWest"      2002-03-26 01:59    388.04    5.6422e+05    2002-03-28 19:55    "winter storm"
    "MidWest"      2002-04-20 16:46     23141           NaN                 NaT    "unknown"
    "SouthWest"    2002-05-08 20:34    50.732         34481    2002-05-08 22:21    "thunder storm"
    "MidWest"      2002-05-18 11:04    1389.1    1.3447e+05    2002-05-21 01:22    "unknown"
    "NorthEast"    2002-05-20 10:57    9116.6    2.4983e+06    2002-05-21 15:22    "unknown"
    "SouthEast"    2002-05-27 09:44    237.28    1.7101e+05    2002-05-27 16:19    "wind"
    "SouthEast"    2002-06-02 16:11         0             0    2002-06-05 05:55    "energy emergency"
    "West"         2002-06-06 19:28    311.86           NaN    2002-06-07 00:51    "equipment fault"
    "SouthEast"    2002-06-17 23:01    42.542         39877    2002-06-17 23:49    "thunder storm"
    "MidWest"      2002-07-01 04:33    203.94         60650    2002-07-02 14:54    "severe storm"
    "MidWest"      2002-07-01 08:18    100.71    1.8116e+05    2002-07-01 11:33    "severe storm"
    "MidWest"      2002-07-10 01:49    168.02           NaN    2002-07-10 17:20    "equipment fault"
    "SouthEast"    2002-07-14 21:32     90.83         60133    2002-07-14 23:53    "thunder storm"
      ⋮
테이블 변수에 액세스하려면 점 표기법을 사용하여 테이블 변수를 이름으로 참조하면 됩니다. 점 표기법을 사용하면 테이블 변수를 배열처럼 처리할 수 있습니다.
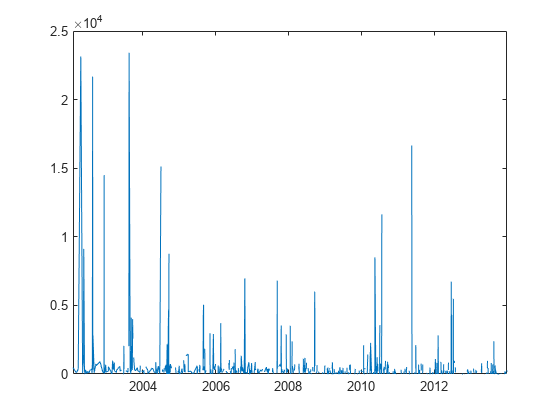
정전 시간 대비 전력 손실을 플로팅합니다. 점 표기법을 사용하여 테이블의 해당 변수에 액세스합니다.
plot(T.OutageTime,T.Loss)
정전이 지속된 시간을 계산하고 OutageTime에 대해 플로팅합니다. 지속 시간을 계산하려면 RestorationTime에서 OutageTime을 뺍니다. datetime 값에 산술 연산을 사용하면 출력값이 시간의 길이로 생성되므로, 계산 결과인 OutageDuration은 duration형 배열입니다. 일부 정전 시간이 장기간 지속되었으므로 ytickformat을 사용하여 y축 눈금 값의 형식을 시간에서 연도로 변경합니다. 정전이 수 년간 지속된 경우가 일부 있다는 것은 파일에 의심스러운 값이 있을 수 있다는 의미입니다. 데이터를 어떻게 분석할지에 따라 데이터를 재처리하거나 혹은 잘못된 값이 포함된 행을 제거할 수 있습니다.
OutageDuration = T.RestorationTime - T.OutageTime;
plot(T.OutageTime,OutageDuration)
ytickformat("y")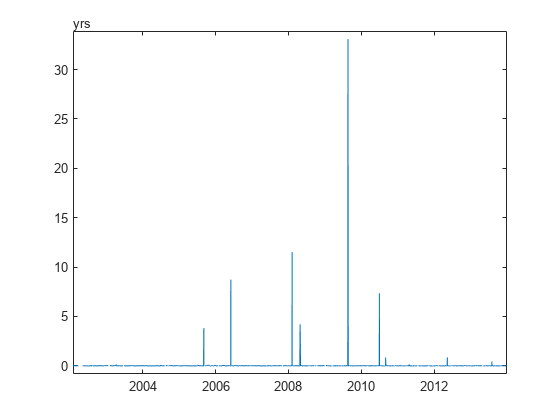
참고 항목
plot | datetime | duration | seconds | readtable | sortrows | xlim | xtickformat | xticks