이 페이지의 내용은 이전 릴리스에 관한 것입니다. 해당 영문 페이지는 최신 릴리스에서 제거되었습니다.
사전 훈련된 Keras 계층에서 신경망 조합하기
이 예제에서는 사전 훈련된 Keras 신경망에서 계층을 가져오고 지원되지 않는 계층을 사용자 지정 계층으로 바꾼 다음 이러한 계층을 예측을 실행할 준비가 된 신경망으로 조합하는 방법을 보여줍니다.
Keras 신경망 가져오기
Keras 신경망 모델에서 계층을 가져옵니다. 'digitsDAGnetwithnoise.h5'의 신경망은 숫자 영상을 분류합니다.
filename = 'digitsDAGnetwithnoise.h5';
lgraph = importKerasLayers(filename,'ImportWeights',true);
Warning: 'importKerasLayers' is not recommended and will be removed in a future release. To import TensorFlow-Keras models, save using the SavedModel format and use importNetworkFromTensorFlow function.
Warning: Unable to import some Keras layers, because they are not supported by the Deep Learning Toolbox. They have been replaced by placeholder layers. To find these layers, call the function findPlaceholderLayers on the returned object.
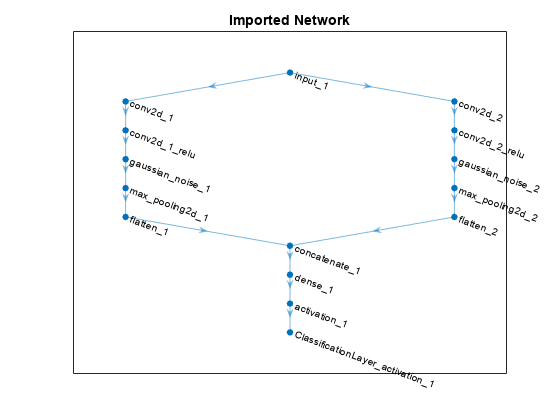
Keras 신경망은 Deep Learning Toolbox에서 지원하지 않는 몇몇 계층을 포함합니다. importKerasLayers 함수는 경고를 표시하고 지원되지 않는 계층을 자리 표시자 계층으로 바꿉니다.
plot을 사용하여 계층 그래프를 플로팅합니다.
figure
plot(lgraph)
title("Imported Network")
자리 표시자 계층 바꾸기
자리 표시자 계층을 바꾸려면 먼저 바꾸려는 계층의 이름을 식별하십시오. findPlaceholderLayers를 사용하여 자리 표시자 계층을 찾습니다.
placeholderLayers = findPlaceholderLayers(lgraph)
placeholderLayers =
  2x1 PlaceholderLayer array with layers:

     1   'gaussian_noise_1'   GaussianNoise   Placeholder for 'GaussianNoise' Keras layer
     2   'gaussian_noise_2'   GaussianNoise   Placeholder for 'GaussianNoise' Keras layer
이러한 계층의 Keras 구성을 표시합니다.
placeholderLayers.KerasConfiguration
ans = struct with fields:
        trainable: 1
             name: 'gaussian_noise_1'
           stddev: 1.5000
    inbound_nodes: {{1x1 cell}}
ans = struct with fields:
        trainable: 1
             name: 'gaussian_noise_2'
           stddev: 0.7000
    inbound_nodes: {{1x1 cell}}
헬퍼 gaussianNoiseLayer 함수를 사용하여 가져온 Keras 계층과 같은 구성을 갖는 가우스 잡음 계층을 2개 만듭니다.
gnLayer1 = gaussianNoiseLayer(1.5,'new_gaussian_noise_1');
gnLayer2 = gaussianNoiseLayer(0.7,'new_gaussian_noise_2');
replaceLayer를 사용하여 자리 표시자 계층을 사용자 지정 계층으로 바꿉니다.
lgraph = replaceLayer(lgraph,'gaussian_noise_1',gnLayer1);
lgraph = replaceLayer(lgraph,'gaussian_noise_2',gnLayer2);
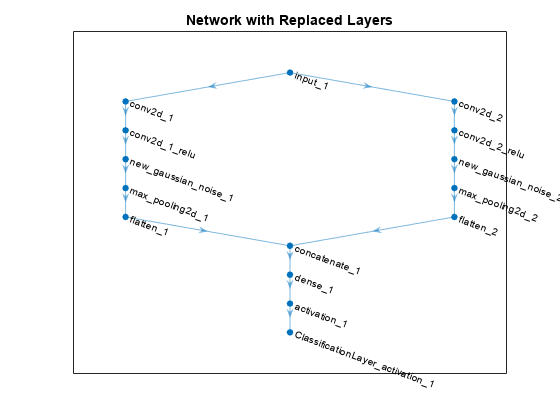
plot을 사용하여 업데이트된 계층 그래프를 플로팅합니다.
figure
plot(lgraph)
title("Network with Replaced Layers")
클래스 이름 지정하기
가져온 분류 계층이 클래스를 포함하지 않는 경우, 예측을 실행하기 전에 먼저 클래스를 지정해야 합니다. 클래스를 지정하지 않으면 클래스가 자동으로 1, 2, ..., N으로 설정됩니다. 여기서 N은 클래스의 개수입니다.
계층 그래프의 Layers 속성을 확인하여 분류 계층의 인덱스를 찾습니다.
lgraph.Layers
ans =
  15x1 Layer array with layers:

     1   'input_1'                            Image Input             28x28x1 images
     2   'conv2d_1'                           2-D Convolution         20 7x7x1 convolutions with stride [1  1] and padding 'same'
     3   'conv2d_1_relu'                      ReLU                    ReLU
     4   'conv2d_2'                           2-D Convolution         20 3x3x1 convolutions with stride [1  1] and padding 'same'
     5   'conv2d_2_relu'                      ReLU                    ReLU
     6   'new_gaussian_noise_1'               Gaussian Noise          Gaussian noise with standard deviation 1.5
     7   'new_gaussian_noise_2'               Gaussian Noise          Gaussian noise with standard deviation 0.7
     8   'max_pooling2d_1'                    2-D Max Pooling         2x2 max pooling with stride [2  2] and padding 'same'
     9   'max_pooling2d_2'                    2-D Max Pooling         2x2 max pooling with stride [2  2] and padding 'same'
    10   'flatten_1'                          Keras Flatten           Flatten activations into 1-D assuming C-style (row-major) order
    11   'flatten_2'                          Keras Flatten           Flatten activations into 1-D assuming C-style (row-major) order
    12   'concatenate_1'                      Depth concatenation     Depth concatenation of 2 inputs
    13   'dense_1'                            Fully Connected         10 fully connected layer
    14   'activation_1'                       Softmax                 softmax
    15   'ClassificationLayer_activation_1'   Classification Output   crossentropyex
분류 계층의 이름은 'ClassificationLayer_activation_1'입니다. 분류 계층을 표시하고 Classes 속성을 확인합니다.
cLayer = lgraph.Layers(end)
cLayer =
  ClassificationOutputLayer with properties:

            Name: 'ClassificationLayer_activation_1'
         Classes: 'auto'
    ClassWeights: 'none'
      OutputSize: 'auto'

   Hyperparameters
    LossFunction: 'crossentropyex'
계층의 Classes 속성이 'auto'이므로 클래스를 수동으로 지정해야 합니다. 클래스를 0, 1, ..., 9로 설정한 다음 가져온 분류 계층을 새로운 분류 계층으로 바꿉니다.
cLayer.Classes = string(0:9)
cLayer =
  ClassificationOutputLayer with properties:

            Name: 'ClassificationLayer_activation_1'
         Classes: [0    1    2    3    4    5    6    7    8    9]
    ClassWeights: 'none'
      OutputSize: 10

   Hyperparameters
    LossFunction: 'crossentropyex'
lgraph = replaceLayer(lgraph,'ClassificationLayer_activation_1',cLayer);신경망 조합하기
assembleNetwork를 사용하여 계층 그래프를 조합합니다. 함수가 예측을 실행할 준비가 된 DAGNetwork 객체를 반환합니다.
net = assembleNetwork(lgraph)
net =
  DAGNetwork with properties:

         Layers: [15x1 nnet.cnn.layer.Layer]
    Connections: [15x2 table]
     InputNames: {'input_1'}
    OutputNames: {'ClassificationLayer_activation_1'}
참고 항목
importKerasNetwork | assembleNetwork | replaceLayer | importKerasLayers | trainNetwork | layerGraph | DAGNetwork | findPlaceholderLayers
