Navigate Using the Simulink 3D Animation Viewer
Basic Navigation
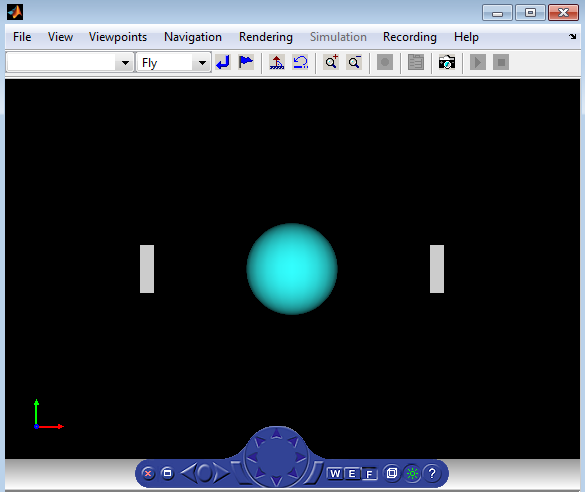
You can navigate in a virtual scene using the menu bar, toolbar, navigation panel, mouse, and keyboard.
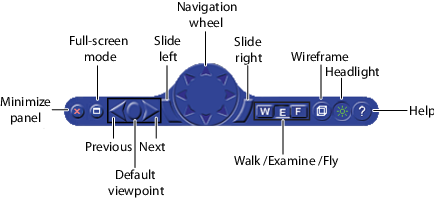
Navigation Panel — The center navigation wheel and two curved buttons on either side allow you to move about in the scene. Experiment by moving backward and forward and side to side.
Navigation view — You can change the camera position. From the menu bar, select the Navigation menu Straighten Up option. Alternatively, from the toolbar, click the Straighten Up control, or on the keyboard, you can press F9. This option resets the camera so that it points straight ahead.
Use your mouse wheel to move forward and backward in the Viewer.

Navigation methods — Navigation with the mouse depends on the navigation method that you select and the navigation zone that you are in when you first click and hold down the mouse button. You can set the navigation method using one of these approaches:
From the menu bar, select the Navigation menu Method option. This option provides three choices:
Walk,Examine, orFly. See Mouse Navigation.From the toolbar, select the drop-down list that displays the navigation options
Walk,Examine, andFly.From the navigation panel, click the W, E, or F buttons.
On the keyboard, press Shift+W, Shift+E, Shift+F, or Shift+N.
Navigation zones — You can view the navigation zones for a scene by using the menu bar or keyboard.
From the menu bar, select the View menu Navigation Zones option. The virtual scene changes as the navigation zones are toggled on and appear in the virtual scene. Alternatively, on the keyboard, press the F7 key.
Navigation Panel
The Simulink® 3D Animation™ viewer navigation panel has navigation controls for some of the more commonly used navigation operations available from the menu bar.

If you have multiple viewers open, the navigation panel in the active viewer is blue.
Minimize the Navigation Panel
You can minimize the navigation panel using either of these approaches:
Click the red x control on the left side of the navigation panel.
Select View > Navigation Panel > Minimized
The minimized navigation panel appears as an icon in the lower right corner of the viewer.
To display the navigation panel again, click the Show Panel left arrow on the minimized navigation panel icon.
To minimize the navigation panel by default, from the MATLAB® Toolstrip, set the Preferences > Simulink 3D Animation > Canvas > Navigation panel preference to minimized.
The minimized navigation panel is blue for the active viewer and gray for the inactive viewers.
Viewer Keyboard Shortcuts
| Navigation Function | Keyboard Shortcut |
|---|---|
Use full-screen mode. | Ctrl+f |
Undo move. | Backspace |
Start or stop recording. | Ctrl+r |
Capture frame. | Ctrl+i |
Start or stop simulation. | Ctrl+t |
Straighten up and make the camera stand on the horizontal plane of its local coordinates. | F9 |
Zoom in and out. | +/- |
Toggle the headlight on and off. | F6 |
Toggle the navigation zones on and off. | F7 |
Toggle the wireframe option on and off. | F5 |
Toggle the antialiasing option on and off. | F8 |
Go to default viewpoint. | Esc |
Return to current viewpoint. | Home |
Go to previous viewpoint. | Page Up |
Go to next viewpoint. | Page Down |
Camera is bound/unbound from the viewpoint. | F10 |
Set the navigation method to Walk. | Shift+w |
Set the navigation method to Examine. | Shift+e |
Set the navigation method to Fly. | Shift+f |
Move the camera forward and backward. | Shift Up/Down Arrow |
Pan the camera up and down. | Up/Down Arrow |
Pan the camera right and left. | Left/Right Arrow, Shift+Left/Right Arrow |
Slide up and down. | Alt+Up/Down Arrow |
Slide left and right. | Alt+Left/Right Arrow |
Pressing Ctrl alone acquires the examine lock at the point of intersection between the line perpendicular to the screen, coming through the center of the viewer window, and the closest visible surface to the camera. Pressing the arrow keys without releasing Ctrl rotates the viewpoint about the acquired center point. | Ctrl+Left/Right/ Up/Down Arrow |
Tilt the camera right and left. | Shift+Alt+Left/ Right Arrow |
Mouse Navigation
When you use your mouse to navigate through a virtual world, the behavior depends on the movement modes and navigation zones. Turn on the navigation zones and experiment by clicking and dragging your mouse in the different zones of a virtual world.
Simulink 3D Animation Viewer Mouse Navigation
| Movement Mode | Zone and Description |
|---|---|
Walk | Outer — Click and drag the mouse up, down, left, or right to slide the camera in any of these directions in a single plane. Inner — Click and drag the mouse up and down to move forward and backward. Drag the mouse left and right to turn left or right. |
Examine | Outer — Click and drag the mouse up and down to move forward and backward. Drag the mouse left and right to slide left or right. Inner — Click and drag the mouse to rotate the viewpoint around the origin of the scene. |
Fly | Outer — Click and drag the mouse to tilt the view either left or right. Inner — Click and drag the mouse to pan the camera up, down, left, or right within the scene. Center — Click and drag the mouse up and down to move forward and backward. Move the mouse left or right to turn in either of these directions. |
If your virtual world contains sensors, these sensors take precedence over mouse navigation at the sensor location.
Navigation Control Menu
Access the control menu by right-clicking in the viewer window. You can use the control menu to specify a predefined viewpoint or change the appearance of the control panel. You can also control the navigation method, speed, and rendering of the virtual world. For more information about navigation methods, see Navigate Using the Simulink 3D Animation Viewer. For more information about rendering, see Specify Rendering Techniques.
Change the Navigation Speed
You can change the speed at which you navigate around the view.
In the menu bar, select the Navigation menu.
Select the Speed option.
Select the specific speed that you want.
Navigate the virtual world.
Note
Your navigation speed controls the distance that you move with each keystroke. It does not affect rendering speed.
Consider setting a higher speed for large scenes and a slower speed for more controlled navigation in smaller scenes.
To change the default navigation speed for a virtual scene, modify the
speed field of the NavigationInfo node in
the scene virtual world 3D file.
Display a Coordinate Axes Triad
To help you visualize changes in the orientation (coordinate axes) of nodes in a
virtual world, display a triad of red, green, and blue arrows. These arrows are always
parallel with global x, y, and
z coordinate axes. As you navigate in a virtual world, the triad
display changes to reflect changes in orientation.

To display a triad in the viewer, or to change the location of the triad, use either of these approaches:
Right-click in the virtual world. Select the appropriate option from the View > Triad menu.
In the viewer menu bar, select the appropriate option from the View > Triad menu.
To change the default location or visibility of the triad:
From the MATLAB Toolstrip, in the Home tab, in the Environment section, select Preferences.
In the Preferences dialog box, select Simulink 3D Animation > Figure > Triad.
Pivot Point
To use a mouse to rotate a virtual world around a point, In Examine mode, you can use a pivot point.
To set the pivot point in a virtual world, hold Ctrl and double-click the spot where you want the pivot point.
Note
On Macintosh platforms, use the command key instead of Ctrl.
