Edit Lookup Table Data with Lookup Table Spreadsheet
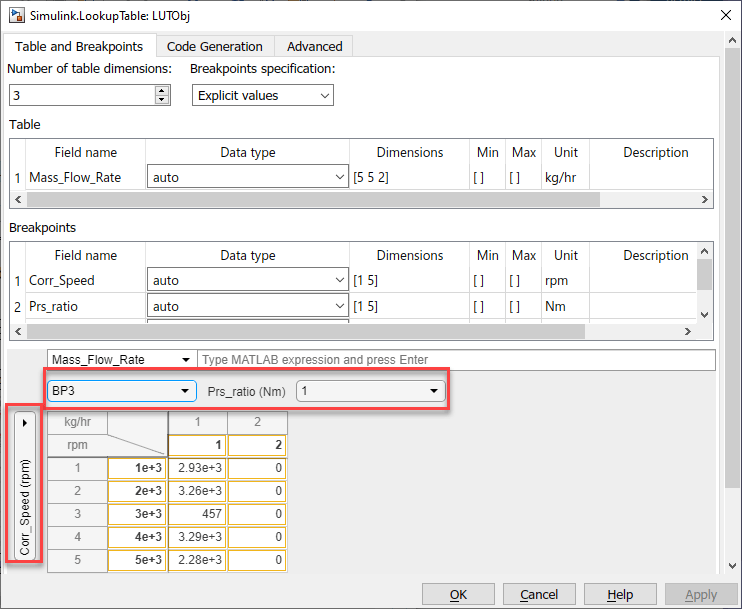
You can use a lookup table spreadsheet to view lookup table and breakpoint data. The lookup table spreadsheet is shared by multiple interfaces, including the Simulink.LookupTable property dialog box and the Lookup Table Editor. This topic and its examples are presented using the Simulink.LookupTable property dialog box. Here is lookup table data spreadsheet as seen through the Simulink.LookupTable property dialog box. The spreadsheet is highlighted.

When the Breakpoints specification property is set to Explicit values, use the lookup table spreadsheet at the bottom to:
View, add, manipulate, and remove table and breakpoint data.
Create or modify table or breakpoint data using MATLAB® expressions.
Alternatively, you can copy and paste the contents of a Microsoft® Excel® spreadsheet or any spreadsheet application.

View and edit 2-D slices of data from multiple dimensions.
This topic describes:
Supported data types for the lookup table spreadsheet
How to create, edit, and view table and breakpoint data in the tabular interface
How to view multidimensional 2-D slices
How the tabular interface handles data overflows
How the tabular interface handles invalid data
Supported keyboard shortcuts
Lookup Table Spreadsheet Data Type Support
The spreadsheet supports these data types:
Built-in data types (
int8,uint8,int16,uint16,int32,uint32,double,single,boolean)Fixed-point data types
uint64,int64half
It does not support other data types that Simulink® supports.
Create Simulink.LookupTable Objects
To start working with a Simulink.LookupTable object, create one at the MATLAB command line:
LUTObj = Simulink.LookupTable;
How to Open the Simulink.LookupTable Object Property Dialog Box
To work with the Simulink.LookupTable object, start its property dialog box in one of these ways from the MATLAB Command Window:
In the workspace, double-click the
Simulink.LookupTableobject.In the Model Explorer, double-click the object in the specific workspace for the object.
In the command line, use the
openfunction, for example:open LUTObj
Create Table and Breakpoint Data
Generate data and manipulate it using standard table editing actions. You can generate lookup table data in multiple ways, such as in the workspace, from Microsoft
Excel, and so forth, and copy that data into the lookup table spreadsheet. For Simulink.LookupTable objects, you can also generate data from within the property dialog box using MATLAB expressions.
This example describes how to create data in the MATLAB Command Window workspace and how to set up the property dialog box lookup table spreadsheet using an example with that data.
To create table and breakpoint data, at the MATLAB command line, type:
LUTObj.Breakpoints(1).Value = fi(linspace(1000,5000,5),1,16,2);
LUTObj.Breakpoints(2).Value = single(linspace(1,2,5));
LUTObj.Table.Value = uint16(rand(5,5)*60*60);
Set up the Unit and Field name properties for the object.
LUTObj.Breakpoints(1).Unit = 'rpm';
LUTObj.Breakpoints(2).Unit = 'Nm';
LUTObj.Table.Unit = 'kg/hr';
LUTObj.Breakpoints(1).FieldName = 'Corr_Speed';
LUTObj.Breakpoints(2).FieldName = 'Prs_ratio';
LUTObj.Table.FieldName = 'Mass_Flow_Rate';
Open the property dialog box.
open LUTObj;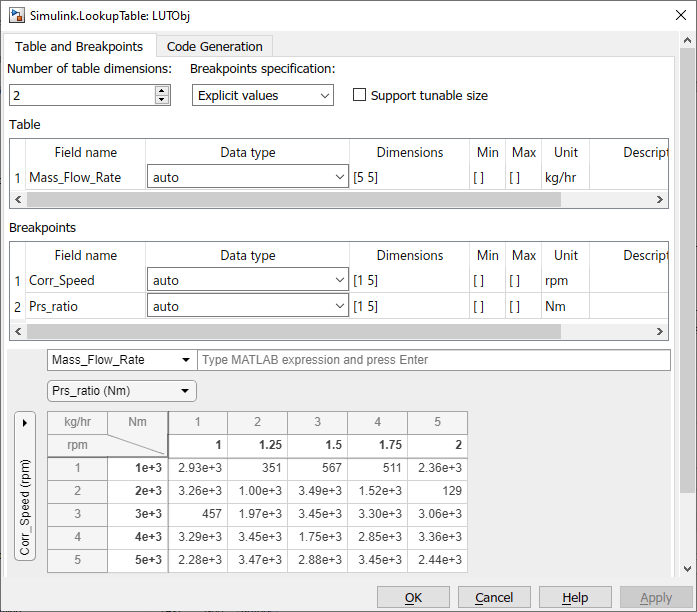
From within the tabular area, you can perform typical table edits on particular breakpoint data, such as copying and pasting. Data that has been edited but not applied is outlined in yellow. When you are done, click Apply. Observe that the yellow outline for the data is gone.
Tip
To create this data directly in the lookup table spreadsheet:
Set Number of table dimensions to
2.Set the first breakpoint to
fi(linspace(1000,5000,5),1,16,2);.Set the second breakpoint to
single(linspace(1,2,5));.Set Table to
uint16(rand(5,5)*60*60);.
View Multidimensional Slices of Data
The spreadsheet lets you view and edit 2-D slices of data. This example describes how to use the slice selector to navigate through the 2-D slices of 3-D data.
To view a multidimensional slice, use the dropdown lists under the MATLAB expression parameter. There is a dropdown list for each breakpoint. To view a two-dimensional slice, choose a combination of the breakpoint data from the vertical and horizontal dropdown lists.
Change the table dimensions to
3.
In the tabular area at the bottom, change the horizontal breakpoint slice to
BP3. Observe the changed view of the slice of data.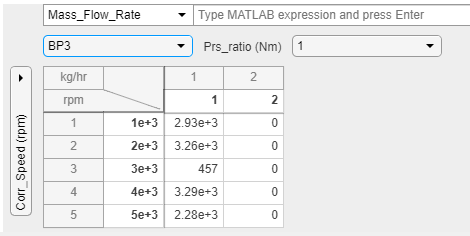
Edit Table and Breakpoint Data with MATLAB Expressions
Edit table and breakpoint data using standard table editing actions, such as cutting or copying and pasting, or directly editing table cells. You can also edit table and breakpoint data with MATLAB expressions.
This example shows how to replace the table and breakpoint using a MATLAB expression.
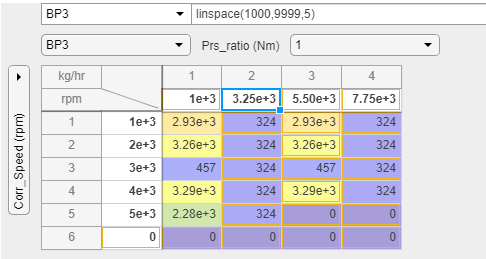
In the spreadsheet, select BP3 from the horizontal dimension dropdown list.
In the MATLAB expression field, enter
linspace(1000,9999,5).Observe the changed view of the slice of data.

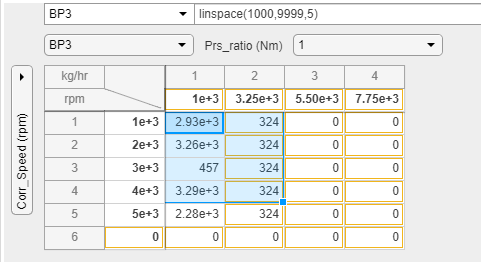
Edit Table and Breakpoint Data
You can perform standard table edits in the spreadsheet. This example shows how to apply the same value to multiple cells.
Replace a column of data with the same value.
In the spreadsheet, select row 1, column 2 of the table data.
Select the entire column by dragging down the column.
Enter
324.Press Ctrl+Enter.
Observe that the entire column of data is now
324.
Add a row to the table.
In the spreadsheet, right-click the last row of the table and select Insert > Insert Row Below.

Delete a column in the table.
In the spreadsheet, right-click the last column of the table and select Delete > Delete Column.

Select and paste a region in the table.
In the spreadsheet, select the top-left cell of your selection and drag to the bottom-right of your selection.
Copy the selected area with Ctrl+C.
Select another area of the table. Paste the selected data with Ctrl+V.

Enable Heatmap for Table Data
You can view heatmaps for your data. Right-click any cell in the table and select Heatmap On.
Overflow Handling
The Simulink.LookupTable object property dialog box handles data overflows in the lookup table spreadsheet by automatically changing values to ones that do not cause overflows. For example, if you enter a value of 70000 in a cell for a data type of uint16, the property dialog box automatically changes the value to 65535, which is the maximum number for uint16. For a list of supported Simulink.LookupTable object property dialog box data types, see Lookup Table Spreadsheet Data Type Support.
Data Validation
The lookup table spreadsheet performs data validation when you enter a table cell value and
press Enter. For example, if you enter NaN,
Inf or -Inf as a table cell value, an error is
displayed.
The MATLAB expression area also validates expressions. For example, if you enter an invalid expression, the text box is outlined in red and displays an error message on an expected expression. If you enter an expression for fixed-point data with a bias, the software evaluates and, as necessary, saturates the value to the nearest available fixed-point value before displaying the corrected value in the table.
Lookup Table Spreadsheet Tabular Interface Shortcuts
Table Navigation
| Action | Key or Keys |
|---|---|
Move to the table cell above current active cell. | Up Arrow |
Move to table cell under current active cell. | Down Arrow |
Move to the table cell to the right of the current active cell. | Right Arrow or Tab |
Move to the table cell to the left side of current active cell. | Left Arrow or Tab+Shift |
Move to the first table cell in a column. | Ctrl+Up Arrow |
Move to the last table cell in a column. | Ctrl+Down Arrow |
Move to the first table cell in a row. | Ctrl+Left Arrow |
Move to the last table cell in a row. | Ctrl+Right Arrow |
Selection
| Action | Key or Keys |
|---|---|
Select all. | Ctrl+A |
Extend selection of the table cell above. | Shift+Up Arrow |
Extend selection of the table cell underneath. | Shift+Down Arrow |
Extend selection of the table cell to the right. | Shift+Right Arrow |
Extend selection of the table cell to the left. | Shift+Left Arrow |
Select all table cells in the row to the left, including the current cell. | Shift+Ctrl+Left Arrow |
Select all table cells in the row to the right, including the current cell. | Shift+Ctrl+Right Arrow |
Select all cells from the column to the top of the table, including the current cell. | Shift+Ctrl+Up Arrow |
Select all cells from the column to the bottom of the table, including the current cell. | Shift+Ctrl+Down Arrow |
Editor
| Action | Key or Keys |
|---|---|
| Open or close table cell editor. | Enter |
| Open table cell editor. | F2 |
| Cancel editing and close table cell editor. | Esc |
| Clear table cell. | Backspace or Delete |
| Copy table cell content. | Ctrl+C |
| Cut table cell content. | Ctrl+X |
| Paste table cell content. | Ctrl+V |
| Fill all selected table cells with edited cell value. | Ctrl+Enter |
| Undo. | Ctrl+Z |
| Redo. | Ctrl+Y |
Context Menu Navigation
| Action | Key or Keys |
|---|---|
Move the selection to the next option in context menu. | Down Arrow |
Move the selection to the previous option in context menu. | Up Arrow |
Select option from context menu. | Enter |