Import and Export Variants and Doses from Excel to SimBiology Model Builder
You can store variant and dosing information in an Excel® spreadsheet that you can import to the Model Builder app and create the corresponding variants and doses for your models. You can also export the existing variants and doses from a SimBiology model to an Excel file.
Import Variants from Excel
In the Model Builder app, on the Home tab, select Model >
Import Model Components from
      Excel
.
Select your Excel file containing variants. In the next dialog, select Variants in the Components table. The Properties table is then updated to show the required properties that need to be defined in the Excel sheet. These required properties are preselected and cannot be unchecked.
Depending on if you have stored all the variants in one sheet or multiple sheets, the workflow differs as shown next. For details on making such an Excel file, see Create Excel File for Variants.
Tip
You can also generate the Excel file by exporting an existing variant from your model.
Variants in One Sheet
If you have stored the information of all the variants in one sheet, select the check box Variants defined in one sheet and select the corresponding sheet name in the Sheet Name list.

Variants in Multiple Sheets
If you have stored variants in multiple sheets, clear the check box and select which sheets to import in the Sheet Names table.

Export Variants to Excel
On the Home tab of the Model Builder app, select Export >
Export Model Components to
       Excel
.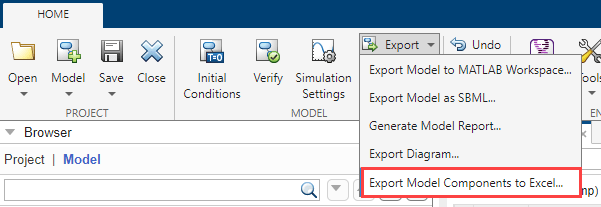
In the next dialog, select Variants in the Components table. The Properties table on the right is then updated to show which properties are exported. Each property is exported as a column in the spreadsheet.
(Optional) By default, the app stores all variants in one sheet. If you want to store one variant per sheet, clear the Write variants to one sheet check box.

Tip
You can change the order of columns by pressing the up and down arrows on the right of the Properties table.
Create Excel File for Variants
You can store the variant information in one sheet or multiple sheets within one Excel file.
Store Variants in One Sheet
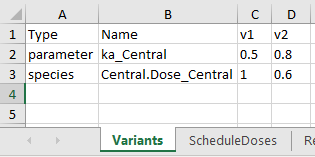
The sheet must have the Type column, the Name
column, and one column for each variant that contains the variant values. Each variant column
name must be the same as the corresponding variant name. The Type column
corresponds to the model component type (species, parameter, or compartment). The
Name column is the model component name. You can leave the cell empty or
use NaN or '.' (a period) to indicate that there is no
variant value for a particular component. Here is an example of what such a sheet looks
like.
Note
The transposed version of this format, where each row is a variant and each column is a model component, is not supported.
Store Variants in Multiple Sheets
Each sheet must have the following columns:
VariantName — Name of the variant. The app uses this name when creating the variant.
Type — Model component type (species, parameter, or compartment)
Name — Model component name
Value — Model component value
The next screenshot shows an example of what such an Excel file with multiple sheets looks like.

Import Doses from Excel
On the Home tab of the app, select Model >
Import Model Components from Excel. Select your Excel file containing the dosing information. You can store multiple schedule doses in one or multiple sheets. All repeat doses must be saved in one sheet.In the next dialog, select the dosing type stored in the Excel sheet: Schedule Doses or Repeat Doses (or both) in the Components table. When you click Schedule Doses or Repeat Doses row, the Properties table on the right is updated automatically to show the corresponding required properties that need to be defined in the Excel sheet. These required properties are preselected and cannot be unchecked.
If the Excel sheet also has columns for the optional properties (such as Rate or AmountUnits) that you want to import, select the corresponding check boxes in the Properties table as well.
For the repeat doses, select the corresponding sheet under Sheet Name.

For schedule doses, depending on if you have stored the schedule doses in one sheet or multiple sheets, the workflow differs as shown next.
For details on making an Excel file for schedule or repeat doses, see Create Excel File for Doses. Alternatively, you can export an existing dose from your model to Excel to look at it as an example.
Schedule Doses in One Sheet
Select the check box Schedule doses defined in one sheet and select the corresponding sheet name in the Sheet Name list.

Schedule Doses in Multiple Sheets
Clear the check box Schedule doses defined in one sheet and select which sheets to import in the Sheet Names table.

Export Doses to Excel
On the Home tab of the app, select Export >
Export Model Components to Excel.In the next dialog, select Repeat Doses or Schedule Doses (or both) in the Components table. The Properties table on the right is then updated to show which properties are exported. Each property is exported as a column in the spreadsheet.
(Optional) By default, the app stores all schedule doses in one sheet. If you want to store one schedule dose per sheet, clear the Write schedule doses to one sheet check box. The repeat doses can only be stored in one sheet. You can change the order of columns by pressing the up and down arrows on the right of the Properties table.

Create Excel File for Doses
For Repeat Doses
Store all repeat doses in one sheet. The sheet must have one row per repeat dose and must have the following columns:
Name — Dose name
TargetName — Name of the dose target
StartTime — Dose start time
Amount — Dose amount
The optional columns are:
Rate — Dose rate
Interval — Time between doses
RepeatCount — Dose repetitions
AmountUnits — Dose amount units
RateUnits — Dose rate units
TimeUnits — Dose time units
DurationParameterName — Parameter specifying length of time to administer a dose
LagParameterName — Parameter specifying time lag for dose
EventMode — Determining how events that change dose parameters affect in-progress dosing
Here is an example of what such a sheet looks like.

For Schedule Doses
Store all schedule doses in one sheet or use one sheet per dose. The rows in each sheet are monotonically increasing time points with corresponding dose amounts for each schedule dose.
Regardless of using one sheet or multiple sheets, each sheet must have the following columns:
Name — Dose name
TargetName — Name of the dose target
Time — Schedule dose time
Amount — Dose amount
The optional columns are:
Rate — Dose rate
AmountUnits — Dose amount units
RateUnits — Dose rate units
TimeUnits — Dose time units
DurationParameterName — Parameter specifying length of time to administer a dose
LagParameterName — Parameter specifying time lag for dose
EventMode — Determining how events that change dose parameters affect in-progress dosing
Here is an example of storing all schedule doses in one sheet.

Here is an example of using one sheet per schedule dose.

See Also
SimBiology Model Builder | Doses in SimBiology Models | Variants in SimBiology Models