이 페이지는 기계 번역을 사용하여 번역되었습니다. 최신 내용을 영문으로 보려면 여기를 클릭하십시오.
Kinect for Windows V2에서 골격 데이터 보기
이 예제에서는 Kinect® for Windows® V2에서 RGB 이미지를 보고 그 이미지에 뼈대 관절 위치를 중첩하는 방법을 보여줍니다.
요구 사항
MATLAB® 및 Image Acquisition Toolbox™
Kinect for Windows V2 센서
최소 PC 구성: 전용 USB3 컨트롤러가 있는 Windows 10 64비트
색상 및 깊이 수집을 위한 Kinect V2 설정
색상과 깊이를 담은 videoinput 객체를 만듭니다.
colorVid = videoinput("kinect",1)Summary of Video Input Object Using 'Kinect V2 Color Sensor'.
Acquisition Source(s): Kinect V2 Color Source is available.
Acquisition Parameters: 'Kinect V2 Color Source' is the current selected source.
10 frames per trigger using the selected source.
'BGR_1920x1080' video data to be logged upon START.
Grabbing first of every 1 frame(s).
Log data to 'memory' on trigger.
Trigger Parameters: 1 'immediate' trigger(s) on START.
Status: Waiting for START.
0 frames acquired since starting.
0 frames available for GETDATA.
depthVid = videoinput("kinect",2)Summary of Video Input Object Using 'Kinect V2 Depth Sensor'.
Acquisition Source(s): Kinect V2 Depth Source is available.
Acquisition Parameters: 'Kinect V2 Depth Source' is the current selected source.
10 frames per trigger using the selected source.
'Depth_512x424' video data to be logged upon START.
Grabbing first of every 1 frame(s).
Log data to 'memory' on trigger.
Trigger Parameters: 1 'immediate' trigger(s) on START.
Status: Waiting for START.
0 frames acquired since starting.
0 frames available for GETDATA.
Kinect V2의 깊이 센서인 깊이 소스 장치의 장치별 속성을 살펴보세요.
'EnableBodyTracking'를 켜면 깊이 센서가 깊이 프레임과 함께 신체 추적 메타데이터를 반환합니다.
depthSource = getselectedsource(depthVid);
depthSource.EnableBodyTracking = "on";
100개의 색상과 깊이 프레임을 얻습니다.
framesPerTrig = 100;
colorVid.FramesPerTrigger = framesPerTrig;
depthVid.FramesPerTrigger = framesPerTrig;
깊이 및 색상 수집 객체를 시작합니다. 이렇게 하면 데이터 수집이 시작되지만, 수집된 데이터의 기록은 시작되지 않습니다.
pause(5);
start([depthVid colorVid]);
이미지 및 골격 데이터 액세스
색상 및 깊이 장치 객체에서 이미지와 메타데이터를 가져옵니다.
[colorImg] = getdata(colorVid);
[~,~,metadata] = getdata(depthVid);
이는 Kinect에서 반환된 관절의 순서입니다.
SpineBase = 1;
SpineMid = 2;
Neck = 3;
Head = 4;
ShoulderLeft = 5;
ElbowLeft = 6;
WristLeft = 7;
HandLeft = 8;
ShoulderRight = 9;
ElbowRight = 10;
WristRight = 11;
HandRight = 12;
HipLeft = 13;
KneeLeft = 14;
AnkleLeft = 15;
FootLeft = 16;
HipRight = 17;
KneeRight = 18;
AnkleRight = 19;
FootRight = 20;
SpineShoulder = 21;
HandTipLeft = 22;
ThumbLeft = 23;
HandTipRight = 24;
ThumbRight = 25;
관절을 연결하기 위해 뼈대 연결 맵을 만듭니다.
SkeletonConnectionMap = [
    [4 3];  % Neck
    [3 21]; % Head
    [21 2]; % Right Leg
    [2 1];
    [21 9];
    [9 10];  % Hip
    [10 11];
    [11 12]; % Left Leg
    [12 24];
    [12 25];
    [21 5];  % Spine
    [5 6];
    [6 7];   % Left Hand
    [7 8];
    [8 22];
    [8 23];
    [1 17];
    [17 18];
    [18 19];  % Right Hand
    [19 20];
    [1 13];
    [13 14];
    [14 15];
    [15 16];
    ];
90번째 프레임을 추출하고 신체 정보를 추적합니다.
imageFrame = framesPerTrig-10;
imageframeMetadata = metadata(imageFrame);
추적된 시체의 색인을 찾아보세요.
anyBodiesTracked = any(imageframeMetadata.IsBodyTracked ~= 0);
trackedBodies = find(imageframeMetadata.IsBodyTracked);
추적된 해골의 수를 찾으세요.
nBodies = length(trackedBodies);
추적된 물체의 조인트 인덱스를 컬러 이미지를 기준으로 구합니다.
colorJointIndices = imageframeMetadata.ColorJointIndices(:,:,trackedBodies);
90번째 색상 프레임을 추출합니다.
colorImage = colorImg(:,:,:,imageFrame);
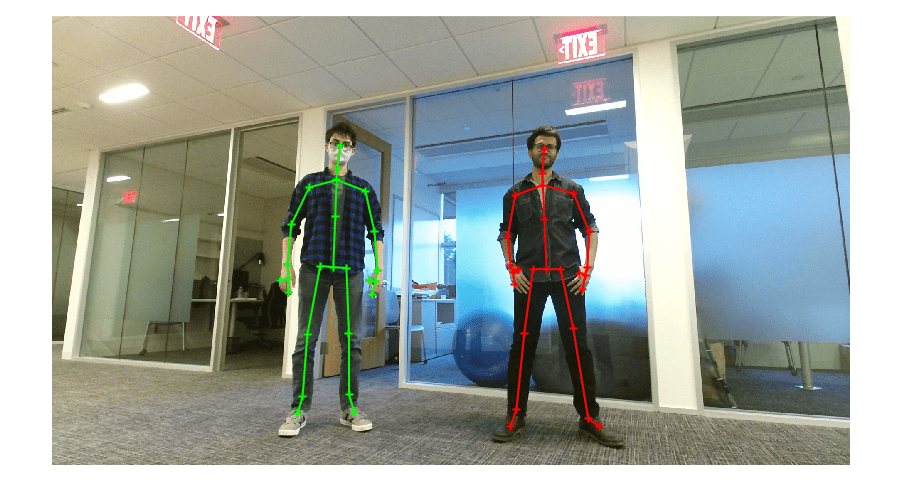
스켈레탈 오버레이로 RGB 이미지 보기
최대 6개의 신체에 대한 마커 색상.
colors = ["r";"g";"b";"c";"y";"m"];
RGB 이미지를 표시합니다.
imshow(colorImage);
이 RGB 프레임에 뼈대를 오버레이합니다.
for i = 1:24
    for body = 1:nBodies
        X1 = [colorJointIndices(SkeletonConnectionMap(i,1),1,body) colorJointIndices(SkeletonConnectionMap(i,2),1,body)];
        Y1 = [colorJointIndices(SkeletonConnectionMap(i,1),2,body) colorJointIndices(SkeletonConnectionMap(i,2),2,body)];
        line(X1,Y1,"LineWidth",1.5,"LineStyle","-","Marker","+","Color",colors(body));
    end
    hold on;
end
hold off;