이 페이지는 기계 번역을 사용하여 번역되었습니다. 최신 내용을 영문으로 보려면 여기를 클릭하십시오.
Basler ToF blaze-101 카메라로 심도 이미지를 획득하고 포인트 클라우드로 시각화합니다.
이 예제는 GenICam™ 규격을 준수하는 Basler ToF blaze-101 카메라에서 범위 맵을 획득하고 이를 포인트 클라우드로 시각화하는 방법을 보여줍니다.
요구 사항
이 예제를 실행하려면 다음 추가 기능이 필요합니다.
Image Acquisition Toolbox™
GenICam™ 인터페이스용 Image Acquisition Toolbox 지원 패키지
카메라에 연결
gentl 어댑터를 사용하여 videoinput 객체를 생성합니다. 이 예제에서는 Basler ToF blaze-101 카메라에서 2D 깊이 이미지를 획득하기 위해 첫 번째 장치와 Coord3D_C16 픽셀 형식을 선택합니다. imaqhwinfo를 사용하면 사용 가능한 모든 장치를 볼 수 있습니다.
vid = videoinput("gentl", 1, "Coord3D_C16");
카메라를 수동 트리거 모드로 설정하십시오. 예제 getsnapshot를 사용하여 루프에서 단일 이미지 수집에 설명된 대로 스냅샷을 루프에서 사용하는 기법을 활용하게 됩니다.
triggerconfig(vid, "manual");카메라 설정
비디오 소스 객체를 가져옵니다.
src = getselectedsource(vid);
범위 맵에 접근하기 위해 Range 컴포넌트를 사용하여 카메라를 스트리밍하도록 구성하고 다른 모든 컴포넌트는 비활성화하십시오.
src.ComponentSelector = "Intensity";
src.ComponentEnable = "False";
src.ComponentSelector = "Confidence";
src.ComponentEnable = "False";
src.ComponentSelector = "Range";
src.ComponentEnable = "True";
카메라의 최소 심도를 설정하십시오.
src.DepthMin = 0;
Scan3dCoordinateSelector 속성을 Z축을 나타내는 "CoordinateC"로 설정하고, Scan3dCoordinateScale property 값을 읽어 깊이-거리 변환 계수를 가져옵니다. 이는 범위 맵을 포인트 클라우드로 변환하는 동안 사용됩니다.
src.Scan3dCoordinateSelector = "CoordinateC";
% Depth-to-distance(mm) conversion factor
gray2mm = src.Scan3dCoordinateScale;
수집 시작
범위 지도의 높이와 너비를 미리 지정합니다.
videoResolution = vid.VideoResolution;
rangeMap = zeros(videoResolution(2), videoResolution(1), 0);
카메라 스트리밍을 시작하세요.
start(vid)
범위 지도를 점군으로 시각화하기 위해 산점도를 생성합니다.
포인트 클라우드를 생성하려면 X, Y, Z 좌표가 필요합니다. find 함수를 사용하면 X, Y 좌표를 얻을 수 있습니다. Z 좌표는 다음 공식을 사용하여 계산됩니다.
단일 이미지를 캡처하세요.
img = getsnapshot(vid);
rangeMap(:, :, end+1) = img;
이미지에서 X, Y 좌표를 추출합니다.
[y, x] = find(img);
픽셀의 깊이(Z 좌표) 값을 저장합니다.
z = zeros(numel(x), 1);
for i = 1:numel(x)
    % Acquire the pixel data from the image
    pixelValue = img(y(i), x(i));
    % Calculate z-coordinate value using the above formula
    z(i) = pixelValue * gray2mm;
end
scatter3 객체를 생성합니다.
fig = figure(Name="Point Cloud Preview");
hscatter = scatter3(x, y, z, 1, z, "filled");
% Add colormap and colorbar
colormap(gca, "parula");
colorbar;
% Turn the axis rotation on.
rotate3d on;
포인트 클라우드를 스트리밍하고 범위 맵을 생성합니다.
scatter3 플롯이 닫힐 때까지 범위 데이터를 스트리밍하고 저장합니다.
while ishandle(hscatter)
    img = getsnapshot(vid);
    rangeMap(:, :, end+1) = img;
    [y, x] = find(img);
    z = zeros(numel(x), 1);
    for i = 1:numel(x)
        % Acquire the pixel data from the image
        pixelValue = img(y(i), x(i));
        % Calculate z-coordinate value using the above formula
        z(i) = pixelValue * gray2mm;
    end
    if ishandle(hscatter)
        % Update scatter3 plot
        set(hscatter, XData=x, YData=y, ZData=z, CData=z);
    end
end
clear hscatter;
clear fig;
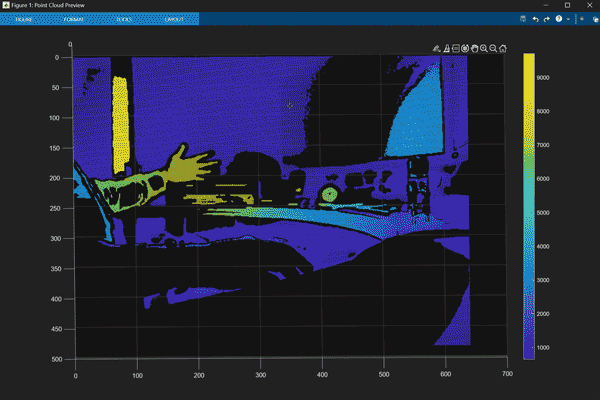
범위 맵을 획득하는 동안 포인트 클라우드 보기
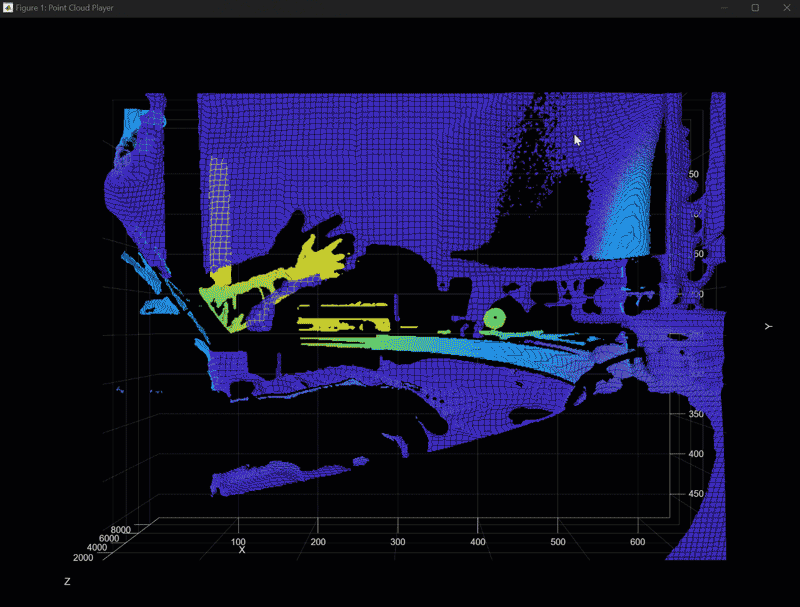
Computer Vision Toolbox™를 사용하면 데이터를 pointCloud (Computer Vision Toolbox) 객체로 변환하고 pcplayer (Computer Vision Toolbox)를 사용하여 포인트 클라우드 데이터를 시각화할 수도 있습니다.
pcplayer 객체를 생성합니다.
player = pcplayer([min(x) max(x)], [min(y) max(y)], [min(z) max(z)]);
pcplayer가 닫힐 때까지 포인트 클라우드 데이터를 스트리밍합니다.
ptCloud = [];
while isOpen(player)
    img = getsnapshot(vid);
    rangeMap(:, :, end+1) = img;
    [y, x] = find(img);
    z = zeros(numel(x), 1);
    for i = 1:numel(x)
        % Acquire the pixel data from the image
        pixelValue = img(y(i), x(i));
        % Calculate z-coordinate value using the above formula
        z(i) = pixelValue * gray2mm;
    end
    ptCloud = [ptCloud pointCloud([x,y,z], "Intensity", z)];
    view(player, ptCloud(end))
end
정리
stop(vid);
delete(vid);