Use Freehand ROIs to Refine Segmentation Masks
This example shows how to refine a logical segmentation mask by converting it into a Freehand ROI object. In this method, you take advantage of the interactive reshaping capability of the Freehand ROI object to make a better fit of the edge of the segmentation mask to the shape of the image region that you want to segment.
Introduction - Image Segmentation
Segmentation algorithms are used to segment interesting parts of an image. To illustrate, this example uses K-means clustering to segment bone and tissue in an MRI image.
im = dicomread("knee1.dcm");
segmentedLabels = imsegkmeans(im,3);
boneMask = segmentedLabels==2;
imshowpair(im,boneMask);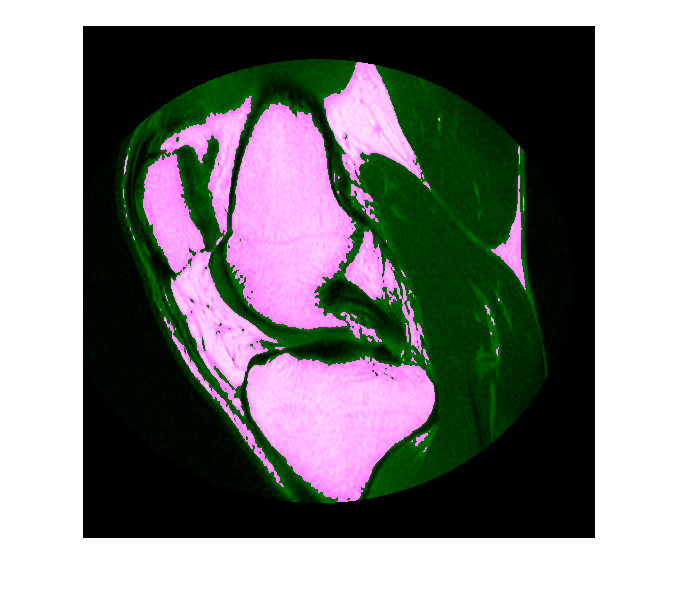
Post-Process the Segmentation Masks
Often, the results of automated segmentation algorithms need additional post-processing to clean up the masks. As a first step, select the two largest bones from the mask, the femur and the tibia.
boneMask = bwareafilt(boneMask,2);
imshowpair(im,boneMask);

Convert Mask to Freehand ROI Object
To refine the edges of the automatic k-means segmentation, convert the two masks into interactive freehand ROI objects. First, retrieve the locations of boundary pixels that delineate these two segmented regions. Include the boundary of the ROI in the masks. Note that these ROI objects are densely sampled—their Position property has the same resolution as the image pixels.
blocations = bwboundaries(boneMask,"noholes",TraceStyle="pixeledge");
figure
imshow(im,[]);
for ind = 1:numel(blocations)
    % Convert to x,y order
    pos = blocations{ind};
    pos = fliplr(pos);
    % Create a freehand ROI
    drawfreehand(Position=pos);
end
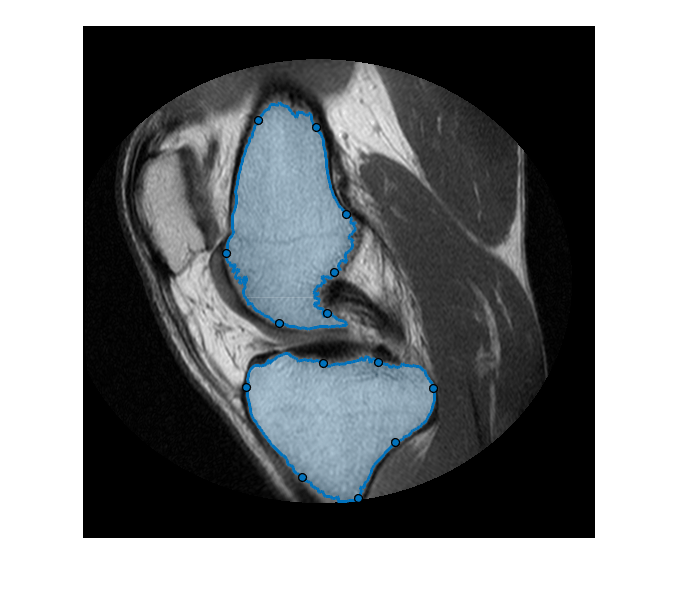
Edit the ROIs
The Freehand ROI object allows simple 'rubber-band' interactive edits. To edit the ROI, click and drag any of the waypoints along the ROI boundary. You can add additional waypoints anywhere on the boundary by double-clicking the ROI edge or by using the context menu accessible by right-clicking the edge.
Convert the Freehand ROIs Back to Masks
After editing the ROIs, convert these ROI objects back to binary masks using the ROI object's createMask function. Note the additional step required to include the boundary pixels in the final mask.
% Convert edited ROI back to masks
hfhs = findobj(gca,Type="images.roi.Freehand");
editedMask = false(size(im));

for ind = 1:numel(hfhs)
    % Accumulate the mask from each ROI
    editedMask = editedMask | createMask(hfhs(ind));
end
See Also
dicomread | imsegkmeans | bwareafilt | bwboundaries | drawfreehand | Freehand | createMask