이 번역 페이지는 최신 내용을 담고 있지 않습니다. 최신 내용을 영문으로 보려면 여기를 클릭하십시오.
안개 보정
이 예제는 GPU 코드 생성을 위해 영상 처리 함수를 사용하는 방법을 보여줍니다. 이 예제에서는 안개 낀 이미지를 입력으로 받아서 안개가 제거된 이미지를 생성합니다. 이 예제는 전형적인 안개 보정 알고리즘입니다. 이 예제에서는 conv2, im2gray, imhist 함수를 사용합니다.
타사 선행 조건
필수
이 예제는 CUDA® MEX를 생성하며, 다음과 같은 타사 요구 사항이 있습니다.
CUDA 지원 NVIDIA® GPU 및 호환되는 드라이버. 반정밀도 코드 생성을 위해서 GPU는 최소 Compute Capability 6.0을 갖추어야 합니다.
선택 사항
정적, 동적 라이브러리 또는 실행 파일과 같은 비 MEX 빌드의 경우, 이 예제에는 다음과 같은 추가 요구 사항이 있습니다.
NVIDIA 툴킷.
컴파일러 및 라이브러리 환경 변수. 자세한 내용은 타사 하드웨어 항목과 필수 제품 설정하기 항목을 참조하십시오.
GPU 환경 확인하기
coder.checkGpuInstall 함수를 사용하여 이 예제를 실행하는 데 필요한 컴파일러와 라이브러리가 올바르게 설치되었는지 확인합니다.
envCfg = coder.gpuEnvConfig('host');
envCfg.BasicCodegen = 1;
envCfg.Quiet = 1;
coder.checkGpuInstall(envCfg);
fog_rectification 진입점 함수
fog_rectification.m 진입점 함수는 안개 낀 이미지를 입력으로 받아서 안개가 제거된 이미지를 반환합니다.
type fog_rectificationfunction [out] = fog_rectification(input) %#codegen
%
% Copyright 2017-2023 The MathWorks, Inc.
coder.gpu.kernelfun;
% restoreOut is used to store the output of restoration
restoreOut = zeros(size(input),"double");
% Changing the precision level of input image to double
input = double(input)./255;
%% Dark channel Estimation from input
darkChannel = min(input,[],3);
% diff_im is used as input and output variable for anisotropic
% diffusion
diff_im = 0.9*darkChannel;
num_iter = 3;
% 2D convolution mask for Anisotropic diffusion
hN = [0.0625 0.1250 0.0625; 0.1250 0.2500 0.1250;
0.0625 0.1250 0.0625];
hN = double(hN);
%% Refine dark channel using Anisotropic diffusion.
for t = 1:num_iter
diff_im = conv2(diff_im,hN,"same");
end
%% Reduction with min
diff_im = min(darkChannel,diff_im);
diff_im = 0.6*diff_im ;
%% Parallel element-wise math to compute
% Restoration with inverse Koschmieder's law
factor = 1.0./(1.0-(diff_im));
restoreOut(:,:,1) = (input(:,:,1)-diff_im).*factor;
restoreOut(:,:,2) = (input(:,:,2)-diff_im).*factor;
restoreOut(:,:,3) = (input(:,:,3)-diff_im).*factor;
restoreOut = uint8(255.*restoreOut);
%%
% Stretching performs the histogram stretching of the image.
% im is the input color image and p is cdf limit.
% out is the contrast stretched image and cdf is the cumulative
% prob. density function and T is the stretching function.
% RGB to grayscale conversion
im_gray = im2gray(restoreOut);
[row,col] = size(im_gray);
% histogram calculation
[count,~] = imhist(im_gray);
prob = count'/(row*col);
% cumulative Sum calculation
cdf = cumsum(prob(:));
% Utilize gpucoder.reduce to find less than particular probability.
% This is equal to "i1 = length(find(cdf <= (p/100)));", but is
% more GPU friendly.
% lessThanP is the preprocess function that returns 1 if the input
% value from cdf is less than the defined threshold and returns 0
% otherwise. gpucoder.reduce then sums up the returned values to get
% the final count.
i1 = gpucoder.reduce(cdf,@plus,"preprocess", @lessThanP);
i2 = 255 - gpucoder.reduce(cdf,@plus,"preprocess", @greaterThanP);
o1 = floor(255*.10);
o2 = floor(255*.90);
t1 = (o1/i1)*[0:i1];
t2 = (((o2-o1)/(i2-i1))*[i1+1:i2])-(((o2-o1)/(i2-i1))*i1)+o1;
t3 = (((255-o2)/(255-i2))*[i2+1:255])-(((255-o2)/(255-i2))*i2)+o2;
T = (floor([t1 t2 t3]));
restoreOut(restoreOut == 0) = 1;
u1 = (restoreOut(:,:,1));
u2 = (restoreOut(:,:,2));
u3 = (restoreOut(:,:,3));
% replacing the value from look up table
out1 = T(u1);
out2 = T(u2);
out3 = T(u3);
out = zeros([size(out1),3], "uint8");
out(:,:,1) = uint8(out1);
out(:,:,2) = uint8(out2);
out(:,:,3) = uint8(out3);
end
function out = lessThanP(input)
p = 5/100;
out = uint32(0);
if input <= p
out = uint32(1);
end
end
function out = greaterThanP(input)
p = 5/100;
out = uint32(0);
if input >= 1 - p
out = uint32(1);
end
end
CUDA 코드와 MEX 함수 생성하기
코드 생성을 위한 입력값을 설정하고 GPU 코드 생성을 위한 구성을 생성합니다.
inputImage = imread('foggyInput.png');
cfg = coder.gpuConfig('mex');
cfg.GpuConfig.EnableMemoryManager = true;
코드 생성 실행하기
codegen 명령을 사용하여 fog_rectification_mex MEX 파일을 생성합니다.
codegen -args {inputImage} -config cfg fog_rectification
Code generation successful: View report
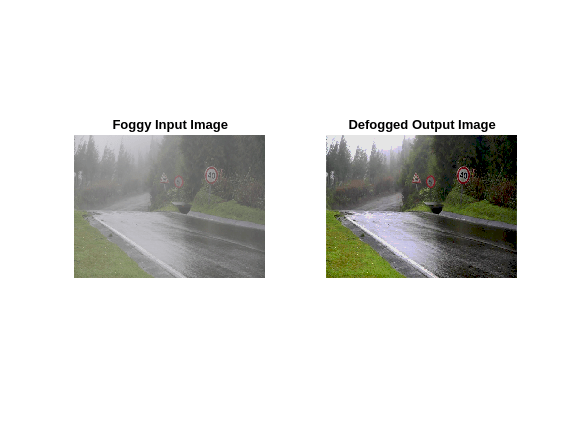
안개 낀 이미지를 사용하여 MEX 함수 실행하기
안개 낀 이미지를 입력값으로 사용하여 생성된 fog_rectification_mex를 실행하고, 안개 낀 이미지와 안개가 제거된 이미지를 플로팅합니다.
[outputImage] = fog_rectification_mex(inputImage);

% plot images
p1  = subplot(1, 2, 1);
p2 = subplot(1, 2, 2);
imshow(inputImage, 'Parent', p1);
imshow(outputImage, 'Parent', p2);
title(p1, 'Foggy Input Image');
title(p2, 'Defogged Output Image');
CPU와 GPU의 아키텍처 차이로 인해 수치 검증이 항상 일치하지는 않습니다. 이 시나리오는 single 데이터형을 사용하거나 MATLAB 코드에서 정수형 변환을 수행하는 경우에 해당합니다. 이 예제에서 fog_rectification.m 진입점 함수의 정수형 변환으로 인해 MATLAB 시뮬레이션과 수치적 차이가 발생합니다.
반정밀도
이 예제의 계산은 fog_rectification_half_precision.m 진입점 함수를 사용하여 반정밀도 부동소수점 숫자로도 수행할 수 있습니다. 반정밀도 데이터형으로 코드를 생성하고 실행하려면 CUDA Compute Capability가 6.0 이상이어야 합니다. 코드 구성 객체의 ComputeCapability 속성을 '6.0'으로 설정합니다. 반정밀도 유형의 경우 CUDA 코드 생성을 위한 메모리 할당(malloc) 모드를 'Discrete'로 설정해야 합니다.
inputImageHalf = half(imread('foggyInput.png'));
cfg = coder.gpuConfig('mex');
cfg.GpuConfig.EnableMemoryManager = true;
cfg.GpuConfig.ComputeCapability = '6.0';
cfg.GpuConfig.MallocMode = 'Discrete';
codegen -args {inputImageHalf} -config cfg fog_rectification_half_precision
Code generation successful: View report
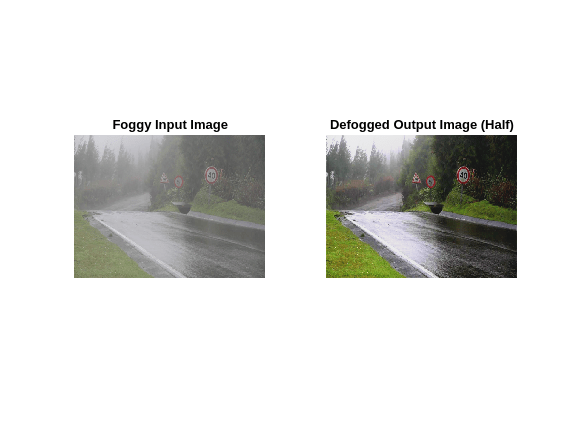
안개가 낀 이미지를 사용하여 반정밀도 MEX 함수 실행하기
안개 낀 이미지를 입력값으로 사용하여 생성된 fog_rectification_half_precision_mex를 실행하고, 안개 낀 이미지와 안개가 제거된 이미지를 플로팅합니다.
[outputImageHalf] = fog_rectification_half_precision_mex(inputImageHalf);

% plot images
p1  = subplot(1, 2, 1);
p2 = subplot(1, 2, 2);
imshow(inputImage, 'Parent', p1);
imshow(outputImageHalf, 'Parent', p2);
title(p1, 'Foggy Input Image');
title(p2, 'Defogged Output Image (Half)');
참고 항목
함수
codegen|coder.gpu.kernel|coder.gpu.kernelfun|gpucoder.matrixMatrixKernel|coder.gpu.constantMemory|stencilfun|coder.checkGpuInstall