Truck Platooning Using Vehicle-to-Vehicle Communication
This example shows how to simulate a platooning application with vehicle-to-vehicle (V2V) communication, tractor-trailer dynamics, and controller components in the Unreal Engine® simulation environment.
Introduction
Platooning is the coordinated travel by two or more autonomous vehicles, with each following vehicle maintaining a consistent distance from the preceding vehicle. The vehicle at the front of the line serves as the platoon leader. As the movement of the platoon leader changes, the vehicles behind it respond and adjust. The vehicles use V2V communication and automated driving systems for effective platooning. Vehicles traveling in tightly spaced platoons can improve traffic flow, safety, and fuel economy.
This example shows how to design and simulate platooning of trucks that have tractors and trailers by using V2V communication. To test the platooning application, you can configure the test bench model with different acceleration profiles for the platoon leader, and also specify different initial states for both the leader and the followers. In this example, you:
Explore the test bench model — The test bench model consists of a platoon leader and two platoon followers, as well as V2V communication, visualization, and metrics components.
Model V2V communication — Model the V2V communication between three vehicles for platooning. Each vehicle in the platoon has a V2V transmitter and a V2V receiver. The V2V transmitter enables the vehicle to transmit its pose information using basic safety messages (BSMs). The platoon followers use V2V receivers to receive BSMs from other vehicles.
Model platooning controller — Each platoon follower has a platooning controller that specifies longitudinal controls to keep a constant spacing from its preceding vehicle while following the lead vehicle.
Model 6DOF tractor-trailer dynamics — The six degrees of freedom (DOF) tractor-trailer dynamics model a three-axle tractor towing a three-axle trailer through a hitch.
Simulate the test bench model — Simulate the test bench model to test the integration of the V2V communication, platooning controller, and the vehicle dynamics components and visualize the results.
Explore other scenarios — These scenarios test the system under additional conditions.
This example uses Unreal Engine from Epic Games® for visualization.
if ~ispc
    error(['This example is supported only on Microsoft',char(174),' Windows',char(174),'.'])
end
Explore Test Bench Model
In this example, you use a system-level simulation test bench model to explore and analyze the interactions between the platooning controller and the behavior of the tractor-trailer dynamics model for the platooning system.
To explore the test bench model, load the platooning project.
openProject("Platooning");
Open the simulation test bench model.
open_system("PlatooningUsingV2VTestBench")
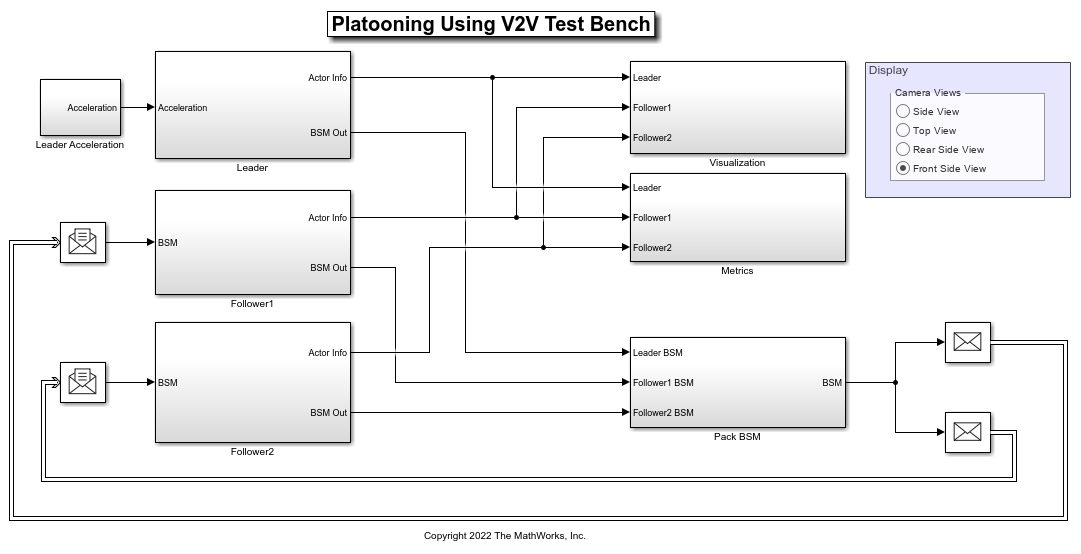
Opening this model runs the helperSLPlatooningUsingV2VSetup function, which initializes the vehicles with their initial poses and creates all the variables in the base workspace required by the test bench model. The function runs the default scenario, scenario_01_Platooning_StartAndSlow, which places three tractors and their trailers in the Straight Road (Vehicle Dynamics Blockset) scene with the given initial spacing and initial velocity. This function also loads the V2XChannelInfo.mat file, to save the precomputed channel characteristics to the base workspace for the range specified. The setup function configures the controller parameters, vehicle model parameters, and Simulink® bus signals required for defining the inputs and outputs for the PlatooningUsingV2VTestBench model.
The test bench model contains these subsystems:
Leader— Models the platoon leader, which moves along the lane and follows a given acceleration profile.Follower1andFollower2— TheFollower1andFollower2subsystems model the platoon followers, which use V2V communication and a platooning controller to follow the platoon leader.Metrics— Verifies platoon stability and checks for collision.Visualization— Displays the platoon in a 3D simulation environment using a camera, and plots the vehicle velocity and spacing.Display— TheDisplayarea provides radio buttons to select the desired camera view from these options: Side View, Top View, Rear Side View, or Front Side View.
Platoon Leader
The platoon leader determines the course of the journey and drives the entire platoon. This example configures the leader to travel in a straight line with a predefined acceleration profile.
Open the Leader subsystem.
open_system("PlatooningUsingV2VTestBench/Leader")
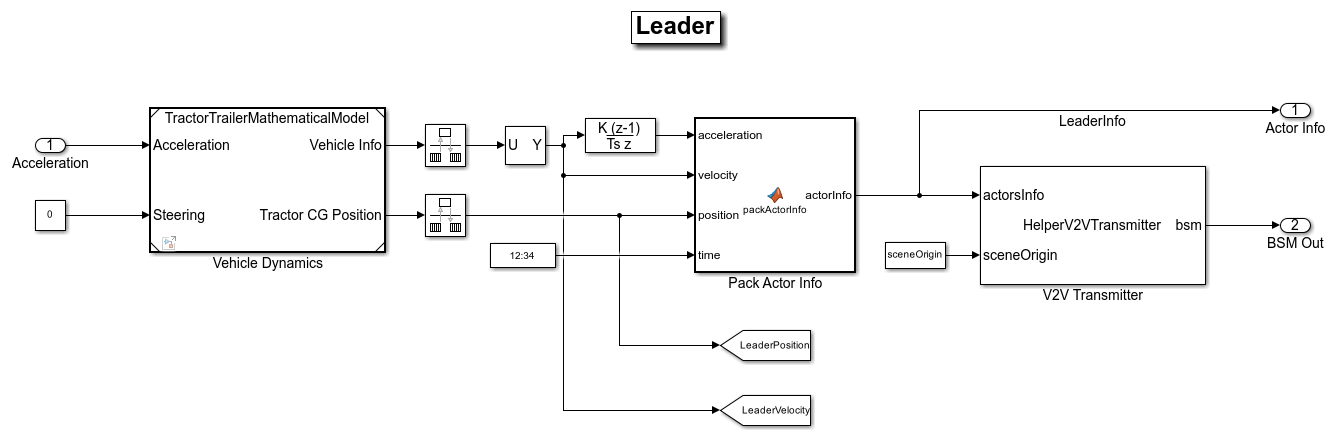
The Leader subsystem implements the platoon leader using the mathematical model of tractor-trailer dynamics. The mathematical model has two inputs: acceleration and steering angle. The acceleration is set from a predefined set of values, and the steering angle is set to zero, because the vehicles travel on a straight road. The Pack Actor Info MATLAB Function block packs the updated vehicle information and feeds it to the V2V Transmitter block, which transmits it to other vehicles in the platoon as BSM messages.
Platoon Followers
This example models two platoon followers that follow the leader and keep constant spacing from the preceding vehicle.
Open the Follower1 subsystem.
open_system("PlatooningUsingV2VTestBench/Follower1")
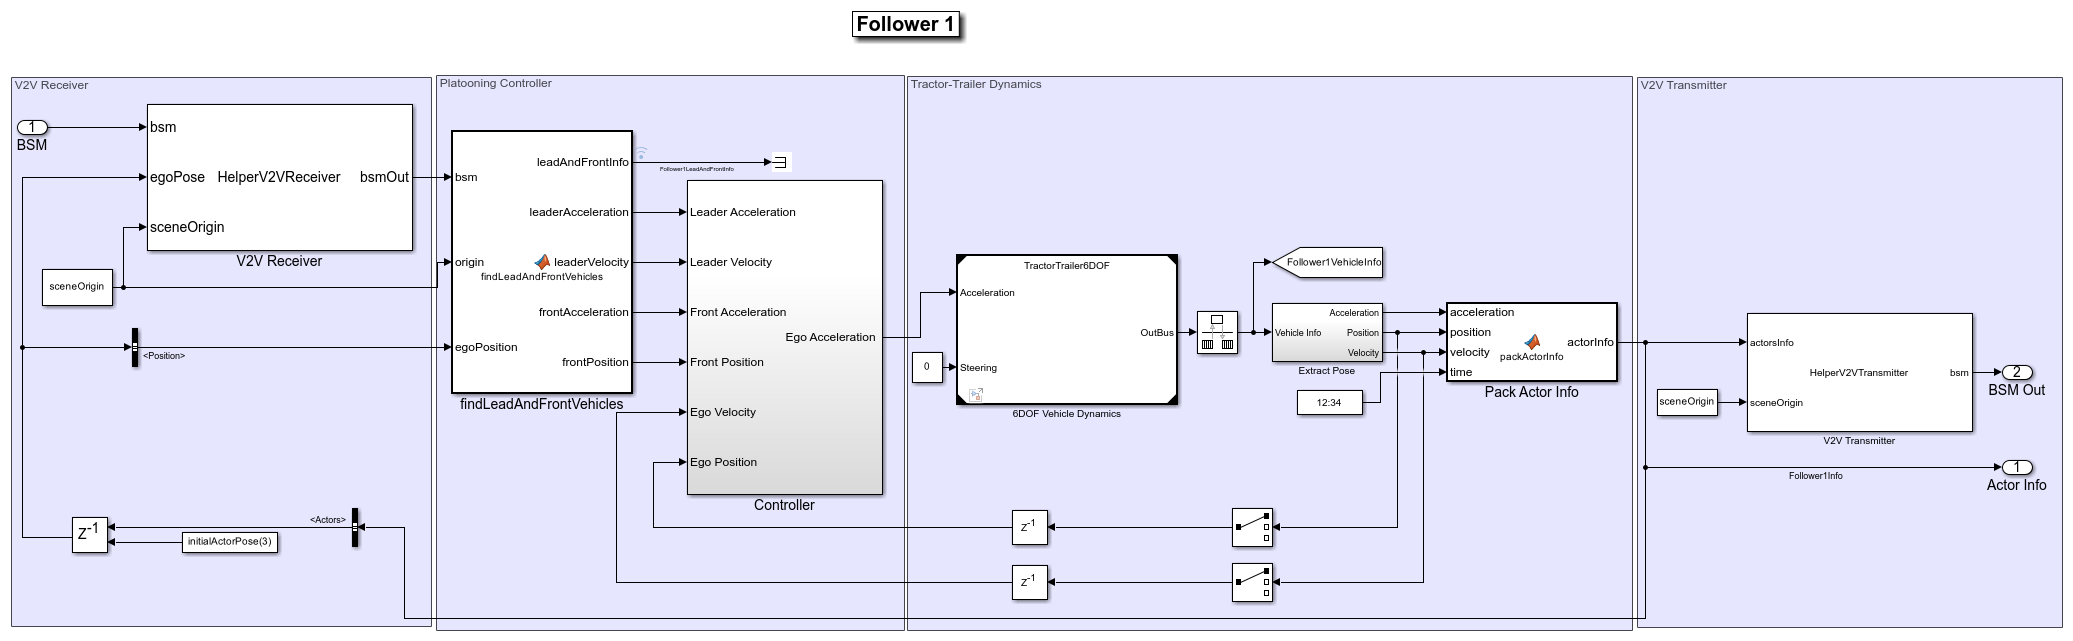
The Follower1 subsystem consists of four sections:
V2V Receiver— Implements the receiver behavior for the followers to receive the BSMs from other vehicles present in the platoon using the precomputed channel characteristics.Platooning Controller— Extracts information about platooning vehicles from the received BSM and feeds this information to the controller. TheControllersubsystem computes the acceleration of platoon followers to maintain a constant spacing from preceding vehicle and follow the lead vehicle.Tractor-Trailer Dynamics— Implements a model of a three-axle tractor towing a three-axle trailer through a hitch. The tractor, trailer, and hitch are of six degrees of freedom (DOF). The tractor and trailer both have individual models for their vehicle body, wheels, and suspension. The platooning controller feeds the acceleration input to the vehicle dynamics, and the steering angle remains constant at zero.V2V Transmitter— Implements the transmitter of the platoon follower. This block takes the actor information and scene origin as input to generate and broadcast the BSM.
Visualization
The Visualization subsystem sets up the 3D visualization, and plots the velocity of the vehicles and the spacing between them.
Open the Visualization subsystem.
open_system("PlatooningUsingV2VTestBench/Visualization")
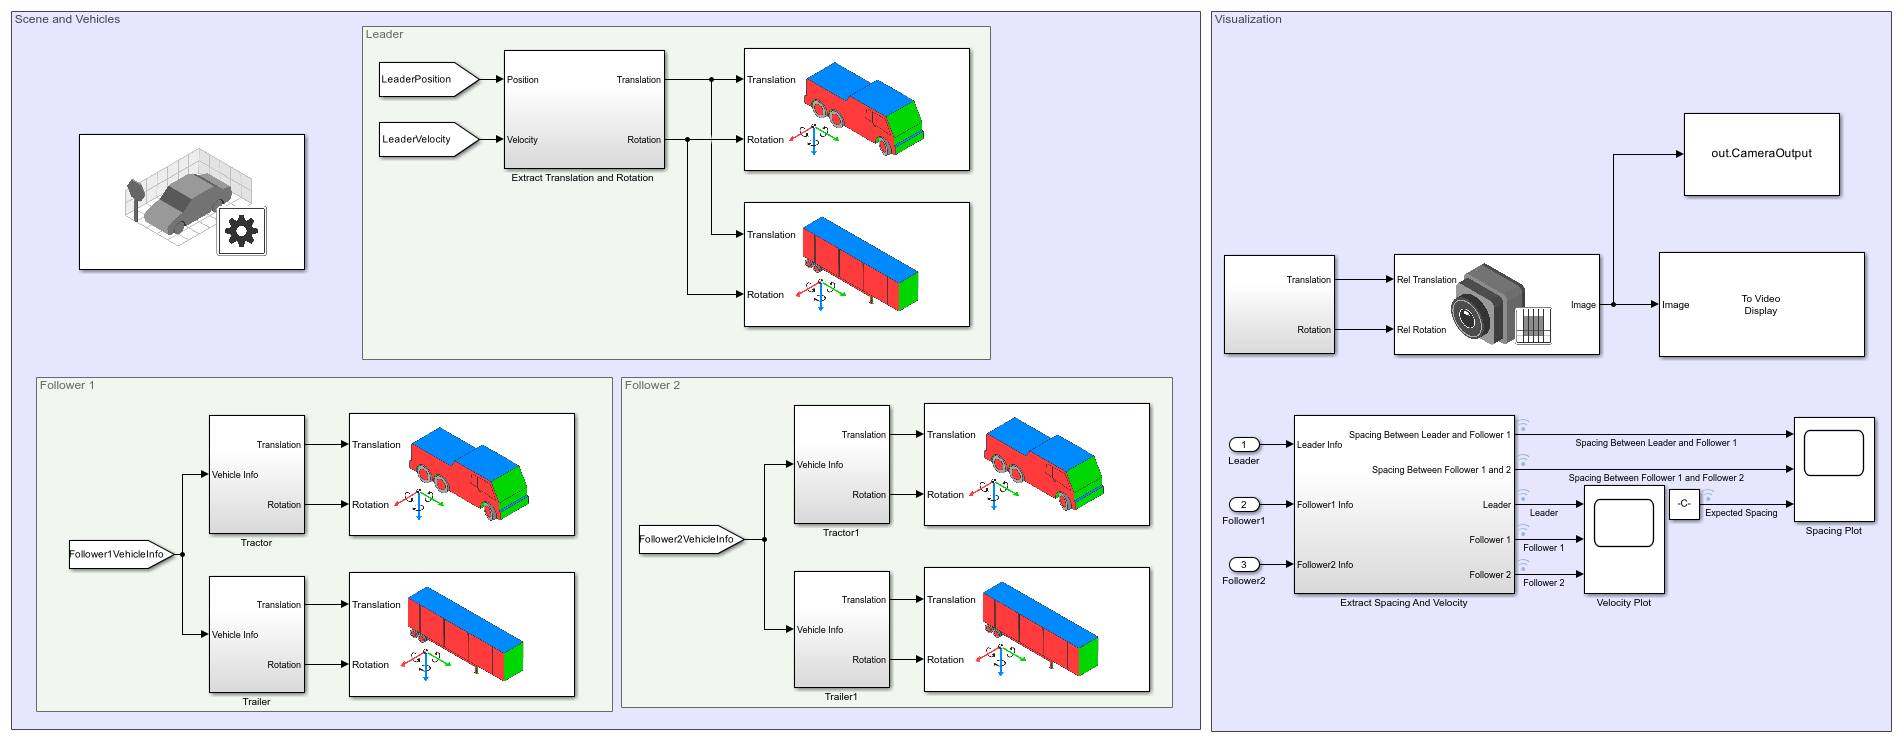
These blocks configure the vehicles and 3D simulation environment:
The Simulation 3D Scene Configuration (Vehicle Dynamics Blockset) block configures the 3D simulation environment. This example uses the Straight Road (Vehicle Dynamics Blockset) scene for 3D simulation environment.
The Simulation 3D Tractor (Vehicle Dynamics Blockset) block implements a three-axle tractor in the 3D simulation environment.
The Simulation 3D Trailer (Vehicle Dynamics Blockset) block implements a three-axle trailer in the 3D simulation environment. Vehicle dynamics models for each tractor and trailer provide their updated positions.
These parts of the subsystem implement the camera display and generate the plots for velocity and spacing:
The Simulation 3D Camera block captures the images from the 3D simulation environment.
The To Video Display block displays the images captured by the camera.
Metrics Assessment
The Metrics subsystem verifies platoon stability and checks for collision.
Open the Metrics subsystem.
open_system("PlatooningUsingV2VTestBench/Metrics")
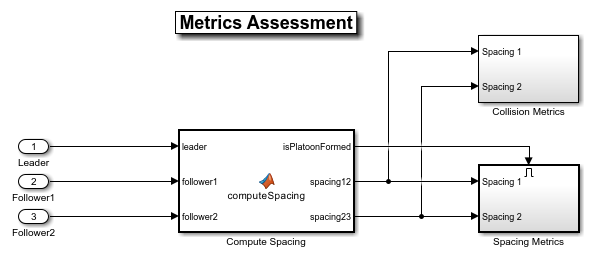
This example evaluates the platooning system using these metrics:
Spacing Metrics— Verifies whether the spacing between the vehicles are within a given range. These metrics are enabled only after the platoon formation.Collision Metrics— The collision metrics check for collision during the simulation and stop the simulation if there is any collision.
Model V2V Communication
The platooning controller of each vehicle needs precise information about the other vehicles for effective platooning. V2V communication enables the vehicles in the platoon to communicate with each other over a wireless network. Using V2V communication, the platooning controller of each follower vehicle receives the position, velocity, and acceleration information from the other vehicles. Based on this information, the platooning controller specifies the longitudinal controls for a follower vehicle.
This example models V2V communication using these elements:
V2V Transmitter— TheHelperV2VTransmitterSystem object™ implements the transmitter of the vehicles. Using the actor information, the transmitter generates the BSM for each vehicle. In this example, the leader and followers have their own transmitters to generate their BSMs.V2V Receiver— TheHelperV2VReceiverSystem object implements the receiver behavior. It takes the BSM, ego information, and scene origin as input. TheV2V Receiveruses precomputed channel characteristics to receive the transmitted BSM message. The channel characteristics provide the throughput percentage for a given distance between the transmitter and receiver. If the throughput percentage is greater than the generated random number, then the receiver receives the BSM and appends it to the output. In this example, each platoon follower has its own receiver.
For more information about V2V communication and BSMs, see the Intersection Movement Assist Using Vehicle-to-Vehicle Communication example.
Model Platooning Controller
The platooning controller specifies the longitudinal controls for the follower vehicles. In the Follower1 subsystem, open the Controller subsystem.
open_system("PlatooningUsingV2VTestBench/Follower1/Controller")
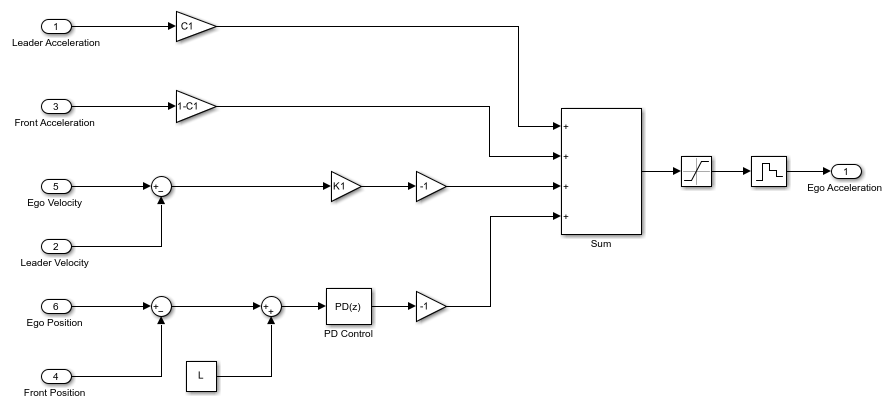
The platooning controller has these objectives:
Individual vehicle stability — The spacing error for each following vehicle converges to zero if the preceding vehicle is traveling at constant speed.
String stability — Spacing errors do not amplify as they propagate towards the tail of the vehicle string.
The controller of each platoon follower reads the poses of the platoon leader, preceding vehicle, and itself. Using this input information, the controller computes the longitudinal acceleration for the platoon follower. This example sets the constant spacing value to 7 meters.
For more details about the controller design and tuning, see the Design Controller for Vehicle Platooning (Simulink Control Design) example.
Model 6DOF Tractor-Trailer Dynamics
The 6DOF tractor-trailer dynamics model implements a three-axle tractor towing a three-axle trailer. The tractor tows the trailer through a 6DOF hitch.
Open the 6DOF model.
open_system("TractorTrailer6DOF","force")
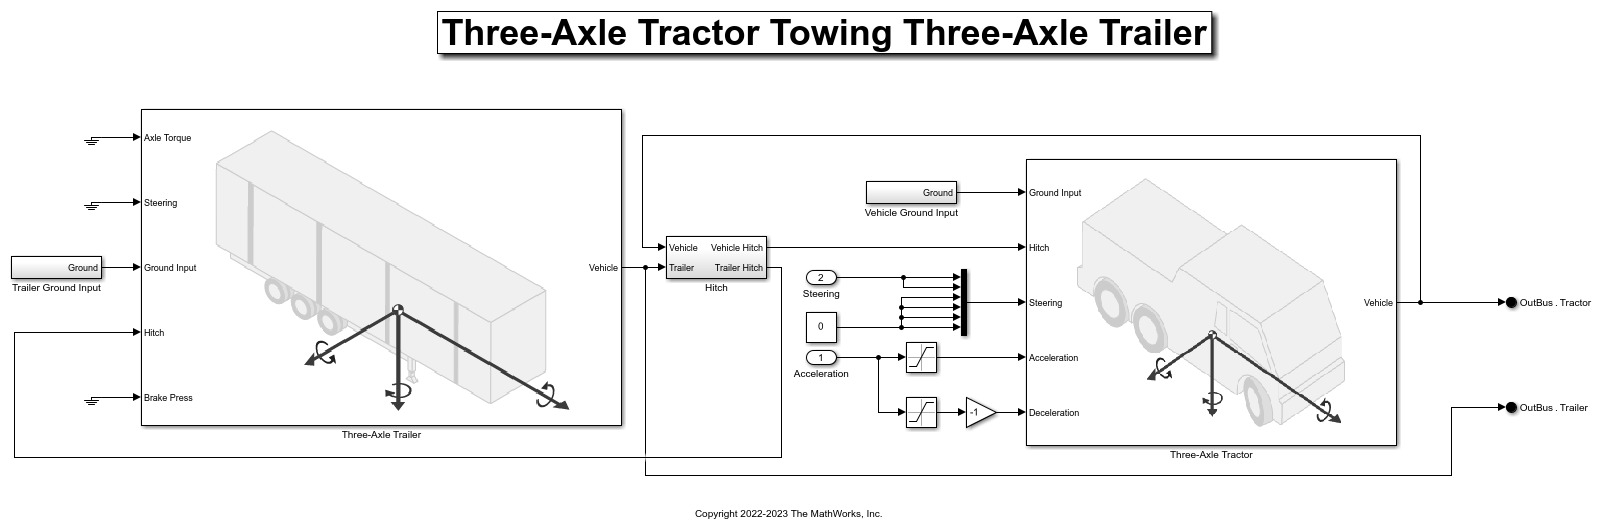
The vehicle dynamics model has three subsystems, for the tractor, the trailer, and the hitch. Both the three-axle tractor and trailer subsystems include models for the wheels, suspension, and vehicle body. The vehicle dynamics model accepts acceleration and steering as the input and outputs the information about the vehicle body, wheels, and suspension. The input acceleration is converted into the axle torque and brake pressure of the tractor. The steering controls the steering angle of the front axle of the tractor.
For more details about the vehicle dynamics model, see the Three-Axle Tractor Towing a Three-Axle Trailer (Vehicle Dynamics Blockset) example.
Simulate Test Bench Model
In this section, you configure the model and assess the simulation results of the platooning system.
Configure the PlatooningUsingV2VTestBench model to use the scenario_01_Platooning_StartAndSlow scenario. This scenario sets the tractors and the trailers on a straight road with the given initial spacing and velocity. The scenario also selects the appropriate acceleration profile for the leader.
helperSLPlatooningUsingV2VSetup(ScenarioFcnName="scenario_01_Platooning_StartAndSlow")
Run the simulation and visualize the results. Use the visualization window to view the vehicles and the scopes to view the spacing and velocity while the simulation is running. To select the desired camera view, use the radio buttons in the Display area of the test bench model.
out = sim("PlatooningUsingV2VTestBench");
% Close the scopes
scopeHandles = get(0,"ShowHiddenHandles");
set(0,ShowHiddenHandles="On")
hScope = findobj(0,Type="Figure",Tag="SIMULINK_SIMSCOPE_FIGURE");
close(hScope)
set(0,ShowHiddenHandles=scopeHandles)
### Searching for referenced models in model 'PlatooningUsingV2VTestBench'.
### Found 2 model reference targets to update.
### Starting serial model reference simulation build.
### Successfully updated the model reference simulation target for: TractorTrailer6DOF
### Successfully updated the model reference simulation target for: TractorTrailerMathematicalModel

Build Summary

Model reference simulation targets:

Model                            Build Reason                                                        Status                        Build Duration
=================================================================================================================================================
TractorTrailer6DOF               Target (TractorTrailer6DOF_msf.mexw64) did not exist.               Code generated and compiled.  0h 5m 24.288s
TractorTrailerMathematicalModel  Target (TractorTrailerMathematicalModel_msf.mexw64) did not exist.  Code generated and compiled.  0h 0m 19.323s

2 of 2 models built (0 models already up to date)
Build duration: 0h 5m 50.527s
During simulation, the model logs signals to the base workspace and records the output of the camera sensor. You can use the helperPlotSimulationResults function to visualize the simulation results.
Plot the simulation results.
hFig = helperPlotSimulationResults(out);

Close the figure.
close(hFig)
Explore Other Scenarios
The example provides these additional scenarios that are compatible with the PlatooningUsingV2VTestBench model. All these scenarios are configured on the Straight Road (Vehicle Dynamics Blockset) scene to test the platooning application with different acceleration profiles and initial conditions.
scenario_01_Platooning_StartAndSlow(default)scenario_02_Platooning_StopAndGoscenario_03_Platooning_AccelAndStop
For more details on each scenario, view the comments in its file. You can configure the Simulink model and workspace to simulate these scenarios using the helperSLPlatooningUsingV2VSetup function. For example, this command configures the test bench model to use the default scenario_01_Platooning_StartAndSlow scenario.
helperSLPlatooningUsingV2VSetup(ScenarioFcnName="scenario_01_Platooning_StartAndSlow")
See Also
Blocks
- Simulation 3D Camera | Simulation 3D Scene Configuration | Simulation 3D Tractor (Vehicle Dynamics Blockset) | Simulation 3D Trailer (Vehicle Dynamics Blockset)