Import PyTorch Model Using Deep Network Designer
This example shows how to import a PyTorch® model interactively by using the Deep Network Designer app.
In this example, you:
Import a PyTorch network into Deep Network Designer.
Inspect issues using the Import Report.
Complete placeholder functions.
Analyze the network to check that it has no remaining issues.
Import Network
Open Deep Network Designer by typing deepNetworkDesigner at the command line.
To import a PyTorch model, on the Deep Network Designer Start Page, under From PyTorch, click Import.

The app opens the Import PyTorch Model dialog box. Set the location of the model file to dNetworkWithUnsupportedOps.pt. During import, the app might save custom layers to the current folder. Before importing, check that you have write permissions for the current working directory. To import the model, click Import. Importing the network can take some time.

To import the network, specify the input sizes in the order expected by PyTorch. In this example, the network input size is [1 3 8 16]. For more information about PyTorch input sizes, see Tips on Importing Models from TensorFlow, PyTorch, and ONNX.

Click Import. The app displays the network in the Designer canvas. This network contains networklayer objects which are layers that contain nested networks. For each network layer, you can see the number of layers inside it.

To see inside the network layer, double click the layer block. The app displays the read-only contents of the network layer.
Fix Issues
The app generates an import report listing any issues found by the software during import. You can see that there is a placeholder function that requires action. When the software is unable to convert a PyTorch layer into a built-in MATLAB® layer or generate a custom layer with associated MATLAB functions, the function creates a custom layer with a placeholder function. You must complete the placeholder function before you can use the network.

Edit Placeholder Function
To fix the issue, click Edit function to open the placeholder function. You must complete this function before using the network.
The function contains placeholder text that you must replace with a function implementing this layer. The order of dimensions is different in Deep Learning Toolbox™ and PyTorch. For the placeholder function, the software generates helper code to make sure the inputs and outputs are in the right format.
The input and the expected output of the function are structures with two fields: "value" and "rank". Input value is a dlarray in this particular example. The rank is the number of dimensions of the value, specified as an integer.

To complete the placeholder function, you must:
Extract the data from the input structure array.
Implement the core functionality of the layer.
Transform the data into the required output format and disable the error.

The next sections go through each of these steps in detail. To see the completed function, see Complete Function.
Extract and Inspect Function Input
Start by extracting the values from the input structure array. Set a breakpoint in the first line so that you can view the structure array. For more information about using breakpoints to examine values, see Set Breakpoints.
In Deep Network Designer, click Analyze. The software analyzes the network and stops when it hits the breakpoint in the pyAtenMish layer. In the Command Window, call inputs{1} to inspect the input to the function. You can see that the value field is an unformatted dlarray object with five dimensions (rank: 5).
inputs{1}

ans =

  struct with fields:

    value: [5-D dlarray]
     rank: 5
The order of dimensions is different in Deep Learning Toolbox and PyTorch. For the placeholder layer function, the inputs are in PyTorch® order. The expected output of the function is reverse PyTorch order. For more information, see Input Dimension Ordering.
Implement Mish Function
Next, implement the mish activation function. The mish function maintains the shape, size, and rank of the input.
For more information, consult the PyTorch documentation.
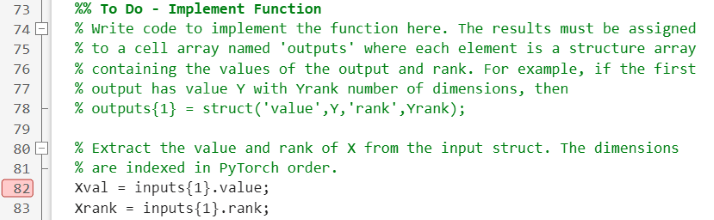
function varargout = pyAtenMish(varargin)
% Function for the PyTorch operator named aten::mish.

% ...

Xval = inputs{1}.value;
Xrank = inputs{1}.rank;

% Softplus function
Yval = log(1+exp(Xval));

% Mish function
Yval = Xval .* tanh(Yval);

% ...
end
Complete Function
Finally, convert the output of the mish function to the output type expected by the layer and disable the error. The function must output a structure array with "value" and "rank" fields. The "value" field must be a formatted dlarray object. For more information about data formats, see fmt. Set the rank of the output as equal to the rank of the input. Disable the error in the function by commenting it out or deleting it. You can also delete the comments at the top of the function that describe how to implement it.
The completed function is:
function varargout = pyAtenMish(varargin)
% Function for the PyTorch operator named aten::mish.
%
% Inputs:
%   Each input argument is a struct with fields:
%       value: Input data
%       rank:  Number of dimensions of the input data, including any
%              trailing dimensions of size 1, specified as a scalar.
%   Most functions will have a single input. Some functions can have
%   multiple inputs if the original PyTorch operator expects multiple
%   inputs. If a function requires multiple inputs, then varargin{1} is the
%   first input, varargin{2} is the second input, and so on.
%
% Outputs:
%   Each output argument is a struct with fields:
%       value: Output data
%       rank:  Number of dimensions of the output data, including any
%              trailing dimensions of size 1, specified as a scalar.
%   The function can have multiple outputs if the original PyTorch
%   operator expects multiple outputs. If a function returns multiple
%   outputs, then varargout{1} is the first output, varargout{2} is the
%   second output, and so on.

import dNetworkWithUnsupportedOps.ops.*

%% Do Not Edit - Code Generated by PyTorch Importer
% This code permutes the dimensions of the inputs into PyTorch ordering.
% When you implement the rest of this function, assume that the dimensions
% of the arrays are in the same order that they appear in the original
% PyTorch model.
inputs = cell(1,nargin);
[inputs{:}] = permuteToPyTorchDimensionOrder(varargin{:});

%% Do Not Edit - Code Generated by PyTorch Importer
% This code creates a cell array for the outputs.
outputs = cell(1,nargout);


%% To Do - Implement Function
% Write code to implement the function here. The results must be assigned
% to a cell array named 'outputs' where each element is a structure array
% containing the values of the output and rank. For example, if the first
% output has value Y with Yrank number of dimensions, then
% outputs{1} = struct('value',Y,'rank',Yrank);

% Extract the value and rank of X from the input struct. The dimensions
% are indexed in PyTorch order.
Xval = inputs{1}.value;
Xrank = inputs{1}.rank;

% Softplus function
Yval = log(1+exp(Xval));

% Mish function
Yval = Xval .* tanh(Yval);

% Determine rank and dimension format of the output.
Yrank = Xrank;
Yfmt = repmat('U',1,Yrank);

% Convert the output to a dlarray.
Yval = dlarray(Yval, Yfmt);

% Return a struct containing 'value' and 'rank' fields.
outputs{1} = struct('value',Yval,'rank',Yrank);


%% Do Not Edit - Code Generated by PyTorch Importer
% This code permutes the dimensions of the outputs back into reverse-PyTorch
% ordering.
varargout = cell(1,nargout);
[varargout{:}] = permutePyTorchToReversePyTorch(outputs{:});
end
Check Network
To check that your network is complete, click Analyze. Network Analyzer reports zero errors.
