Requirements Settings
You can manage your Requirements Management Interface (RMI) preferences in the Requirements
Settings dialog box. These settings are global and not associated with a particular model.
To open the Requirements Settings dialog box, in the Apps tab, click
Requirements Manager. In the Requirements Browser, set the
View drop-down to Links. Then, in the
Requirements tab, select Link Settings > Linking Options.
In this dialog box, you can select the:
Storage tab to set the default way in which the RMI stores requirements links in a model. For storage information, see Create and Store Links and Specify Requirements Link Storage for Models.
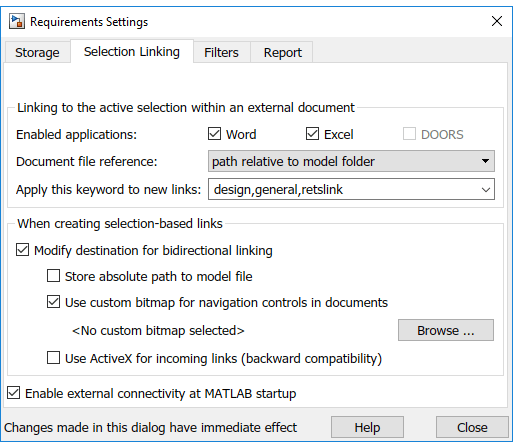
Selection Linking tab to set the options for linking to the active selection in a supported document. For setting information, see Selection Linking Tab.
Filters tab to set the options for filtering requirements in a model. For filtering information, see Configure Requirements Filtering.
Report tab to customize the requirements report without using the Report Generator. For setting information, see Customize Requirements Report Using Requirements Toolbox Settings.
Selection Linking Tab
In the Requirements Settings dialog box, on the Selection Linking tab, use the following options for linking to the active selection in a supported document.
| Options | Description |
|---|---|
| For linking to the active selection within an external document: | |
| Enabled applications | Enable selection-based linking shortcuts to Microsoft® Word, Excel®, or DOORS® applications. |
| Document file reference | Select type of file reference. For information on what settings to use, see Document Path Storage. |
| Apply this keyword to new links | Enter text to attach to the links you create. For more information about user keywords, see Filter Requirements with User Keywords. |
| When creating selection-based links: | |
| Modify destination for bidirectional linking | Creates links both to and from selected link destination. |
| Store absolute path to model file | Select to store the absolute path to the Simulink® model file. |
| Use custom bitmap for navigation controls in documents | Select and browse for your bitmap. You can use your own bitmap file to control the appearance of navigation links in your document. |
| Use ActiveX® buttons in Word and Excel (backward compatibility) | Select to use legacy ActiveX controls to create links in Microsoft Word and Excel applications. By default, if not selected, you create URL-based links. |
Filter Requirements with User Keywords
User Keywords and Requirements Filtering
User keywords are user-defined keywords that you associate with specific requirements. With user keywords, you can highlight a model or generate a requirements report for a model in the following ways:
Highlight or report only those requirements that have a specific user keyword.
Highlight or report only those requirements that have one of several user keywords.
Do not highlight and report requirements that have a specific user keyword.
Apply a User Keyword to a Requirement
To apply one or more user keywords to a newly created requirement:
Open the example model:
openExample("slvnvdemo_fuelsys_officereq.slx")Open the fuel rate controller subsystem.
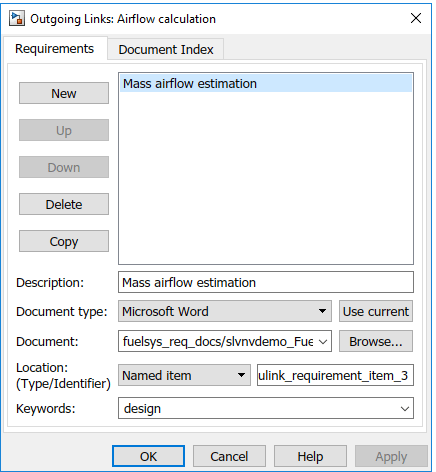
To open the requirements document, right-click the Airflow calculation subsystem and select Requirements > Open Outgoing Links dialog.
The Requirements Traceability Link Editor opens with the details about the requirement that you created.

In the Keywords field, enter one or more keywords, separated by commas, that the RMI can use to filter requirements. In this example, after
design, enter a comma, followed by the user keywordtestto specify a second user keyword for this requirement.User keywords:
Are not case sensitive.
Can consist of multiple words. For example, if you enter
design requirement, the entire phrase constitutes the user keyword. Separate user keywords with commas.
Click Apply or OK to save the changes.
Filter, Highlight, and Report with User Keywords
The slvnvdemo_fuelsys_officereq model includes several
requirements with the user keyword design. This section describes
how to highlight only those model objects that have the user keyword,
test.
Remove highlighting from the
slvnvdemo_fuelsys_officereqmodel. Open the Requirements Perspective. In the Apps tab, click Requirements Manager. In the Requirements Browser, in the View drop-down menu, selectLinks. Then, in the Requirements tab, click Highlight Links.Select Link Settings > Linking Options.
In the Requirements Settings dialog box, click the Filters tab.

To enable filtering with user keywords, click the Filter links by user keywords when highlighting and reporting requirements option.
To include only those requirements that have the user keyword,
test, entertestin the Include links with any of these keywords field.Click Close.
In the Requirements tab, click Highlight Links.
The RMI highlights only those model objects whose requirements have the user keyword
test, for example, the MAP sensor.Reopen the Requirements Settings dialog box to the Filters tab.
In the Include links with any of these keywords field, delete
test. In the Exclude links with any of these keywords field, addtest.In the model, the highlighting changes to exclude objects whose requirements have the
testuser keyword. The MAP sensor and Test inputs blocks are no longer highlighted.In the Requirements tab, select Share > Generate Model Traceability Report.
The report does not include information about objects whose requirements have the
testuser keyword.
Apply User Keywords During Selection-Based Linking
When creating a succession of requirements links, you can apply the same user keywords to all links automatically. This capability, also known as selection-based linking, is available only when you are creating links to selected objects in the requirements documents.
When creating selection-based links, specify one or more user keywords to apply to requirements:
In the Requirements tab, click Link Settings > Linking Options.
In the Apply this keyword to new links field of the Selection Linking tab, enter one or more user keywords, separated by commas.

The RMI applies these user keywords to all new selection-based requirements links that you create.
Click Close to close the Requirements Settings dialog box.
In a requirements document, select the specific requirement text.
Right-click a model object and select Requirements.
The selection-based linking options specify which user keywords the RMI applies to the link that you create. In the following example, you can apply the user keywords
design,general, andreqtslinkto the link that you create to your selected text.
Configure Requirements Filtering
In the Requirements Settings dialog box, in the Filters tab, use the following options for filtering requirements in a model.
| Option | Description |
|---|---|
| Filter links by keyword when highlighting and reporting requirements | Enables filtering for highlighting and reporting, based on specified user keywords. |
| Include links with any of these keywords | Includes information about requirements that have the specified user keywords. Separate multiple user keywords with commas. |
| Exclude links with any of these keywords | Excludes information about requirements that have the specified user keywords. Separate multiple user keywords with commas or spaces. |
| Apply same filters to link labels | Disables link labels in context menus if one of the specified filters are satisfied, for example, if a requirement has a designated user keyword. |
| Apply same filters in consistency checking | Includes or excludes requirements with specified user keywords when running a consistency check between a model and its associated requirements documents. |
| Under Link type filters, Disable synchronization item links in context menus | Disables links to DOORS surrogate items from the context menus when you right-click a model object. This option does not depend on current user keyword filters. |