Explore Project Tools with Airframe Project
MATLAB® Projects help you:
Manage your design, data, source code for S-functions, and files such as model, library,
.m, and.matfiles.Set up and tear down environment, including managing the search path, running setup code, opening and simulating models, and running shutdown code.
Work with files under source control.
Download Example Project
Try this example project to see how the MATLAB Project tools can help you organize your work.
To download and open the project under Git™ source control, run
openExample('simulink/AirframeProjectExample')in MATLAB.To download and open the project under SVN source control, run
openExample('simulink/UsingAProjectWithSVNExample')in MATLAB.
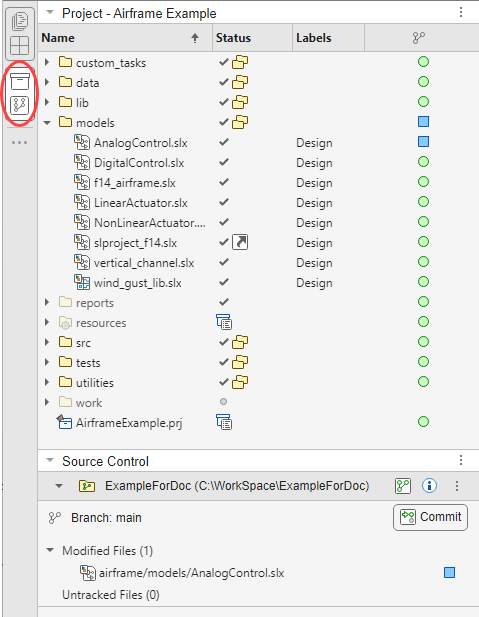
The Project panel opens and loads the Airframe project. The project is configured to run some startup tasks, including starting Simulink® and changing the current working folder to the project root folder.
Using this example project, you can:
Explore the project hierarchy and browse example project files under source control.
Examine project shortcuts to access frequently used files and tasks.
Analyze dependencies in the example project and locate required files that are not yet in the project.
Modify project files, find and review modified files, compare to a previous version of the file, and commit modified files to source control.
View and Find Project Files
The Project panel shows all the files inside the project root folder. To view only the files
that have the status In project, right-click the white space and select Filter > Show Only Files In Project. To view only the files that have the status Not in
project, select Show Only Files Not In Project
instead.
In the Airframe project, to view only project files that have a certain label such as
Test, right-click the white space and select Filter > Filter By Label > Classification > Test.
To clear a filter, right-click the white space and select Filter > Clear Filter. Alternatively, click the filter ![]() that appears at the top of the Project panel.
that appears at the top of the Project panel.
To find files in large projects, use the Find Files panel. For more information, see Find Project Files.
Open and Run Frequently Used Files
You can use shortcuts to make scripts and models easier to find in a large project. You
can run, manage and organize shortcuts from the Shortcuts gallery in
the Project toolstrip. In this example, the top-level model
slproject_f14.slx and the script that regenerates S-functions is set as
a shortcut so that a new user of the project can easily find it.
To open the top model, click the shortcut F14 Model.
To regenerate the S-functions, click the shortcut Rebuild Project's S-functions.
The shortcut file builds a MEX file. If you do not have a compiler set up, follow the instructions to choose a compiler.
Open the
rebuild_s_functions.mfile to explore how it works.To create new shortcuts for accessing frequently used files, in the Project panel, right-click a file, and select Create Shortcut.
You can also specify files to run at startup and shutdown. For more information, see Automate Startup and Shutdown Tasks.
Review Changes in Modified Files
For easier interaction with projects under source control, group the Project and Source
Control panels by dragging one panel icon next to another. If the Source Control icon is not
in the sidebar, click the Open more panels button ![]() and add it.
and add it.
To modify files and review the changes, follow these steps:
In the Project panel, expand a folder and double-click a file to open it.
Make a change in the Editor and save the file.
In the Source Control panel, the Modified Files section lists all modified files, including changes in the
resourcesfolder. The files stored in theresourcesfolder are internal project definition files generated by your changes. The project definition files allow you to add metadata to files, for example, by creating shortcuts, adding labels, and adding a project description. Project definition files also define the files that are added to your project. You can review changes in revisions of project definition files like any other project files. For more information about project definition files, see Project Definition Files.To review changes, in the Source Control panel, right-click the modified file and select View Changes.
The MATLAB Comparison Tool opens a report comparing the modified version of the file against its previous version stored in the version control tool. The comparison report type can differ depending on the file you select.
Run Dependency Analysis
To check that all required files are in the project, run a file dependency analysis on the modified files in your project.
On the Project tab, click the down arrow to expand the Tools gallery. Under Apps, click Dependency Analyzer.
The dependency graph displays the structure of all analyzed dependencies in the project. The Properties pane lists required products, add-ons, and any problem files.

To highlight the problem files, in the Properties pane, in the Problems section, point to the message File not in project and click the magnifying glass icon
 .
.Select the dependency arrow to examine the dependency type.
timesthree.mexw64is an S-function binary file required byf14_airframe.slx. You can add binary files to your project or, as in this project, provide a utility script that regenerates binary files from the project source code.
To remove the file from the problem files list, right-click the file and select Hide Warnings. The next time you run a dependency analysis, the file does not appear as a problem file.

In this example, you do not want to add the binary file to the project. Instead, use the script to regenerate the binary file from the project source code. Use Hide Warnings to stop such files being marked as problems.
View dependencies of the modified files.
In the Dependency Analyzer toolstrip, in the Views section, click Source Control. The color of each file in the graph now represents its source control status.
In the dependency graph, select the modified files. To select multiple files, press Shift and click the files.
In the Dependency Analyzer toolstrip, in the Impact Analysis section, click All Dependencies.
Run Project Integrity Checks
To make sure that your changes are ready to commit, check your project. To run the project integrity checks, in the Environment section, click Project Issues. In the Project Issues panel, in the Checks tab, click Run Checks.
The checks look for missing files, files to add to or retrieve from source control, and other issues. When possible, the checks provide automatic fixes. For more information, see Run Project Checks.
Commit Modified Files
After you modify files and you are satisfied with the results of the checks, you can commit your changes to the source control repository.
In the Source Control panel, click Commit.
Enter a commit message, and click Commit.
Watch the messages in the status bar as the source control commits your changes. Git commits to your local repository.
To send the changes to a remote repository, use Push from the More source control options button
 .
.
View Project and Source Control Information
To view and edit project details, on the Project tab, in the
Environment section, click Settings. View and
edit details such as the name, description, project root, startup folder, and generated
files folders such as the slprj folder.
To view details about the source control integration and repository location, in the Project panel, right-click the white space and select Source Control > View Details.
Alternatively, you can get all the project details and manipulate the project at the
command line using the currentProject
function.
Tip
Projects have dedicated tools to help you:
Upgrade all models in the project to a new release. For more information, see Check for Compatibility Issues and Upgrade Simulink Models Using Project Upgrade.
Use automatic updates to find and fix files impacted by renaming, deleting, or moving files and folders. For more information, see Automatic Updates When Renaming, Deleting, or Removing Project Files.