이 페이지는 기계 번역을 사용하여 번역되었습니다. 영어 원문을 보려면 여기를 클릭하십시오.
Visual Studio Code에서 Polyspace as You Code 구성
첫 번째 분석을 시작하기 전에 Polyspace as You Code 확장을 구성하세요. 확장을 구성하면 워크스테이션 및 분석 기본 설정을 사용자 정의할 수 있습니다. 설정은 세션 간에 유지됩니다.
이 튜토리얼에서는 다음을 수행합니다.
빌드를 수동으로 구성합니다.
자동 품질 모니터링을 설정합니다.
저장 시 분석을 설정합니다.
Polyspace 체커(검사 항목)를 구성합니다.
헤더 파일을 분석합니다.
분석 스크립트를 설정합니다.
Visual Studio Code에서 파일을 엽니다. Visual Studio Code 사이드바에 표시된 Polyspace® 아이콘 ![]() 을 클릭하여 Polyspace 확장 프로그램 사이드바를 엽니다. 사이드바에는 Quality Monitoring, Configuration 및 Baseline와 같이 이 가이드에서 참조되는 다양한 창이 포함되어 있습니다.
을 클릭하여 Polyspace 확장 프로그램 사이드바를 엽니다. 사이드바에는 Quality Monitoring, Configuration 및 Baseline와 같이 이 가이드에서 참조되는 다양한 창이 포함되어 있습니다.
수동으로 빌드 구성
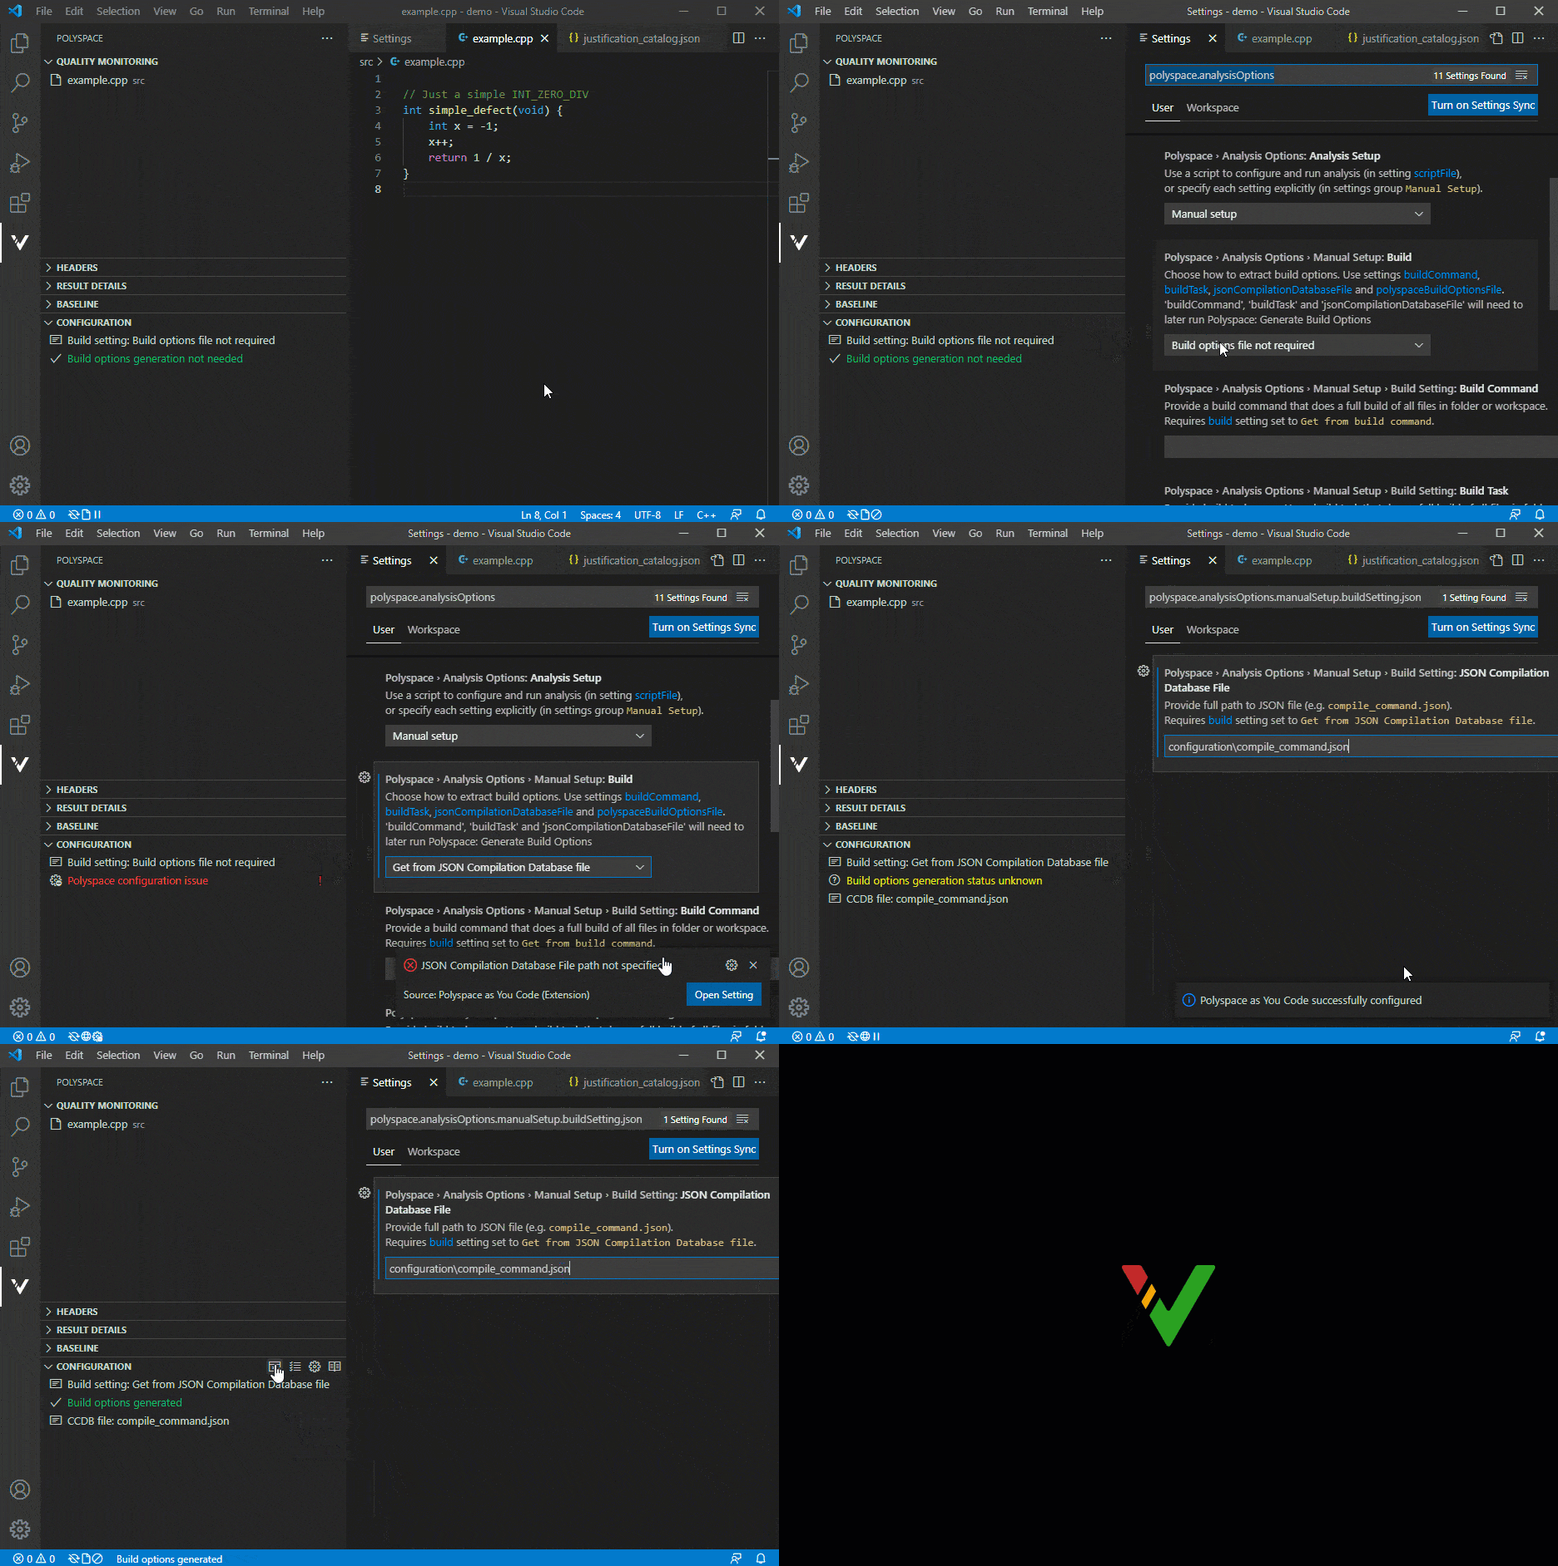
빌드를 수동으로 구성할 수 있는 옵션이 있습니다. 분석을 수동으로 설정하려면 빌드 옵션을 지정해야 합니다. Visual Studio Code 빌드 작업이나 JSON 컴파일 데이터베이스 파일에서 빌드 옵션을 추출하거나 빌드 옵션 파일에서 지정할 수 있습니다.
이 자습서에서는 빌드 옵션을 수동으로 설정하지 않습니다.
Polyspace 사이드바의 Configuration 창에서 설정 아이콘  을 클릭하거나 Settings로 이동하세요. 다양한 빌드 옵션을 보려면
 polyspace.analysisOptions를 검색하세요. Manual Setup: Build 설정을 사용하면 옵션 파일을 제공하는 방법을 선택할 수 있습니다. 동일한 파일 유형의 Manual Setup: Build 옵션을 사용하여 옵션 파일의 경로를 제공합니다.
빌드 옵션에 대한 자세한 내용은 분석 설정 구성를 참조하세요.
자동 품질 모니터링 설정
Polyspace에는 편집된 파일을 추적하는 Quality Monitoring 목록이 있습니다. Polyspace는 Quality Monitoring 목록에 나열된 모든 파일을 동시에 분석할 수 있습니다. Polyspace가 Quality Monitoring 목록에 파일을 자동으로 추가하도록 하거나, 수동으로 파일을 추가할 수 있습니다.
polyspace.analysisOptions.addToQualityMonitoringOnSave 설정이 활성화되어 있으면 Polyspace는 파일을 저장할 때 해당 파일을 Quality Monitoring 목록에 자동으로 추가합니다. 파일 편집기 내부를 마우스 오른쪽 버튼으로 클릭하고 Add file to the Polyspace Quality Monitoring list 를 선택하여 목록에 파일을 수동으로 추가할 수 있습니다.
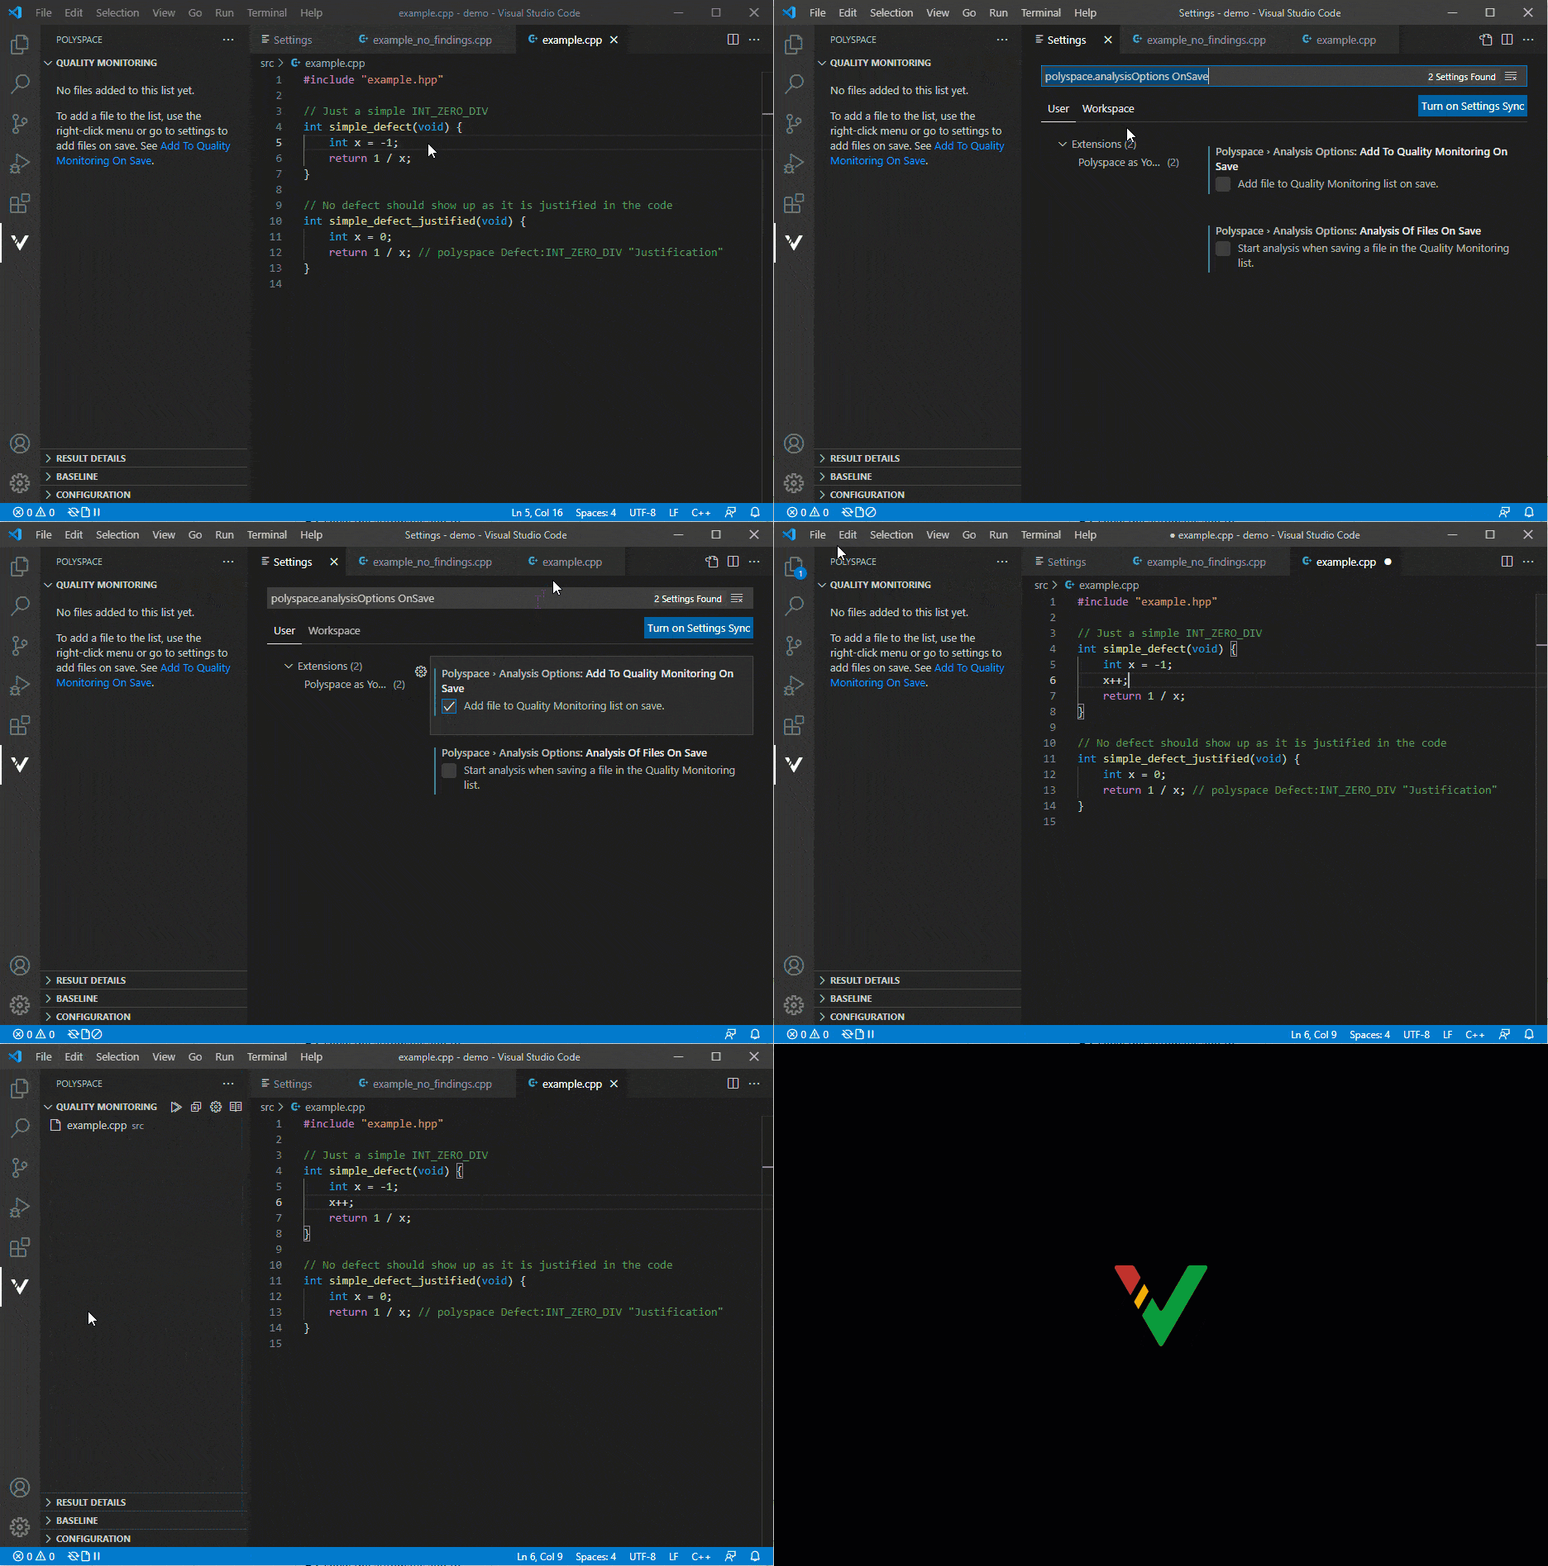
자동 품질 모니터링을 켭니다. Polyspace 사이드바  의 Quality Monitoring 창에서 설정 아이콘을 클릭하고 Add To Quality Monitoring On Save 확인란을 선택합니다. 또는 Settings 탭을 열고
 polyspace.analysisOptions.addToQualityMonitoringOnSave 옵션을 검색하세요. 설정을 활성화하려면 확인란을 선택하세요.
저장 시 분석 설정
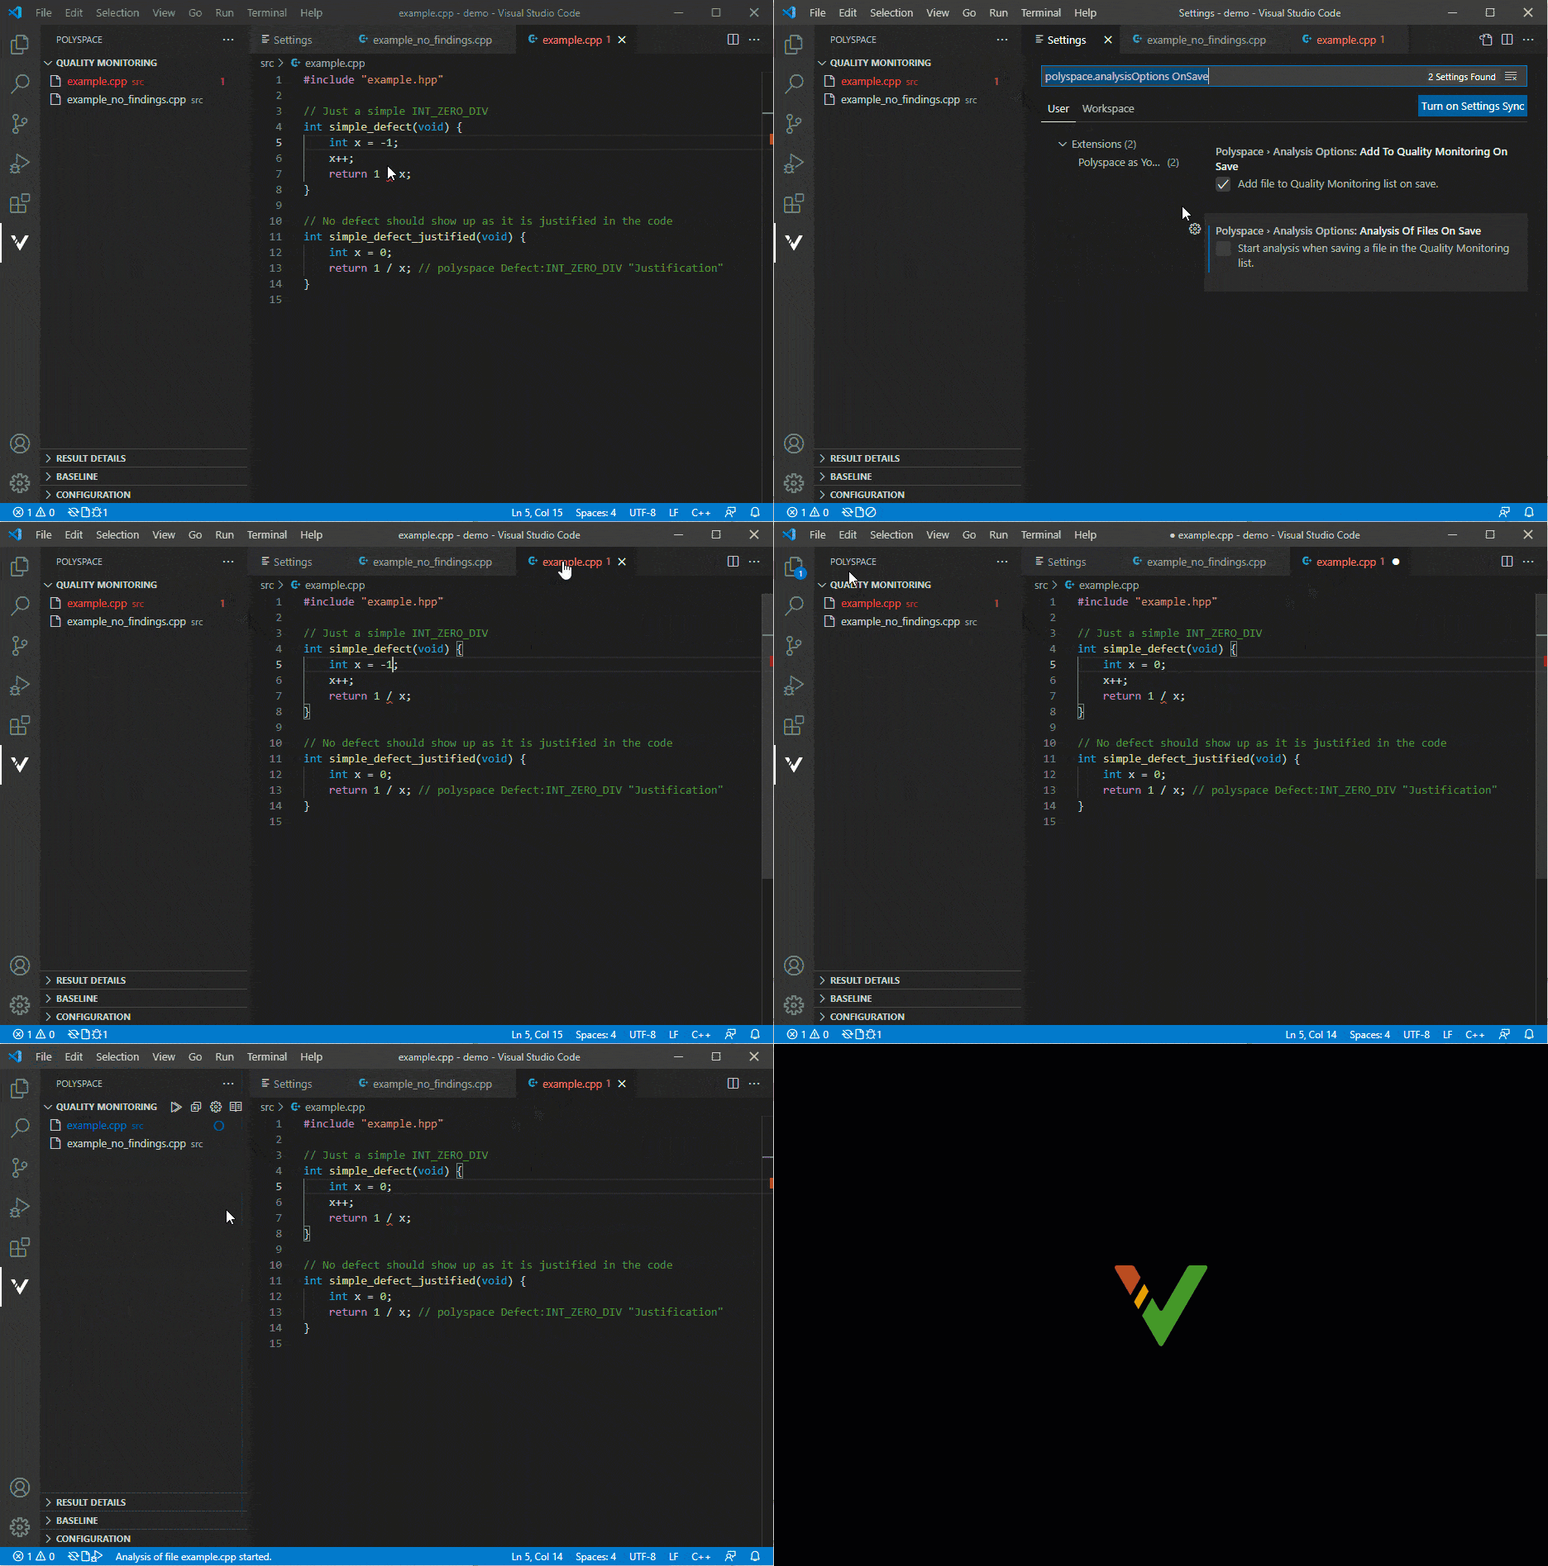
품질 모니터링과 마찬가지로 Polyspace는 파일이 저장될 때 Quality Monitoring 목록에 있는 모든 파일에 대한 분석을 자동으로 실행할 수 있습니다. 또는 개별 파일이나 파일 그룹에 대한 분석을 수동으로 실행할 수 있습니다. Quality Monitoring 목록의 파일 옆에 있는 Run Polyspace Analysis 아이콘 ![]() 을 클릭하거나 파일 편집기 내부를 마우스 오른쪽 버튼으로 클릭하고 Run Polyspace Analysis를 선택하여 분석을 수동으로 트리거합니다.
을 클릭하거나 파일 편집기 내부를 마우스 오른쪽 버튼으로 클릭하고 Run Polyspace Analysis를 선택하여 분석을 수동으로 트리거합니다.
파일 자동 분석을 켭니다. Polyspace 사이드바  의 Quality Monitoring 창에서 설정 아이콘을 클릭하고 Analysis Of Files On Save 확인란을 선택합니다. 또는 Settings 탭을 열고
 polyspace.analysisOptions.analysisOfFilesOnSave 옵션을 검색하세요. 설정을 활성화하려면 확인란을 선택하세요.
Polyspace 체커(검사 항목) 구성
Polyspace는 기본 결함 및 표준 세트를 확인합니다. 확인하려는 인증 표준에 따라 이 표준 및 결함 세트를 사용자 정의할 수 있습니다. 프로젝트에 대한 체커(검사 항목) XML 파일을 설정하려면 설정 옵션 polyspace.analysisOptions.manualSetup:checkersfile을 사용하십시오.
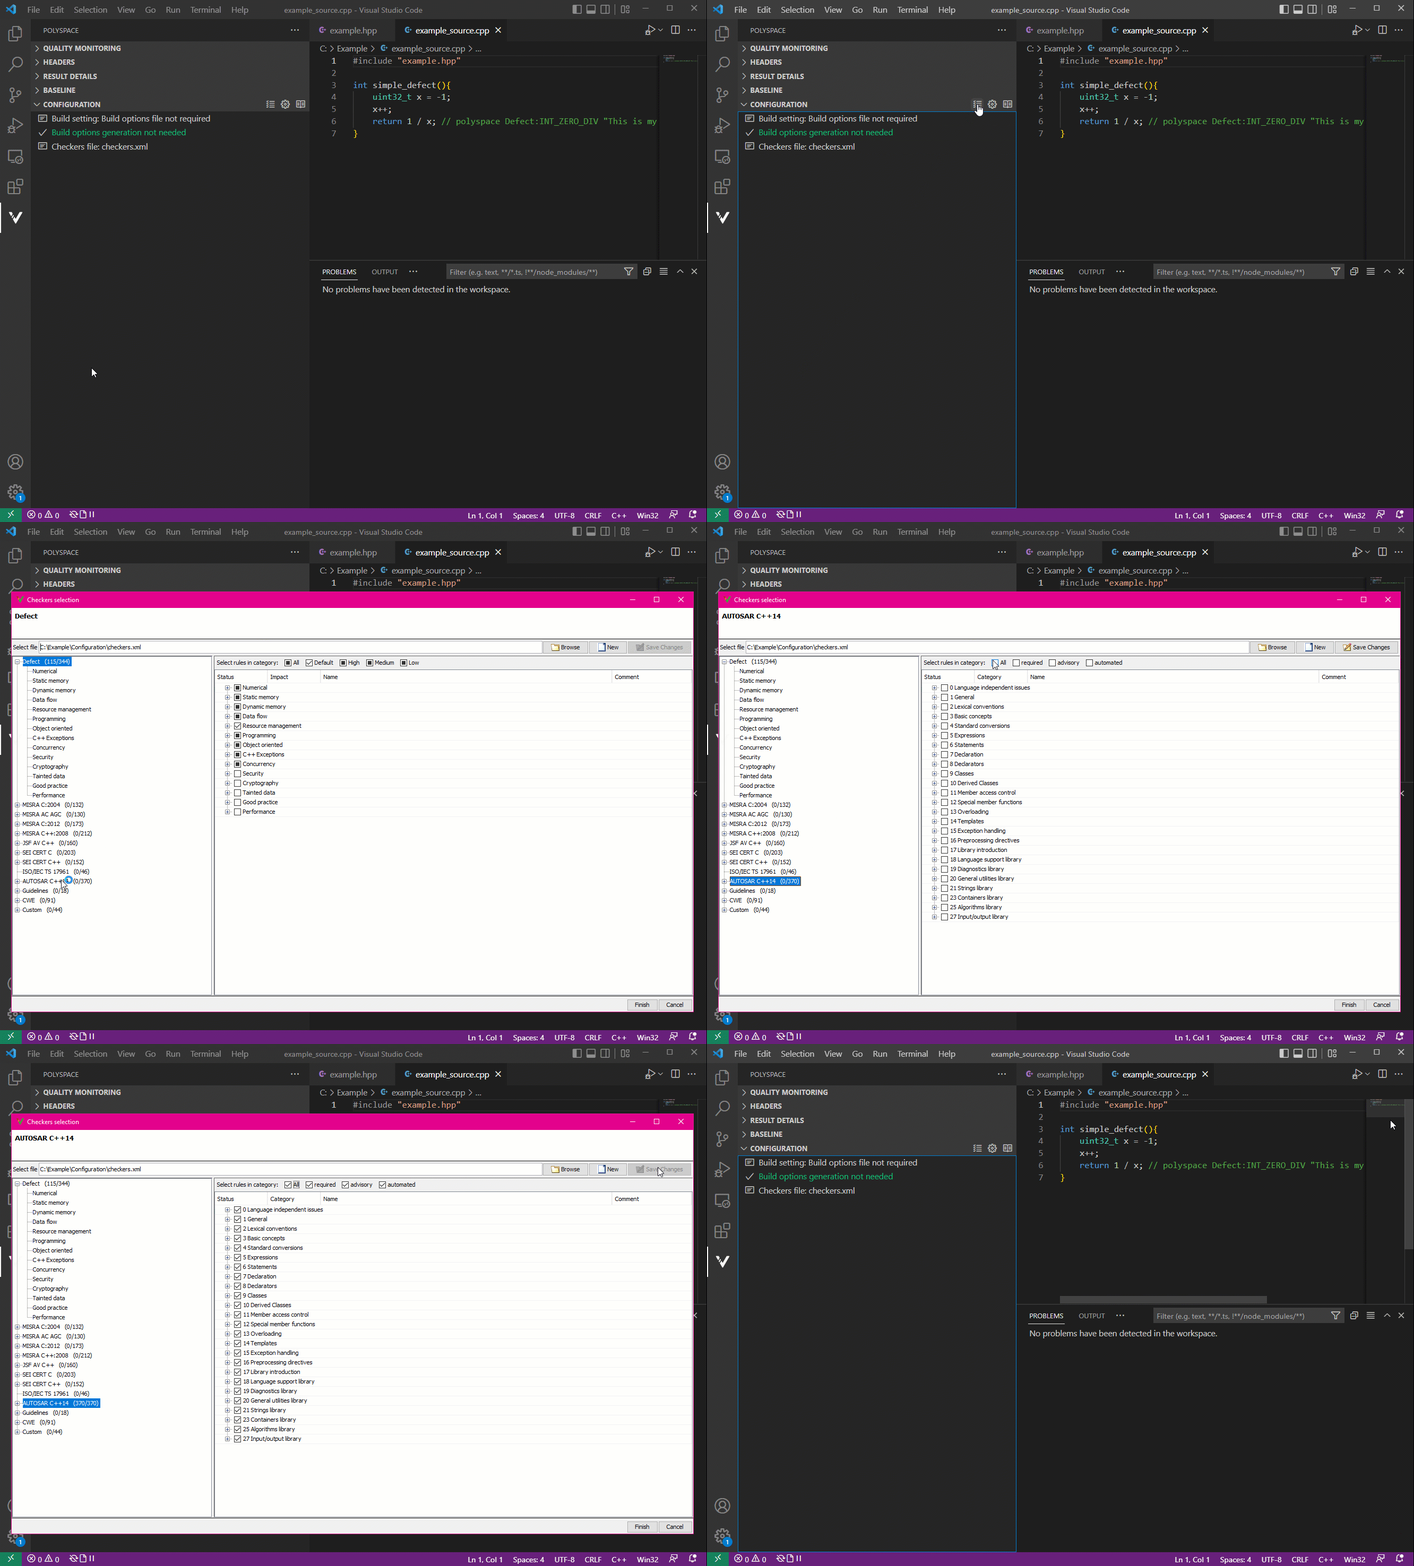
AUTOSAR C++14 체커(검사 항목)를 켭니다. Polyspace 사이드바의 Configuration 섹션에서 Configure Checkers 아이콘  을 클릭하여 Checkers Selection 창을 엽니다.
저장된 체커(검사 항목) 선택 파일을 생성, 저장 및 열 수 있습니다. 자세한 내용은 Visual Studio Code에서 Polyspace as You Code에 대한 체커(검사 항목) 구성 항목을 참조하십시오.
Checkers Selection 창의 왼쪽 창에서 AUTOSAR C++14를 클릭하세요. 오른쪽 창에서 All 확인란을 선택하여 모든 AUTOSAR C++14 규칙을 활성화합니다. 오른쪽 위 모서리에 있는 Save Changes를 클릭하여 체커(검사 항목) 선택 사항을 저장하고 창을 닫아 Visual Studio Code 애플리케이션으로 돌아갑니다.
헤더 파일 분석
헤더 파일이 소스 파일인 것처럼 분석을 실행할 수 있습니다.
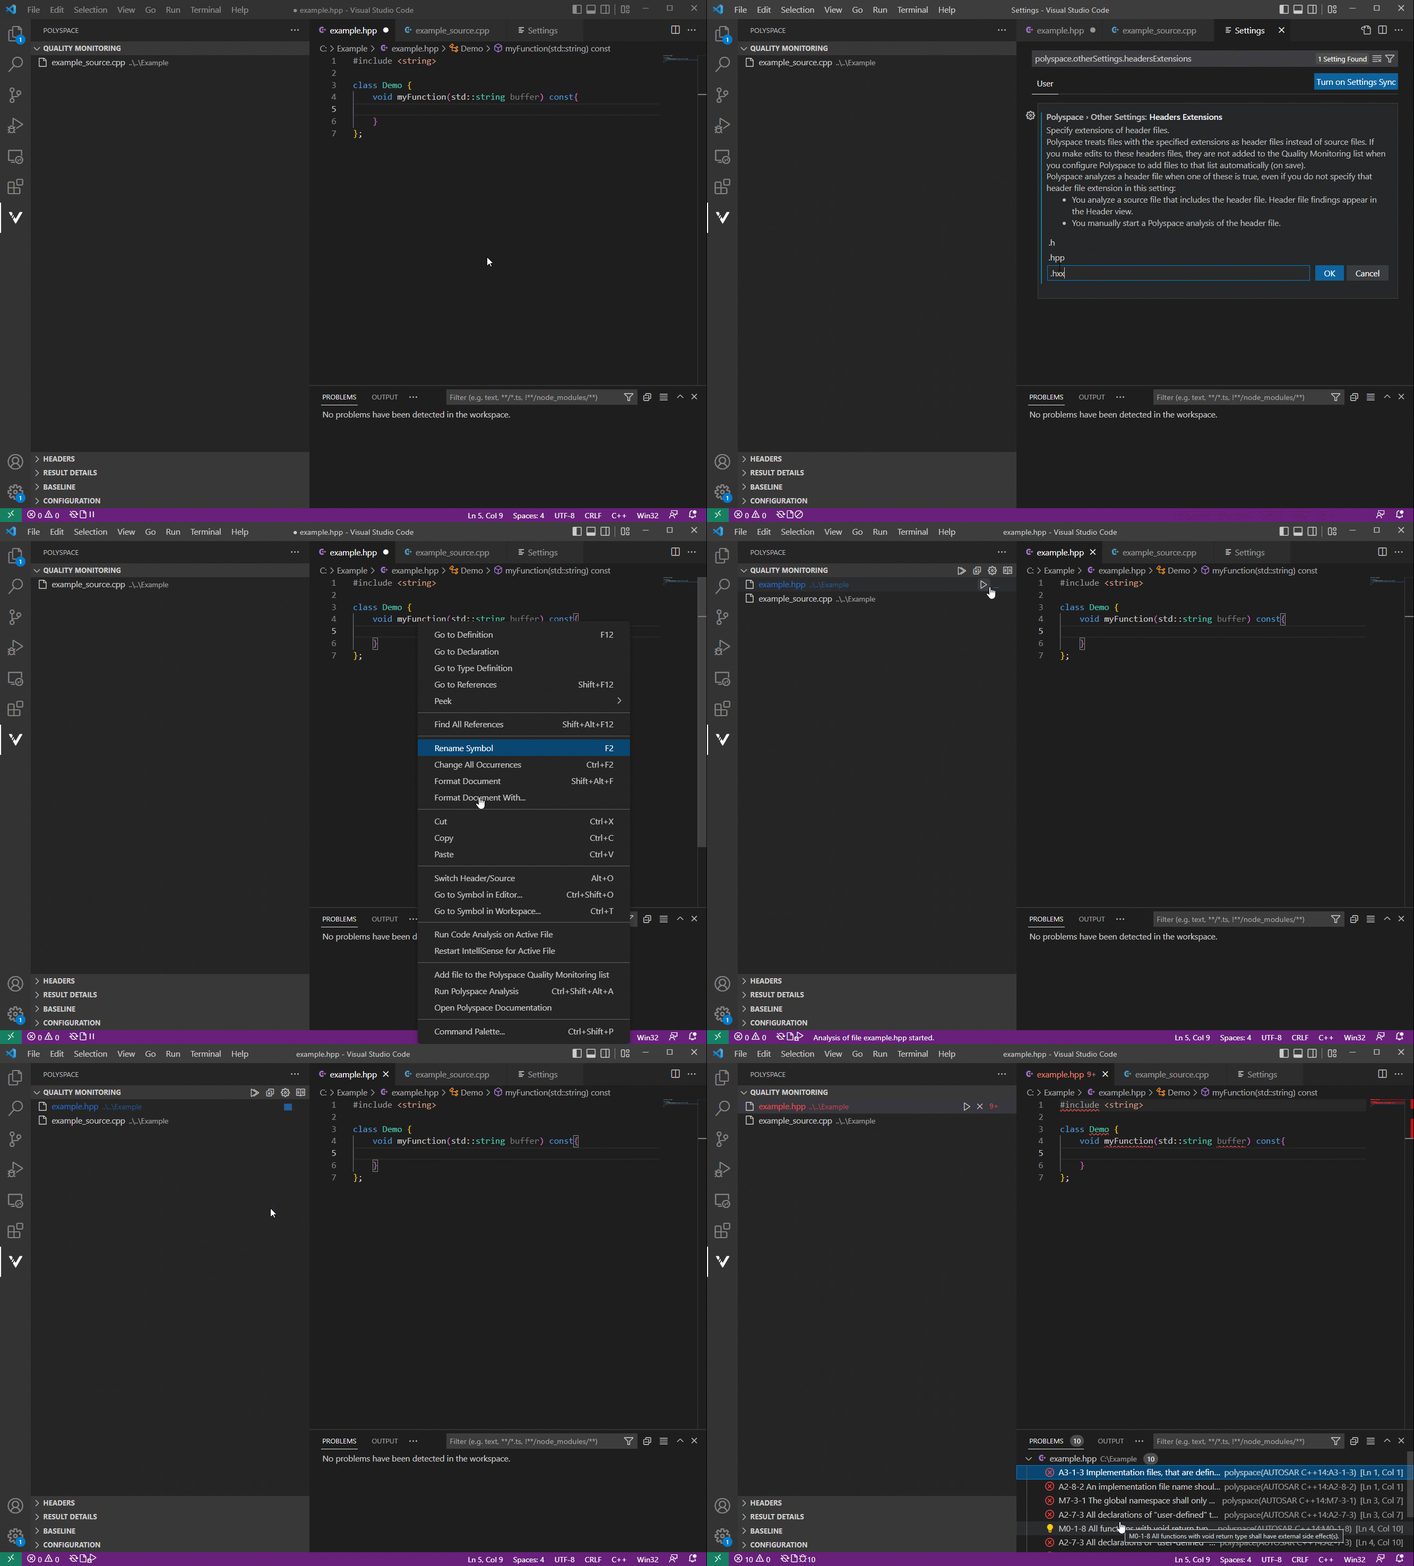
먼저 헤더 파일의 확장자를 정의합니다. Polyspace 사이드바  의 Headers 창에 있는 설정 아이콘을 클릭하세요. 또는 Settings 탭을 열고
 polyspace.otherSettings.headersExtensions 옵션을 검색하세요.
Add Item를 클릭하고 파일 확장자 .hpp가 아직 없으면 추가하세요. 목록에 파일 확장자를 저장하려면 OK를 클릭하세요.
example.hpp 헤더 파일을 Quality Monitoring 목록에 수동으로 추가하고 Run Polyspace Analysis 버튼 ![]() 을 클릭하여 분석을 시작합니다.
을 클릭하여 분석을 시작합니다.
현재 파일에 포함된 헤더가 분석되지 않음 항목을 참조하십시오.
분석 스크립트 설정
Polyspace as You Code에서 Polyspace 분석을 구성하고 실행하기 위한 스크립트를 제공할 수 있습니다.
이 튜토리얼에서는 스크립트를 설정하지 않습니다.
스크립트가 있는 경우 Settings 탭을 열고 polyspace.analysisOptions.script 옵션을 검색하세요.
Script File 설정 텍스트 상자에 스크립트 경로를 제공합니다. 목록을 사용하여 Analysis Setup 설정에 대해 Script를 켭니다.
Polyspace as You Code 확장을 구성하고 나면 분석을 실행하고 결과를 검토할 수 있습니다.

