앱에서 트리를 사용하여 데이터 표시하기
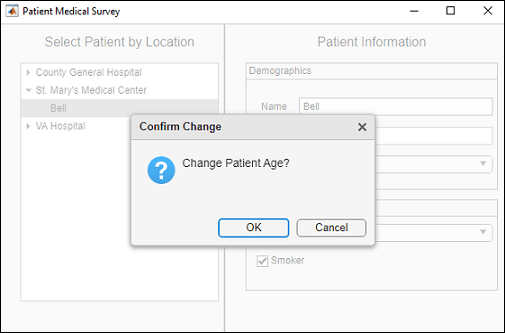
이 예제의 앱은 스프레드시트에서 환자 데이터를 가져와서 트리에 표시합니다. 트리는 병원과 환자의 계층 구조를 보여줍니다. 트리에서 환자 노드를 선택하면 환자 정보가 표시됩니다. 앱 사용자가 환자 데이터를 수정하면 앱은 사용자에게 변경 사항을 확인하도록 한 다음 저장된 데이터를 업데이트합니다.
이 예제에서는 다음과 같은 앱 작성 작업을 수행하는 방법을 보여줍니다.
데이터를 불러와서 저장합니다.
트리를 사용하여 데이터를 구성합니다.
확인 대화 상자를 만듭니다.

데이터를 불러오고 저장하기
데이터를 트리에 표시하려면 먼저 환자 데이터를 저장하는 프라이빗 속성 Data를 생성합니다. startupFcn 콜백에서 스프레드시트 데이터를 테이블로 불러옵니다. 그런 다음 앱 코드의 다른 부분에서 액세스할 수 있도록 Data 속성에 환자 데이터를 저장합니다.
t = readtable("patients.xls");
app.Data = t;
트리를 사용하여 데이터를 구성하고 표시하기
저장된 데이터를 표시하려면 노드가 있는 트리를 만듭니다. 이 섹션에서는 노드가 수동으로 생성되는지 아니면 저장된 데이터에서 동적으로 생성되는지에 따라 노드를 트리 컴포넌트에 추가하는 두 가지 방법을 설명합니다.
디자인 보기에서 대화형 방식으로 노드를 만듭니다.
콜백 함수에서 프로그래밍 방식으로 노드를 만듭니다.
디자인 보기에서 트리 컴포넌트를 앱 캔버스로 끌어서 놓습니다. 트리에 더 많은 노드를 추가하려면 노드 중 하나를 선택하고 트리 왼쪽에 나타나는 플러스 버튼을 누릅니다. 이 방법을 사용하여 세 개의 병원 노드를 만듭니다.
사용자 상호 작용이나 저장된 데이터에 종속되어 있는 노드에 대해 런타임 시 startupFcn 코드에 트리 노드를 동적으로 추가할 수도 있습니다. 예를 들어, 앱을 실행하면 앱 startupFcn의 코드는 저장된 환자 데이터를 기반으로 각 병원 노드 아래에 자식 노드를 추가합니다. 같은 병원의 모든 환자를 쿼리하고 해당 부모 노드 아래에 환자 노드를 만듭니다. 예를 들어, CountyGeneralHospital 트리 노드 아래에 이 병원의 환자에 대한 모든 자식 노드를 추가합니다.
uitreenode(app.CountyGeneralHospitalNode,"Text",lastname);
대화 상자를 사용하여 사용자 편집 내용 확인하기
테이블 데이터에 대한 사용자 편집 내용을 확인하려면 uiconfirm을 사용하여 확인 대화 상자를 만듭니다. 예를 들어, AgeEditFieldValueChanged 콜백 함수에서 데이터 변경 여부를 확인하고 변경이 확인되면 저장된 데이터를 업데이트합니다.
confirm = uiconfirm(app.PatientsMedicalSurveyUIFigure,"Change Patient Age?","Confirm Change");
patientName = app.Tree.SelectedNodes.Text;
if strcmp(confirm,'OK')
     app.Data.Age(patientName) = app.AgeEditField.Value;
% Otherwise, revert change
else
     app.AgeEditField.Value = app.Data.Age(patientName);
end
Age 편집 필드를 변경하려고 하면 확인 대화 상자가 나타납니다.

참고 항목
함수
uitree|uitreenode|uiconfirm|readtable