Install MATLAB Parallel Server for Slurm
If you have a cluster with Slurm, follow these instructions to integrate MATLAB® with your scheduler using MATLAB Parallel Server™. If you do not have an existing scheduler in your cluster, see: Install for MATLAB Job Scheduler with Network License Manager.
These instructions guide you through the following tasks:
After you integrate MATLAB with Slurm, you can access workers in your cluster from a desktop MATLAB client session with Parallel Computing Toolbox™. Workers are MATLAB computational engines that typically correspond to a core.
The setup in these steps uses the network license manager.
Activate Your MATLAB Parallel Server License
To install MATLAB Parallel Server, you must activate your license. To activate your MATLAB Parallel Server license:
Navigate to https://www.mathworks.com/licensecenter.
Log into the Administrator’s MathWorks Account.
Select your MATLAB Parallel Server license, and click the Install and Activate tab.
At the rightmost side, under RELATED TASKS, select Activate to Retrieve License File.
Fill in the requested information. This information must refer to the machine that hosts the license manager. In these instructions, it is the head node. For more information, see Install License Manager.
After filling in the information, download or email the License File and copy the File Installation Key. These are used later in the process.
Note
Activation is not necessary for trials. Contact your sales representative to obtain the License File and the File Installation Key.
Get the Installation Files
To save time and eliminate the need for the installer-based download process for each computer in your cluster, download the installation files prior to installation. Doing so facilitates installation in a large number of machines. If you have access to an Administrator’s account for your license, you can use the installer to download files without installing them. If not, contact the administrator of your license to obtain a copy of the installation files. For more information, see Download Products Without Installing. When using the installer to download the files, choose the following options:
Select the appropriate operating system for the cluster nodes.
Select all products for download. MATLAB Parallel Server cannot run jobs requiring products that are not installed.
There are three server-side components of MATLAB Parallel Server:
The license manager, which hosts the MATLAB Parallel Server license used by each worker. For more information, see Install License Manager.
Your third-party job scheduler, which runs on the head node and manages jobs on your cluster. You integrate this scheduler with MATLAB Parallel Server. For more information, see Install License Manager and Configure Your Cluster.
MATLAB Parallel Server, which runs on the compute nodes. For more information, see Install Software on Compute Nodes.

Install License Manager
Choose a computer node to host the license manager. For the installation, use the offline installer from the previous step. For more information on the offline installation procedure, see Install Products on Offline Computer.
Start the MATLAB installer from the installation files acquired in Get the Installation Files.
Select Advanced Options > I want to install network license manager.
In the License File step, browse to your
license.licfile (obtained from Activate Your MATLAB Parallel Server License).Continue through the prompts to complete the network manager installation. For more information about the procedure, see Install License Manager on License Server
Start the license manager.
Install Software on Compute Nodes
This procedure is similar to Install License Manager. For more information on the offline installation procedure, see Install Products on Offline Computer.
Start the MATLAB installer from the installation files acquired in Get the Installation Files.
Select Advanced Options > I have a File Installation Key and continue through the prompts.
Select all products. Alternatively, to save space, install only the products that the users of the cluster are licensed for.
Use the
license.datfile from the head node. You can obtain this file from thematlabroot/etcfolder, wherematlabrootis the MATLAB installation folder.
For best performance, install locally on each node. However, you can also install in a network share location.
Note
Install noninteractively (silently) instead if you want to
Install the software on a machine without graphical user interface (GUI).
Save the time that it takes to configure the installer for each compute node.
For more information, see Install Products Programmatically.
You can test the installation and licensing by running the following command in a
command-line interface. matlabroot is the MATLAB installation folder. filename is the
location to write the log file to, for example, a temporary location. You must have
write permissions in this
location.
matlabroot/toolbox/parallel/bin/checkLicensing -logfile filename
Note
You do not need to start the mjs service when you want to configure MATLAB Parallel Server for Slurm.
Install Software on Local Desktop
To use MATLAB Parallel Server, you must use a local desktop running MATLAB and Parallel Computing Toolbox. Install the MathWorks® products for which you are licensed, including Parallel Computing Toolbox, on the local desktops from which you want to submit jobs to the cluster. For help with this step, see Installation and Licensing.
Any MATLAB cluster workers that you start use dynamic licensing: they can use all the functionality you are licensed for in the MATLAB client, while checking out only MATLAB Parallel Server licenses in the cluster.
Configure Client Machine
This procedure verifies that the parallel computing products are installed and configured correctly on your cluster.
Create a Cluster Profile
In this step you create a cluster profile to use in subsequent steps.
Start the Cluster Profile Manager. On the Home tab, in the Environment area, select Parallel > Create and Manage Clusters.
Create a new profile in the Cluster Profile Manager by selecting Add Cluster Profile > Slurm.
With the new profile selected in the list, click Rename and edit the profile name to
InstallTest. Select Enter.In the Properties tab, provide values for the following fields:
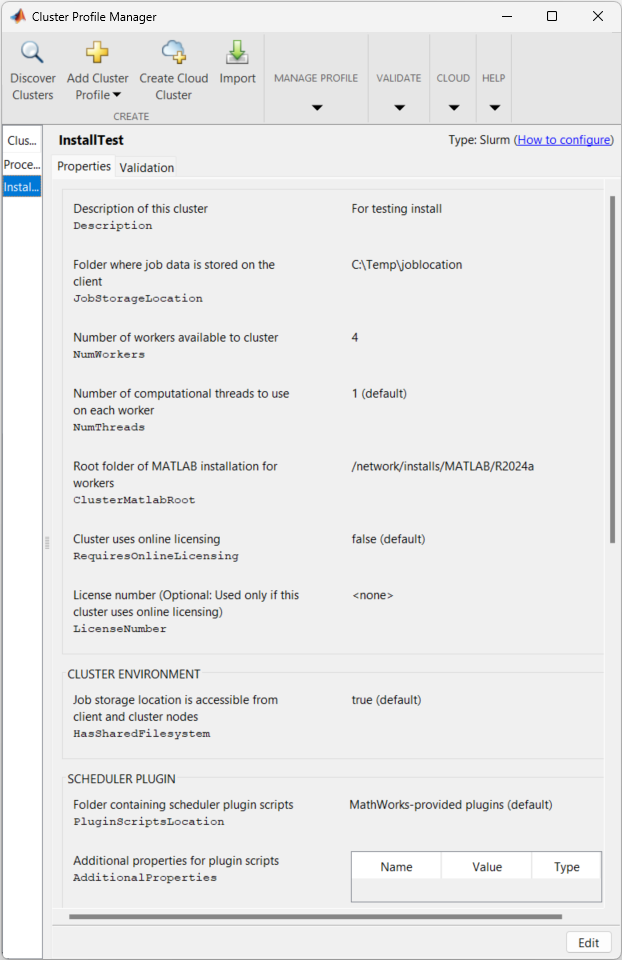
Set the Description field to
For testing installation.Set the JobStorageLocation field to the location where you want to store job and task data on the client machine, for example,
C:\Temp\joblocation. If this location is also accessible from nodes on the cluster, MATLAB workers can read and write to it directly. Otherwise, the client usessftpto copy job and task data files to and from the cluster.Note
You must not use the same job storage location for different versions of parallel computing products. Each version on your cluster must use its own job storage location.
Set the NumWorkers field to the number of workers you want to run the validation tests on, within the limitation of your licensing.
Set NumThreads to the number of threads to use on each worker.
Set the ClusterMatlabRoot to the location of the MATLAB installation to run on the worker machines.
If the cluster uses online licensing, set RequiresOnlineLicensing to true.
If you set RequiresOnlineLicensing to true, in the LicenseNumber field, enter your license number.
Set the HasSharedFilesystem field to indicate if the client and workers can share the same
JobStorageLocationproperty value.By default, your MATLAB installation comes with scheduler plugin scripts that are ready to use. You can leave the PluginScriptsLocation field to the default MathWorks-provided plugin scripts.
If you want to use customized plugin scripts in the cluster profile, you can specify the location of the customized plugin scripts in the PluginScriptsLocation field. To learn how to download and modify the default plugin scripts, see Download and Customize Plugin Scripts.
You can add additional properties to the AdditionalProperties table to customize how the client interacts with the cluster using built-in scheduler properties or custom scheduler properties. For a full list of built-in additional properties for each scheduler, see Customize Behavior of Sample Plugin Scripts.
For example, you can use these additional properties to connect and run jobs on a remote cluster.
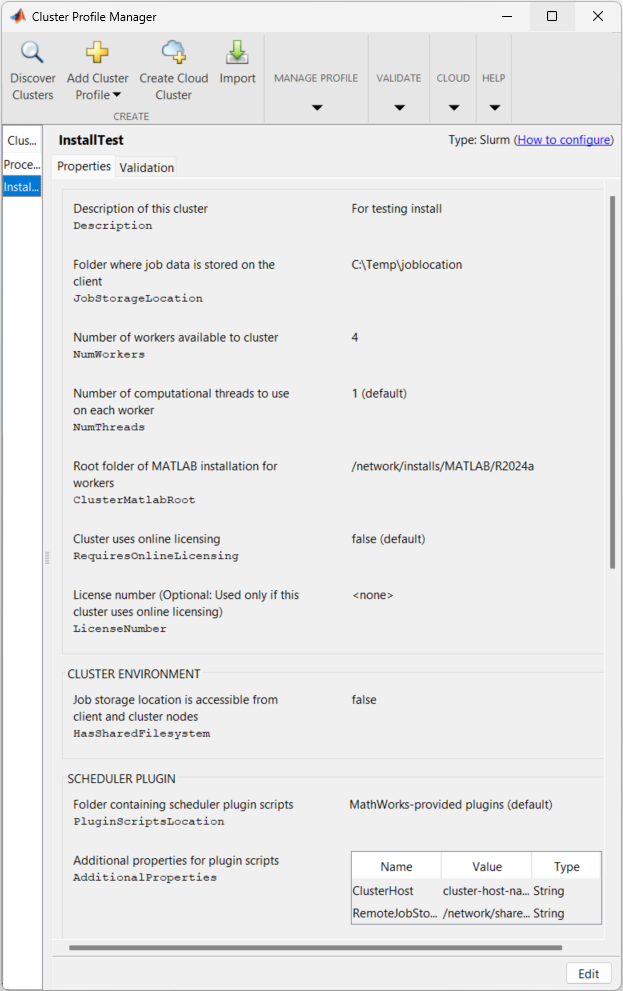
ClusterHostIf the client does not have access to scheduler utilities to directly submit jobs to the third-party scheduler, the plugin scripts create an
sshsession to the cluster and run scheduler commands over that connection. As MATLAB runs scheduler utilities such assbatchandsqueue, you must provide the hostname of the cluster headnode or login node. Under the AdditionalProperties table, select Add. Specify a new property with nameClusterHost. For the value, specify the hostname of the cluster headnode, for example,cluster-host-name. Set Type toString.RemoteJobStorageLocationIf the client and workers do not share the same job storage location, and you set HasSharedFilesystem to false, you must provide a job storage location that the headnode and cluster workers can access. The client copies job and task files between your computer and the remote job storage location on cluster using
sftp. Under the AdditionalProperties table, select Add. Specify a new property with nameRemoteJobStorageLocation. For the value, provide the path to a location that the cluster workers can store jobs and task data, for example/network/share/joblocation. Set Type toString.
Click Done to save your cluster profile. The completed cluster profile should look something like one of these figures.
Validate the Cluster Profile
In this step you verify your cluster profile, and thereby your installation. You
can specify the number of workers to use when validating your profile. If you do not
specify the number of workers in the Validation
tab, then the validation will attempt to use as many workers as the value specified
by the NumWorkers property on the Properties tab. You can specify a smaller number of workers to
validate your configuration without occupying the whole cluster.
If it is not already open, start the Cluster Profile Manager. On the Home tab, in the Environment area, select Parallel > Create and Manage Clusters.
Select your cluster profile in the listing.
Click the Validation tab.
Use the check boxes to choose all tests, or a subset of the validation stages, and specify the number of workers to use when validating your profile.
Click Validate.
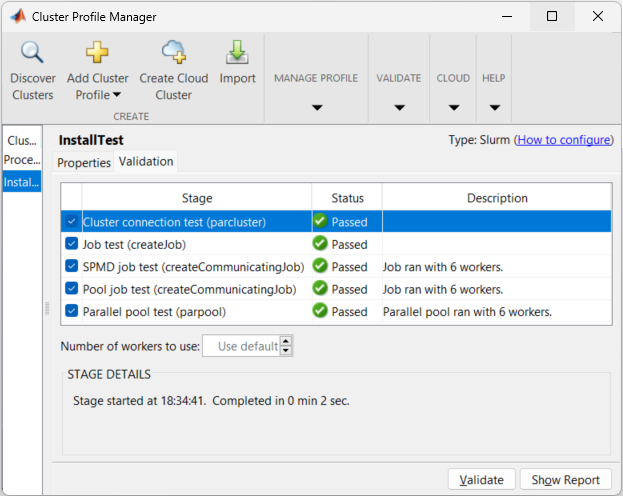
After the client completes the cluster validation, the Validation tab shows the output. The following figure shows the results of a profile that passed all validation tests.

Note
If your validation does not pass, contact the MathWorks install support team.
If your validation passed, you now have a valid profile that you can use in other
parallel applications. You can make any modifications to your profile appropriate
for your applications, such as NumWorkersRange,
AttachedFiles, AdditionalPaths, etc.
To save your profile for other users, select the profile and click Export, then save your profile to a file in a convenient location. Later, when running the Cluster Profile Manager, other users can import your profile by clicking Import.
You can enable MATLAB clients to locate your cluster using the Parallel Computing Toolbox "Discover Clusters" functionality by creating a configuration file and then distributing this file to cluster users. For more information, see Configure for Third-Party Scheduler Cluster Discovery.
Run Parallel Code
After you complete the configuration, you can submit jobs to the cluster. For examples, see Run Code on Clusters and Cloud Platforms.


