Verify HDL Module with Simulink Testbench
Tutorial Overview
This tutorial guides you through the basic steps for setting up an HDL Verifier™ session that uses Simulink® and the HDL Cosimulation block to verify an HDL model. The HDL Cosimulation block cosimulates a hardware component by applying input signals to and reading output signals from an HDL model under simulation in ModelSim™ or Questa™. The HDL Cosimulation block supports simulation of either VHDL® or Verilog® models.
Note
This tutorial is specific to Siemens® simulator users; however, much of the process will be the same for Xcelium™ users. For cosimulating with the Vivado® simulator, you must use the Cosimulation Wizard to generate the HDL Cosimulation block. For an example of this workflow, see Import HDL Code for HDL Cosimulation Block.
Develop VHDL Code
A typical Simulink and ModelSim scenario is to create a model for a specific hardware component in ModelSim that you later need to integrate into a larger Simulink model. The first step is to design and develop a VHDL model in ModelSim. In this tutorial, you use ModelSim and VHDL to develop a model that represents the following inverter:

The VHDL entity for this model will represent 8-bit streams of input and output signal
values with an IN port and OUT port of type
STD_LOGIC_VECTOR. An input clock signal of type
STD_LOGIC will trigger the bit inversion process when set.
Perform the following steps:
Start ModelSim
Change to the writable folder
MyPlayArea, which you may have created for another tutorial. If you have not created the folder, create it now. The folder must be writable.ModelSim>cd C:/MyPlayArea
Open a new VHDL source edit window.
Add the following VHDL code:
---------------------------------------------------
--  Simulink and ModelSim Inverter Tutorial
--
--  Copyright 2003-2004 The MathWorks, Inc.
--
---------------------------------------------------
LIBRARY ieee;
USE ieee.std_logic_1164.ALL;
ENTITY inverter IS PORT (
  sin : IN  std_logic_vector(7 DOWNTO 0);
  sout: OUT std_logic_vector(7 DOWNTO 0);
  clk : IN  std_logic
);
END inverter;

LIBRARY ieee;
USE ieee.std_logic_1164.ALL;
ARCHITECTURE behavioral OF inverter IS
BEGIN
  PROCESS(clk)
  BEGIN
    IF (clk'EVENT AND clk = '1') THEN
      sout <= NOT sin;
    END IF;
  END PROCESS;
END behavioral;
Save the file to
inverter.vhd.
Compile VHDL Code
This section explains how to set up a design library and compile
inverter.vhd, as follows:
Verify that the file
inverter.vhdis in the current folder by entering thelscommand at the ModelSim command prompt.Create a design library to hold your compilation results. To create the library and required
_infofile, enter thevlibandvmapcommands as follows:ModelSim> vlib work ModelSim> vmap work work
If the design library work already exists, ModelSim does not overwrite the current library, but displays the following warning:
# ** Warning: (vlib-34) Library already exists at "work".
Note
You must use the ModelSim File menu or
vlibcommand to create the library folder so that the required_infofile is created. Do not create the library with operating system commands.Compile the VHDL file. One way of compiling the file is to click the file name in the project workspace and select Compile > Compile All. Another alternative is to specify the name of the VHDL file with the
vcomcommand, as follows:ModelSim> vcom inverter.vhd
If the compilations succeed, informational messages appear in the command window and the compiler populates the work library with the compilation results.

Create Simulink Model
Now create your Simulink model. For this tutorial, you create a simple Simulink model that drives input into a block representing the VHDL inverter you coded in Develop VHDL Code and displays the inverted output.
Start by creating a model, as follows:
Start MATLAB®, if it is not already running. Open a new model window. Then, open the Simulink Library Browser.
Drag the following blocks from the Simulink Library Browser to your model window:
Constant block from the Simulink Sources library
HDL Cosimulation block from the HDL Verifier block library
Display block from the Simulink Sinks library
Arrange the three blocks in the order shown in the following figure.

Next, configure the Constant block, which is the model's input source, by performing the following actions:
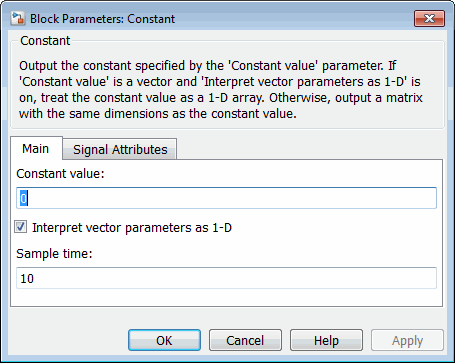
Double-click the Constant block icon to open the Constant block parameters dialog box. Enter the following parameter values in the Main pane:
Constant value:
0Sample time:
10
Later you can change these initial values to see the effect various sample times have on different simulation runs.
The dialog box should now appear as follows.
Click the Signal Attributes tab. The dialog box now displays the Output data type menu.
Select
uint8from the Output data type menu. This data type specification is supported by HDL Verifier software without the need for a type conversion. It maps directly to the VHDL type for the VHDL portsin,STD_LOGIC_VECTOR(7 DOWNTO 0).The dialog box should now appear as follows.

Click OK. The Constant block parameters dialog box closes and the value in the Constant block icon changes to 0.
Next, configure the HDL Cosimulation block, which represents the inverter model written in VHDL. Start with the Ports pane, by performing the following actions:
Double-click the HDL Cosimulation block icon. The Block Parameters dialog box for the HDL Cosimulation block appears. Click the Ports tab.
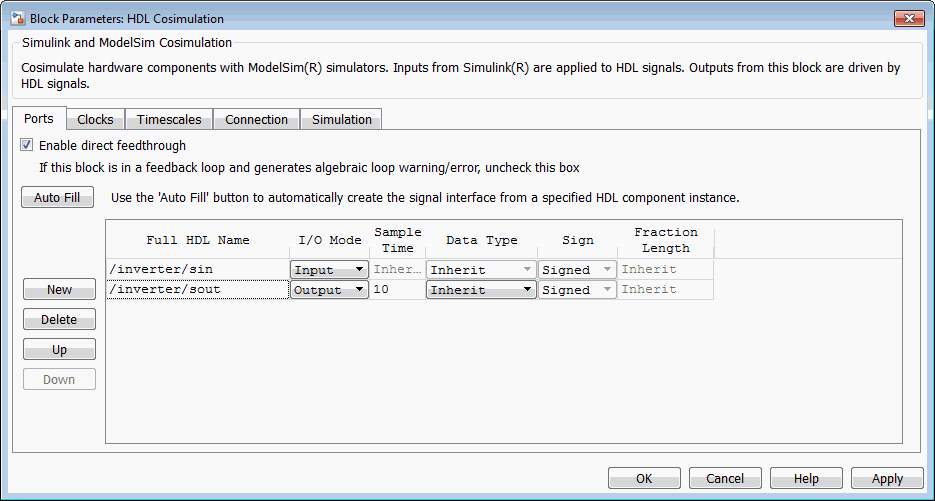
In the Ports pane, select the sample signal
/top/sig1from the signal list in the center of the pane by double-clicking on it.Replace the sample signal path name
/top/sig1with/inverter/sin. Then click Apply. The signal name on the HDL Cosimulation block changes.Similarly, select the sample signal
/top/sig2. Change the Full HDL Name to/inverter/sout. SelectOutputfrom the I/O Mode list. Change the Sample Time parameter to10. Then click Apply to update the list.Select the sample signal
/top/sig3. Click the Delete button. The signal is now removed from the list.The Ports pane should appear as follows.
Now configure the parameters of the Connection pane by performing the following actions:
Click the Connection tab.
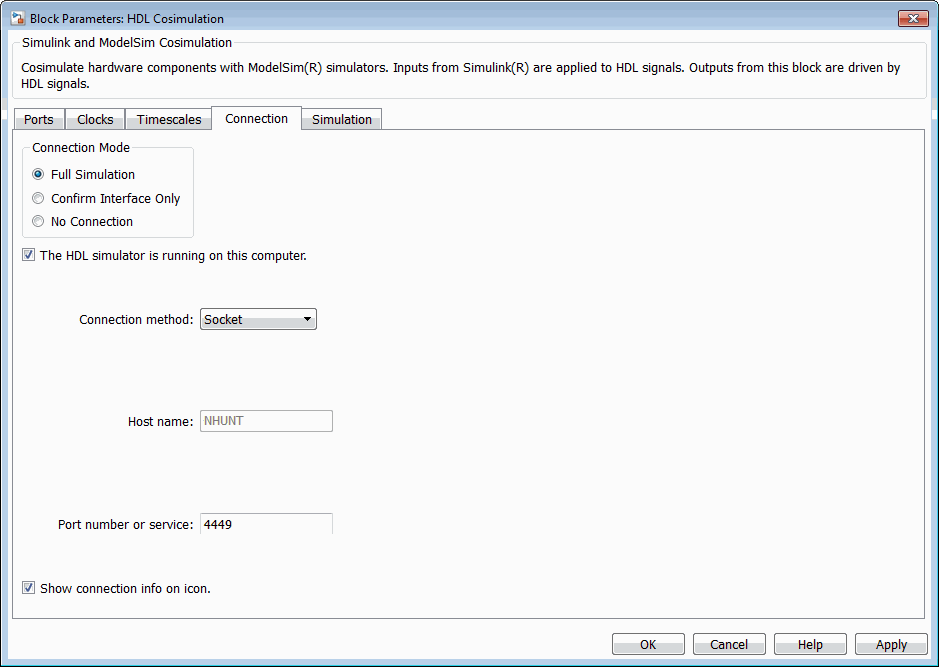
Leave Connection Mode as Full Simulation.
Select socket from the Connection method list. This option specifies that Simulink and ModelSim will communicate via a designated TCP/IP socket port. Observe that two additional fields, Port number or service and Host name, are now visible.
Note that, because The HDL simulator is running on this computer is selected by default, the Host name field is disabled. In this configuration, both Simulink and ModelSim execute on the same computer, so you do not need to enter a remote host system name.
In the Port number or service text box, enter socket port number
4449or, if this port is not available on your system, another valid port number or service name. The model will use TCP/IP socket communication to link with ModelSim. Note what you enter for this parameter. You will specify the same socket port information when you set up ModelSim for linking with Simulink.The Connection pane should appear as follows.
Click Apply.
Now configure the Clocks pane by performing the following actions:
Click the Clocks tab.
Click the New button. A new clock signal with an empty signal name is added to the signal list.
Double-click on the new signal name to edit. Enter the signal path
/inverter/clk. Then selectRisingfrom the Edge list. Set the Period parameter to10.The Clocks pane should appear as follows.

Click Apply.
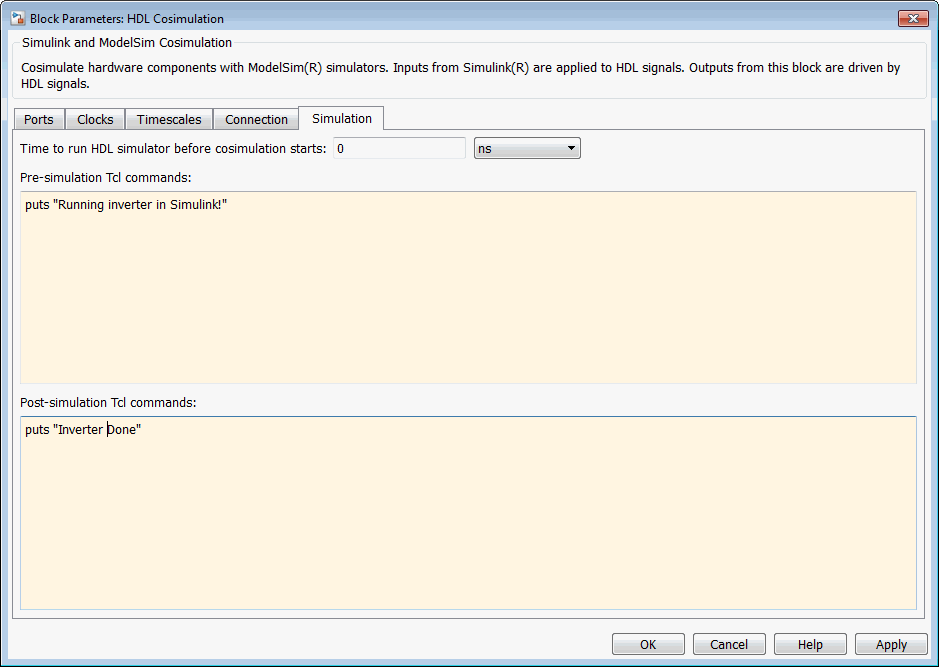
Next, enter some simple Tcl commands to be executed before and after simulation, as follows:
Click the Simulation tab.
In the Pre-simulation Tcl commands text box, edit the default Tcl command:
puts "Running inverter in Simulink!"
In the Post-simulation Tcl commands text box, edit the default Tcl command:
puts "Inverter Done"
The Simulation pane should appear as follows.
Click Apply.
Next, view the Timescales pane to make sure it is set to its default parameters, as follows:
Click the Timescales tab.
The default settings of the Timescales pane are shown in the following figure. These settings are required for operation of this example. See Simulation Timescales for further information.
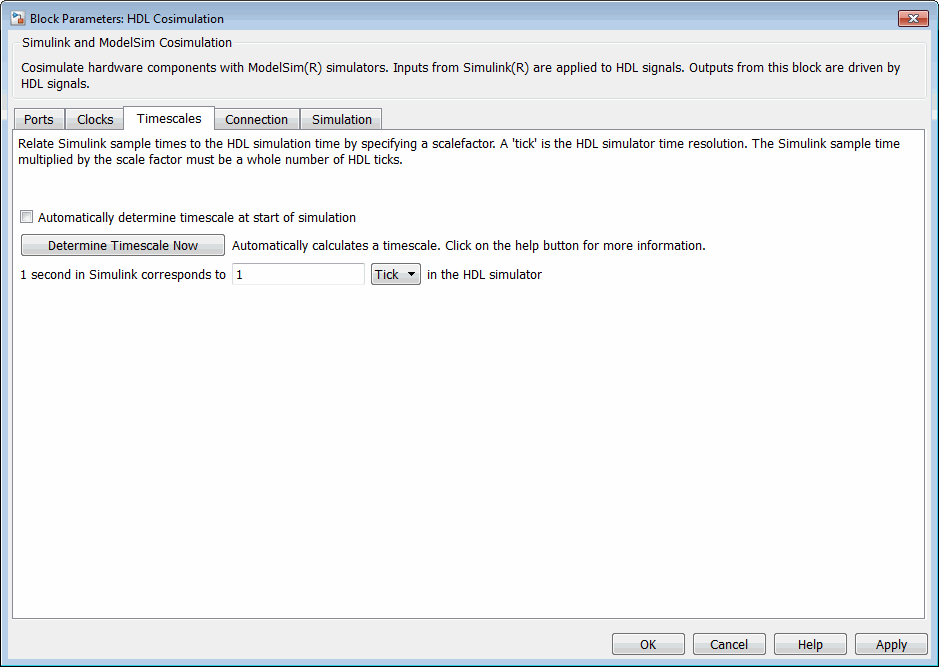
Click OK to close the Block Parameters dialog box.
The final step is to connect the blocks, configure model-wide parameters, and save the model. Perform the following actions:
Connect the blocks as shown in the following figure.

At this point, you might also want to consider adjusting block annotations.
Configure the Simulink solver selection for a fixed-step, discrete simulation; this is required for cosimulation operation. Perform the following actions:
In the Modeling tab, click Model Settings. The Model Configuration Parameters dialog box opens, displaying the Solver selection pane.
Select
Fixed-stepfrom the Type menu.Select
discrete (no continuous states)from the Solver menu.Click Apply.
Click OK to close the Model Configuration Parameters dialog box.
See Set Simulink Model Configuration Parameters for further information on Simulink settings that are optimal for use with HDL Verifier software.
Save the model.
Set Up ModelSim for Use with Simulink
You now have a VHDL representation of an inverter and a Simulink model that applies the inverter. To start ModelSim such that it is ready for use with Simulink, enter the following command line in the MATLAB Command Window:
vsim('socketsimulink', 4449)
Note
If you entered a different socket port specification when you configured the
HDL Cosimulation block in Simulink, replace the port number 4449 in the preceding command line with the
applicable socket port information for your model. The vsim function
informs ModelSim of the TCP/IP socket to use for establishing a communication link with your
Simulink model.
Load Instances of VHDL Entity for Cosimulation with Simulink
This section explains how to use the vsimulink command to load an
instance of your VHDL entity for cosimulation with Simulink. The vsimulink command is an HDL Verifier variant of the ModelSim
vsim command. It is made available as part of the ModelSim configuration.
To load an instance of the inverter entity, perform the following
actions:
Change your input focus to the ModelSim window.
If your VHD file is not in the current folder, change your folder to the location of your
inverter.vhdfile. For example:ModelSim> cd C:/MyPlayArea
Enter the following
vsimulinkcommand:ModelSim> vsimulink work.inverter
ModelSim starts the
vsimsimulator such that it is ready to simulate entityinverterin the context of your Simulink model. The ModelSim command window display should be similar to the following.
Run Simulation
This section guides you through a scenario of running and monitoring a cosimulation session.
Perform the following actions:
Open and add the inverter signals to a wave window by entering the following ModelSim command:
VSIM n> add wave /inverter/*The following wave window appears.

Change your input focus to your Simulink model window.
Start a Simulink simulation. The value in the Display block changes to
255. Also note the changes that occur in the ModelSim wave window. You might need to zoom in to get a better view of the signal data.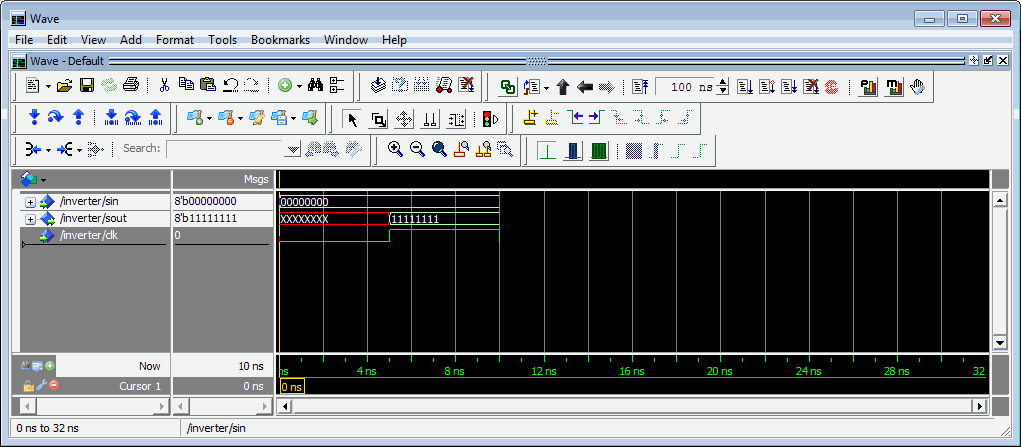
In the Simulink model, change Constant value to
255, save the model, and start another simulation. The value in the Display block changes to0and the ModelSim wave window is updated as follows.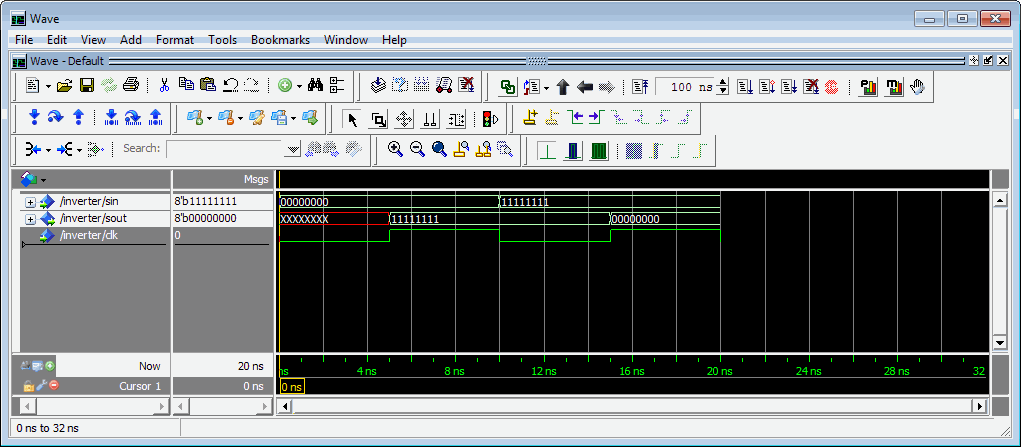
In the Simulink model, change Constant value to
2and Sample time to 20 and start another simulation. This time, the value in the Display block changes to253and the ModelSim wave window appears as shown in the following figure.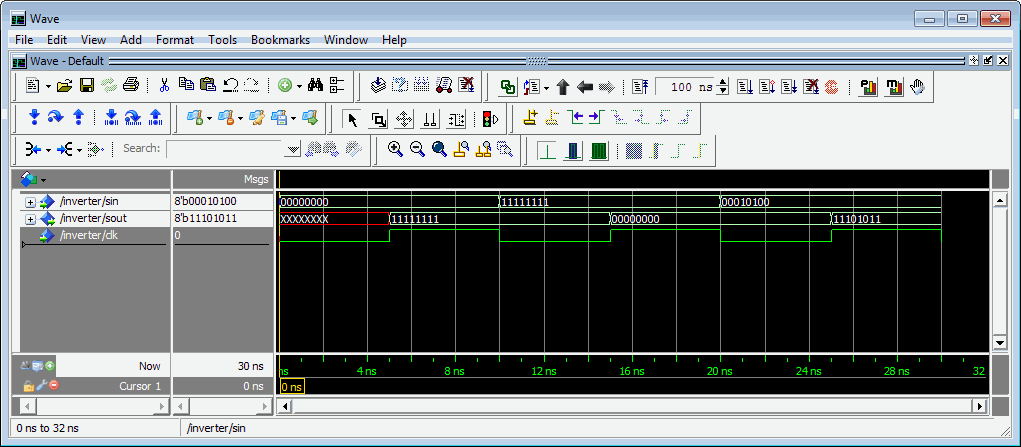
Note the change in the sample time in the wave window.
Shut Down Simulation
This section explains how to shut down a simulation in an orderly way, as follows:
In ModelSim, stop the simulation by selecting Simulate > End Simulation.
Quit ModelSim.
Close the Simulink model window.