Closed Loop Control of a DC-DC Buck Converter
This example shows how to model a closed loop control of a DC-DC buck converter in the C2000™ Microcontroller Blockset. The model runs on a F28379D Launchpad connected to the C2000 digital power supply booster pack.
Using this example you can model:
Digital DC-DC synchronous buck converter voltage mode control (VMC).
Digital DC-DC synchronous buck converter average current mode control using control law accelerator (CLA).
By running the models provided in this example on the host computer, you can:
Simulate a controller for the DC-DC buck converter plant model.
Generate code for the controller and load it on the LaunchPad.
Monitor signals and tune parameters on the host computer.
Required Hardware
F28379D LaunchPad or F28P650D LaunchPad (requires a LaunchPad style passthrough socket strip connector as has been mentioned in Appendix 9.1).
Hardware Connections
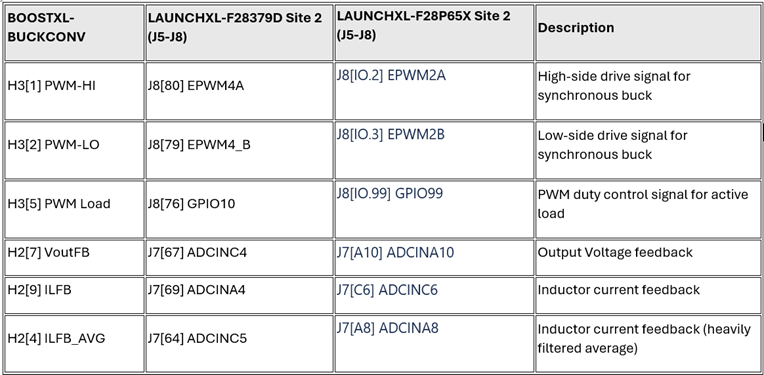
Connect the Digital Power Buck Converter BoosterPack (BOOSTXL-BUCKCONV) to the Texas Instruments Delfino F28379D LaunchPad the Texas Instruments F28P650D LaunchPad as detailed in the following table.

Available Models
The target models can be used to simulate the controller, generate code and load it on the required target. The host models can be run on the host computer to log signals and tune parameters.
F28379D LaunchPad
Target Models:
Host Models:
F28P650D LaunchPad
Target Models:
Host Models:
You can use these models for both simulation and code generation.

The f28379D_DCDC_Buck.slx and f28379D_DCDC_Buck_CLA.slx model consists of these subsystems:
Controller:
Voltage mode control - f28379D_DCDC_Buck.slx model employs a discrete proportional integral (PI) controller to minimize the error between the reference voltage and the output voltage. The duty cycle of the PI controller is limited to 60% of the PWM time period.
Average current mode control - f28379D_DCDC_Buck_CLA.slx model employs a discrete proportional integral (PI) controller to control the average inductor current, which produces the duty cycle. The current controller reference is the output of the voltage controller.
DC-DC Buck Converter: Simscape™ blocks are used to model the DC-DC buck converter circuitry.
Dashboard Controls: Used to set the reference voltage, switch the active load on and off active load, and tune proportional and integral gains.
Peripheral Block Configurations
Set the peripheral block configurations for this model. Double-click on the blocks to open block parameter configurations. You can use the same parameter values if you want to run this example for other hardware boards. The peripheral block configurations shown are for the f28379D_DCDC_Buck_CLA.slx model.
ePWM Block
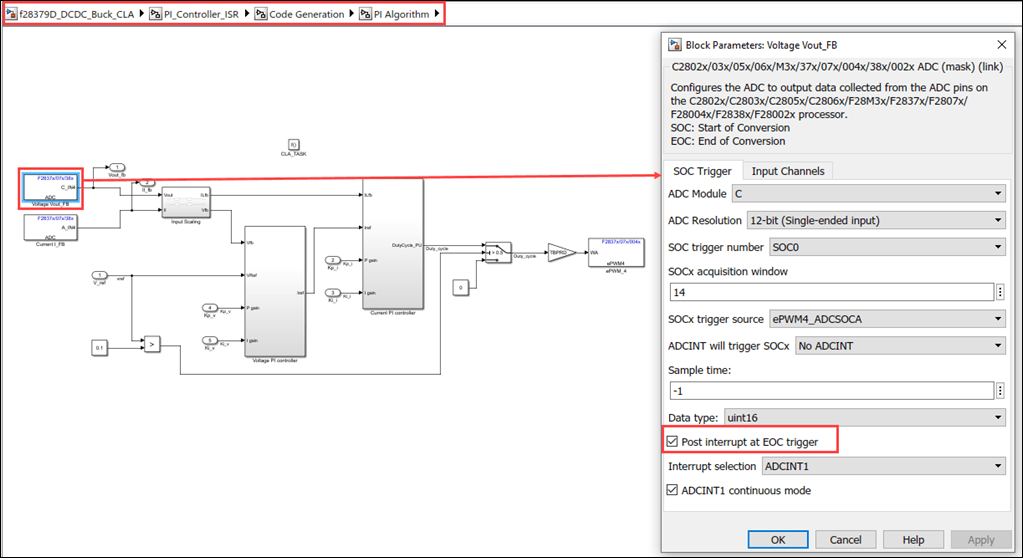
The ePWM block (in PI_Controller_ISR > Code Generation > PI Algrotihm) is configured to operate in Up-Down mode, and it triggers the start of conversion for ADC when the ePWM counter reaches the timer period.

ADC Block
The ADC block (in PI_Controller_ISR > Code Generation > PI Algrotihm) is configured with the Post interrupt at EOC trigger parameter enabled.

CLA Subsystem Block
Inputs to the PI Algorithm block are stored in the CpuToCla1MsgRAM. CLA configuration is applicable only for the f28379D_DCDC_Buck_CLA.slx model. For more information, refer to Overview of CLA Configuration for C2000 Processors Using Subsystem.

Simulate Controller for DC/DC Buck Converter Plant Model
Run the Model
1. Open the f28379D_DCDC_Buck.slx or f28379D_DCDC_Buck_CLA.slx model.
2. Click Run on the Simulation tab to simulate the model.
3. Click Data Inspector on the Simulation tab to view and analyze the simulation results. You can tune the input parameters using the dashboard controls.
Generate Code for Controller and Load It on LaunchPad
In this section, you generate code and load it on the target hardware.
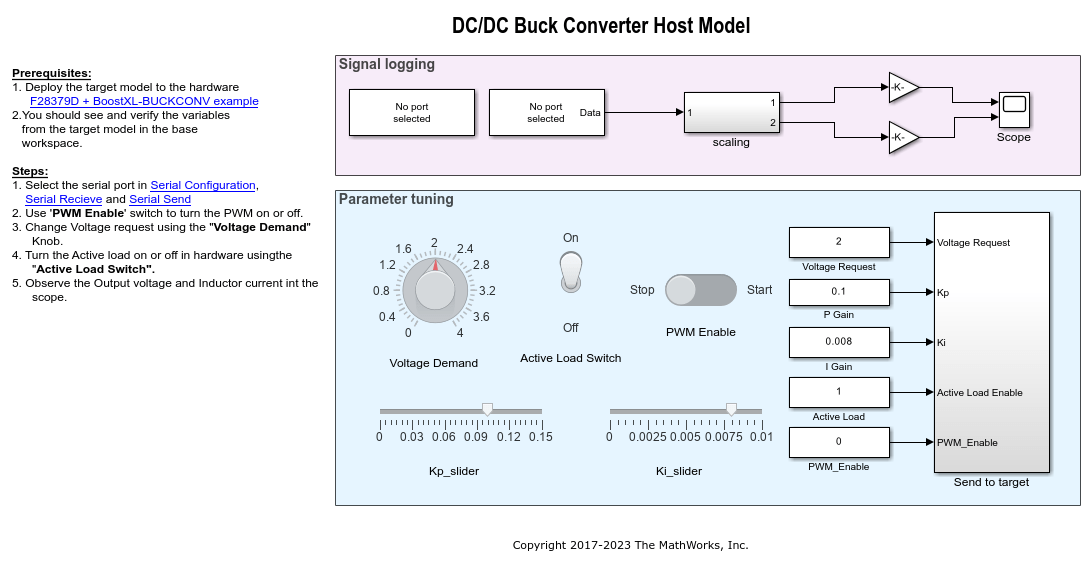
This example uses a host and a target model. The host model is a user interface to the controller hardware board. You can run the host model on the host computer. The prerequisite to use the host model is to deploy the target model to the controller hardware board. The host model uses serial communication to command the target Simulink® model and run the BoostXL-BUCKCONV in a closed-loop control.
Run Model on LaunchPad
1. Open the f28379D_DCDC_Buck.slx or f28379D_DCDC_Buck_CLA.slx model and generate code by pressing Ctrl+B or clicking Build, Deploy & Start on the Hardware tab to deploy the target model to the hardware.
Note: On the F28379D processor, this example runs on CPU1. Ensure that the program running on CPU2 is not using the peripherals that are used by CPU1.
2. Click the host model hyperlink in the target model to open the associated host model. Open the c2000_DCDC_Buck_host_model.slx host model.

Monitor Signals and Tune Parameters on Host Computer
Configure and Run Model on Host Computer
1. On the host computer, browse to Device Manager > Ports (COM & LPT) to find the COM port.
2. Set the parameter Port of the following blocks in the c2000_DCDC_Buck_host_model.slx model to match the COM port of the host computer:
c2000_DCDC_Buck_host_model > Serial Configuration
c2000_DCDC_Buck_host_model > Serial Receive
c2000_DCDC_Buck_host_model > Send to target > Serial Send > Serial Send
3. Click the Run button on the Simulation tab to run the host model.
4. While the model runs, you can tune parameters using the dashboard blocks such as Voltage Demand and Controller gains.
Note: If you encounter any non-real time communication between the host and the target, try closing the Scope block and run the simulation of the host model. You might encounter lag in uploading the data in the Scope block, if you have other applications running simultaneously in your machine.
For more information on using the serial connection for your hardware, see Set Up Serial Communication with Target Hardware.
Monitor the Signals
While the model runs, you can monitor the following signals on the scope:
Voltage Vout_FB: The measured output voltage of the system. 4095 ADC counts is equivalent to 6.0909 V output voltage.
Current I_FB: The real-time current flowing through the inductor (L1). 4095 ADC counts is equivalent to 6.8333 A inductor current.
Tune the Parameters
While the model runs, you can tune parameters using the following dashboard blocks:
Voltage Demand: Change the output voltage demand. This parameter is the main request for the control loop. The controller algorithm compares the voltage request value with the measured output voltage and adjusts the PWM duty cycle towards achieving the output voltage.
Active Load Switch: Use this switch to turn on the active load present on the hardware on or off. This allows you to add an extra load resistor to study the effect of abrupt changes in the load circuit.
PWM Enable: Use this slider to turn the PWM on or off for the synchronous buck converter.
Controller gains: Change the controller gains (Kp and Ki values) using the available Slider blocks (Kp_slider and Ki_slider). You can change this parameter to study the robustness of the controller. Large, abrupt changes might lead to instability of the controller; apply changes smoothly.
Hardware Results
1. The following figure shows the hardware results for the model f28379D_DCDC_Buck.slx. Observe the output voltage and inductor current. You can also see the effect of voltage request change from 1 V to 2 V and effect of active load change.

2. The following figure shows the hardware results for the model f28379D_DCDC_Buck_CLA.slx Observe the output voltage and inductor current. You can also see the effect of voltage request change from 1 V to 2 V and effect of active load change.

Other Things to Try
Run the example on the TI Delfino F280049C LaunchPad and analyze the results.
Change the Kp and Ki values and observe the results.