Create Custom User Interface for Android Application
This example shows how to use the Simulink® Support Package for Android® Devices to create and integrate a customized user interface (UI) for an Android application.
Prerequisites
For more information on how to use Simulink Support Package for Android Devices to run a Simulink model on an Android device, see Getting Started with Android Devices.
Required Hardware
Android device, such as a phone or a tablet
USB cable to connect the device to the host computer
Hardware Setup
Connect your Android device to the host computer using the USB cable.
Workflow to Create and Integrate Custom UI for Android App
Use the workflow described in this section to create and customize your own user interface on an Android device.
1. Create a new Simulink model and connect the FromApp, ToApp, Terminator, Constant, and Add blocks as shown.

2. In MATLAB®, on the Hardware tab, in the Mode section, click Run on board. In the Deploy section, click Build from the drop-down.
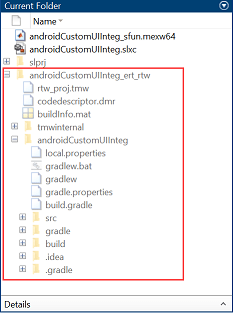
3. In the Current Folder pane of MATLAB, Simulink creates a project folder. In Android Studio, import this project folder. For more information on how to import a project to Android Studio, see Import Project to Google Android Studio.
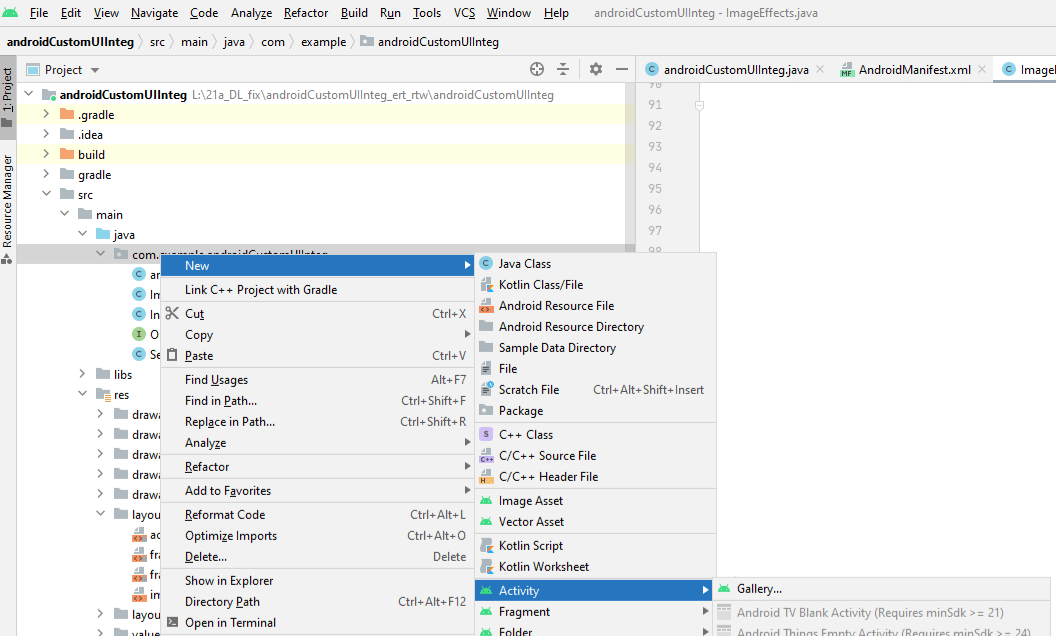
4. In Android Studio, create a new activity file.

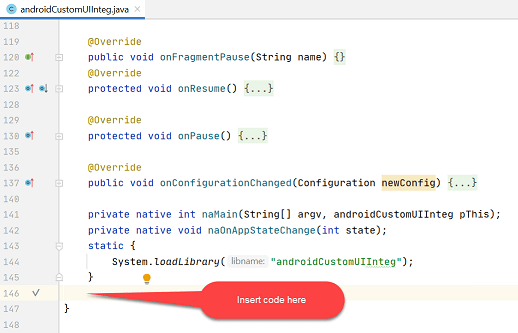
5. In the modelname.java file, at the end of the code, add this code after the second-to-last closing bracket.
public void startModel(){
     if (!BgThread.isAlive()) {
         BgThread.start();
     }
 }
 public interface MyCustomObjectListener {
     public void ToAppMethod(byte[] data);
public byte[] FromAppMethod();
 }
 MyCustomObjectListener listener = null;
 public void setCustomObjectListener(MyCustomObjectListener listener) {
     this.listener = listener;
 }
 public void ToAppMethod(byte[] data){
     if(listener != null)
         listener.ToAppMethod(data);
 }
public byte[] FromAppMethod(){
     if(listener != null)
        return listener.FromAppMethod();
else
return null;
}
The MyCustomObjectListener interface methods must contain the FromApp and ToApp methods present in the Simulink model. The method signatures must match with the FromApp and ToApp blocks present in the Simulink model.
6. In the new activity file, inherit the modelname class and implement the MyCustomObjectListener interface methods.
In
oncreate, add this line of code to set the custom object lister and to obtain a callback from the modelname activity:super.setCustomObjectListener(this);In
onresume, add this line of code to start the model:super.startModel();Add this method to the new activity file at the end of code before
}:
@Override
public void ToAppMethod(byte[] data) {
//processing
}
@Override
public byte[] FromAppMethod() {
//processing
//return data
}7. To set the new activity as the application launcher activity (this activity is displayed on the Android application by default) in Android Studio, in the Android > Project, navigate to src\main\AndroidManifest.xml file and remove these lines of code.
<intent-filter>
         <action android:name="android.intent.action.MAIN" />
          <category android:name="android.intent.category.LAUNCHER" />
 </intent-filter>
8. Add these lines of code after the activity tag.

<activity android:name=".MainActivity" android:theme="@style/Theme.AppCompat.Light.DarkActionBar">
        <intent-filter>
            <action android:name="android.intent.action.MAIN" />
             <category android:name="android.intent.category.LAUNCHER" />
         </intent-filter>
  </activity>
In your code, replace MainActivity with the activity of your Android application.
9. Deploy the application on your Android device.
Configure Simulink Model and Calibrate Parameters
In this example, the previously described workflow is used to create a customized application on your Android device using the androidCustomInteg Simulink model. The application performs image processing on an input image that you select and displays the processed image as an output on the Android application.
Open the androidCustomUIInteg Simulink model.

Receive Data from Method in Generated Android Application
The FromApp blocks receive data from these methods of the Android application.
GetImage– Get input image.GetAlgo– Get image processing algorithm.GetText– Get inserted input text in image.GetPosition– Get position of image.
For the GetImage method, the FromApp block has these parameter values.
Method name –
GetImage.Data type –
uint8.Data size (N) –
480000.Sample time –
1.
For the GetAlgo method, the FromApp block has these parameter values.
Method name –
GetAlgo.Data type –
uint8.Data size (N) –
1.Sample time –
1.
For the GetText method, the FromApp block has these parameter values.
Method name –
GetText.Data type –
uint8.Data size (N) –
10.Sample time –
1.
For the GetPosition method, the FromApp block has these parameter values.
Method name –
GetPosition.Data type –
single.Data size (N) –
1.Sample time –
1.
Process Image
The Process Image MATLAB Function block contains the image processing algorithm that the model performs on the input image Imin.
You can perform these image processing operations on the input image.
Flip the image about its vertical axis
Insert text in the image with a font size of 30
Adjust the contrast of image
Apply a geometric transformation to the image
Rotate the image by 90 degrees
Rotate the image by 270 degrees
Complement the image
Double-click the Process Image MATLAB Function block to open the function. You can edit the parameters of this function to suit your image processing requirements.
Send Data to Method in Generated Android Application
The ToApp block sends the processed image data to the application. The ToApp block has these parameter values.
Method name –
ShowImage.Number of arguments –
1.
Deploy and Run Simulink Model on Android Device
1. On the Hardware tab, in the Mode section, select Run on board.
2. In the Deploy section, click Build from the drop-down. In the Current Folder pane of MATLAB, Simulink creates a project folder, androidCustomUIInteg_ert_rtw.

3. Open Android Studio and select File > New > Import Project.
4. In the Select Eclipse or Gradle Project to Import dialog box, navigate to the project folder.
5. Select the second-level project folder with the same name as the project. For example, in the androidCustomUIInteg_ert_rtw project folder, select the androidCustomUIInteg folder.

6. Click OK.
7. In the Android SDK Manager dialog box, click Use Android Studio's SDK.
8. In the androidCustomUIInteg project, in the left pane, select Android > Project, and then navigate to the src\main\java\com.example.androidCustomUIInteg\androidCustomUIInteg file.
9. In the androidCustomUIInteg.java file, at the end of the code, add this code before the second-to-last closing bracket.

  public void startModel(){
  if (!BgThread.isAlive()) {
      BgThread.start();
  }
}
 public interface MyCustomObjectListener {
  public void ShowImage(byte[] data);
  public byte[] GetImage();
  public byte[] GetAlgo();
  public byte[] GetText();
  public float[] GetPosition();
}
 MyCustomObjectListener listener = null;
 public void setCustomObjectListener(MyCustomObjectListener listener) {
     this.listener = listener;
}
 public void ShowImage(byte[] data){
  if(listener != null)
      listener.ShowImage(data);
}
 public byte[] GetImage(){
  if(listener != null)
      return listener.GetImage();
  else
      return null;
}
 public byte[] GetAlgo(){
  if(listener != null)
      return listener.GetAlgo();
  else
      return null;
}
 public byte[] GetText(){
  if(listener != null)
      return listener.GetText();
  else
      return null;
}
 public float[] GetPosition(){
  if(listener != null)
      return listener.GetPosition();
  else
      return null;
}
10. In the current directory of example, right-click the ImageEffects.java file and select Copy.
11. In Android Studio, in the androidCustomUIInteg project, in the left pane, select Android > Project, and then navigate to src\main\java\com.example.androidCustomUIInteg. Then, paste the ImageEffects.java file.
12. In the current directory of example, right-click the imageeffects.xml file and select Copy.
13. In Android Studio, in the androidCustomUIInteg project, select Android > Project, and then navigate to src\main\res\layout. Then, paste the imageeffects.xml file.

14. In the Android > Project, navigate to src\main\AndroidManifest.xml file and remove these lines of code.
<intent-filter>
         <action android:name="android.intent.action.MAIN" />
          <category android:name="android.intent.category.LAUNCHER" />
 </intent-filter>
15. Add these lines of code after the activity tag.

<activity android:name=".ImageEffects" android:theme="@style/Theme.AppCompat.Light.DarkActionBar">
        <intent-filter>
            <action android:name="android.intent.action.MAIN" />
             <category android:name="android.intent.category.LAUNCHER" />
         </intent-filter>
  </activity>
16. To deploy the app to your Android device, from the project name drop-down below the Android Studio IDE toolbar, select Edit Configurations.
17. In the Run/Debug Configurations dialog box, in the Installation Options section, select APK from app bundle from the Deploy drop-down.
18. Click Apply, and then OK.
19. From the device name drop-down below the Android Studio IDE toolbar, select your device.
20. Click Run to deploy the application to your Android device and run it. The application launches automatically.
21. On your Android device, select an image from your device gallery.
22. You can perform these operations on the selected image.
Flip left to rightInsert TextAdjust contrastImage wrapRotate 90Rotate 270Image Complement

Other Things to Try
Using the workflow in this example, try implementing a different algorithm to create your own customized user interface.