Set Up Industrial Communication Toolbox Software for OPC
Preparation Overview
Before you can communicate with OPC servers on your network, you need to prepare your workstation (and possibly the OPC server host computer) to use the technologies on which Industrial Communication Toolbox™ software is built. These technologies allow you to browse for and connect to OPC servers on your network, and allow those OPC servers to interact with your MATLAB® session using Industrial Communication Toolbox OPC software.
The specific steps are described in the following sections.
Set Up for Communicating with OPC UA Servers
Allow OPC UA Communication Through Firewalls
OPC UA communication takes place using various TCP/IP ports. To locate OPC UA servers on other hosts, Industrial Communication Toolbox uses the OPC UA Local Discovery Service for that host, which is hosted on port 4840. Every other OPC UA server on a host uses a different port for communication. Locally, Industrial Communication Toolbox uses a random local port number to initiate the connection.
If you have a local firewall, you must ensure that the firewall allows MATLAB to communicate through the firewall. All other firewalls between the Industrial Communication Toolbox software and the OPC UA servers must permit communication on port 4840 plus all other ports set up by your OPC server administrator for the OPC UA servers you want to connect to.
Install an OPC UA Simulation Server for OPC UA Examples
OPC UA examples in this documentation make use of a Prosys OPC UA Simulation Server that you can download free of charge from https://prosysopc.com/products/opc-ua-simulation-server/.
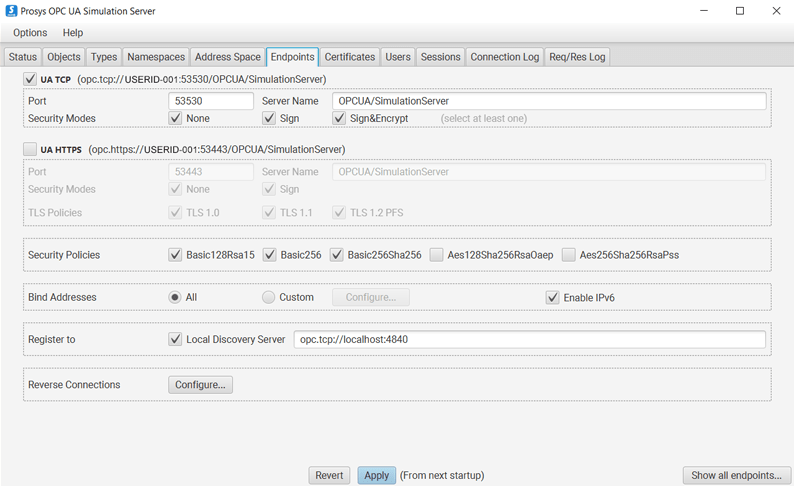
To install the Prosys OPC UA Simulation Server, follow the installation instructions with the software. When you have started the server, you might want to reduce the number of ports used by the server by turning off HTTPS endpoints in the Endpoints tab of the Prosys OPC UA Simulation Server tool.
(Optional) Install a Local Discovery Service for OPC UA Server Discovery Examples
If you want to explore the OPC UA server discovery examples, you must install the OPC UA Local Discovery Service (LDS) and register your Simulation Server with the LDS. A free LDS installer is maintained by the OPC Foundation.
Download the Local Discovery Service
Download the LDS installer from https://opcfoundation.org/developer-tools/samples-and-tools-unified-architecture/local-discovery-server-lds/
The download is free, although you must create an OPC Foundation website account to access downloads.
Run the installer, which automatically registers the LDS on your computer. The LDS always uses port 4840 for communication.
Register the Simulation Server with the Local Discovery Service
The LDS requires a secure connection to OPC UA servers to allow those servers to register successfully with the LDS. This requires an Application Instance certificate to be trusted by the LDS. To allow the Prosys OPC UA Simulation Server to register with the OPC Foundation LDS, follow these steps.
Run the Prosys OPC UA Simulation Server.
Select Options > Switch to Expert Mode.
In the Endpoints tab, select the following options and click Apply.
To create a TCP/IP connection, select UA TCP.
To enable different security modes supported by the server, select the required Security Modes.
To enable the channel security policies supported by the client, select the required Security Policies.
To register the OPC UA Simulation Server with the installed LDS, select the
Local Discovery Serveroption in the Register to parameter.
In the Certificates tab, select the
SimulationServernode and click Open in File Explorer.Copy all files in the folder to
C:\ProgramData\OPC
        Foundation\UA\pki\trusted\certs
. (Note:ProgramDatacan be a hidden folder)Restart the Prosys OPC UA Simulation Server.
In the MATLAB Command Window, discover OPC UA servers published by the LDS. You should see an entry named
SimulationServer.s = opcuaserverinfo('localhost')s = OPC UA ServerInfo 'SimulationServer': Connection Information Hostname: 'opc-demo1.my.local' Port: 53530Create an OPC UA client, and connect it to the simulation server in MATLAB:
uaClient = opcua(s);
connect(uaClient)
Depending on the server configuration, you might see an error on your initial attempt to connect:
Error using opc.ua.Client/Connect
An error occurred verifying security
To correct this, you must manually mark the certificate as trusted on the server side:
Open the Prosys OPC UA Simulation Server tool.
Select Options > Switch to Expert Mode.
In the Certificates tab, right-click the
MATLAB
          Industrial Communication Toolbox
entry, and select Trusted. Now you can connect.
Set Up for Communicating with OPC HDA Servers
Install the OPC Foundation Core Components
OPC HDA uses the “OPC Classic” technologies, which employ Microsoft® DCOM standards. DCOM is used for client-server communication, and for managing security of the connections through standard Microsoft security permissions on DCOM objects. To use OPC Classic capabilities, you must configure your computer and possibly the server computer to allow for this communication.
The OPC Foundation provides a set of tools for browsing other computers on your network for OPC servers, and for communicating with the OPC servers. These tools are called the OPC Foundation Core Components, and are shipped with Industrial Communication Toolbox software.
To install the OPC Foundation Core Components, use the opcregister function. You can also use the opcregister function
to remove or repair the OPC Foundation Core Components installation.
Installing, repairing, and removing the OPC Foundation Core Components follows the same steps:
If you are repairing or removing the OPC Foundation Core Components, make sure that you do not have any OPC objects in memory. Use the
opcresetfunction to clear all objects from memory.opcreset;
Run
opcregisterwith the action you would like to perform. If you do not supply an option, the function assumes that you want to install the components. Otherwise, use'repair'to repair an installation (reinstall the files), or'remove'to remove the components.opcregister('install')You will be prompted to type
Yesto confirm the action you want to perform. You must typeYesexactly as shown, without any quotes. This confirmation question is used to ensure that you acknowledge the action that is about to take place.The OPC Foundation Core Components will be installed, repaired, or removed from your system.
If you receive a warning about having to reboot your computer, you must quit MATLAB and restart your computer for the changes to take effect.
Configure DCOM
DCOM is a client-server based architecture for enabling communication between two applications running on distributed computers. The OPC HDA specifications utilize DCOM for communication between the OPC client (for example, Industrial Communication Toolbox software) and the OPC server. To successfully use DCOM, those two computers must share a common security configuration so that the two applications are granted the necessary rights to communicate with each other.
To connect successfully to OPC Servers using Industrial Communication Toolbox, you must configure DCOM permissions between the client computer (on which MATLAB is installed) and the server computer (running the OPC Server). This section describes two typical DCOM configuration options for Industrial Communication Toolbox software. Other DCOM options might provide sufficient permissions for the toolbox to work with an OPC server; the options described here are known to work with tested vendors’ OPC servers.
There are two configuration types described in this section:
Configure DCOM to Use Named User Security describes how to provide security between the client and server negotiated on a dedicated named user basis. You do not have to be logged in as the named user in order to use this mechanism; all communications between the client and the server are performed using the dedicated named user, independently of the user making the OPC requests. However, the identity used to run the OPC server must be available on the client machine, and the password of that identity must match on both machines.
Configure DCOM to Use No Security describes a configuration that provides no security between the client and server. Use this option only if you are connecting to an OPC server on a dedicated, private network. This configuration option has been known to cause some Microsoft Windows® services to fail, and to leave the computer vulnerable to malicious intrusion from other network users.
You should use the named user configuration, unless your system administrator indicates that no security is required for OPC access.
Caution
If your OPC server software comes with DCOM setup guidelines, you should first attempt to follow the instructions provided by the OPC server vendor. The guidelines provided in this section are generic and may not suit your specific network and security model.
Note
The following instructions apply to the Microsoft Windows 7 operating system with Service Pack 1. Users of other Microsoft Windows operating systems should be able to adapt these instructions to configure DCOM on their systems.
Configure DCOM to Use Named User Security. To configure DCOM to use named user security, you will have to ensure that both the server machine and client machine have a common user who is granted DCOM access rights on both the server and client machines. You should consult the following sections for information on configuring each machine:
OPC Server Machine Configuration provides the steps that you must perform on each of the machines providing OPC servers.
Client Machine Configuration provides the steps that you must perform on the machine that will run MATLAB and Industrial Communication Toolbox software.
OPC Server Machine Configuration. On the machines hosting the OPC servers, perform the following steps:
Create a new local user. (You can also create a domain user if the server and client machines are part of the same domain.) The name used in these instructions is
opc(displayed asOPC Serverin dialog boxes), but you can choose any name, as long as you remain consistent throughout these instructions.Select Start > Control Panel. Double-click
Administrative Toolsand then double-clickComponent Services. The Component Services dialog box appears.
Browse to
Component Services > Computers > My Computer > DCOM Config.Locate your OPC server in the
DCOM Configlist. The example below shows the Matrikon™ OPC Server for Simulation.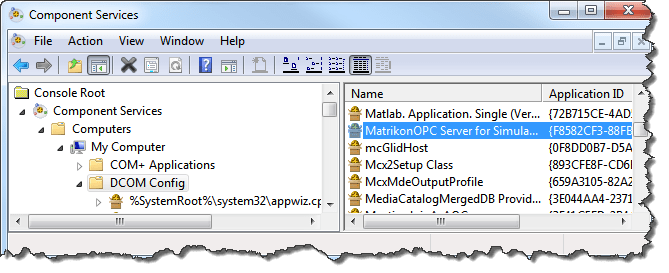
Right-click the OPC server object, and choose Properties.
In the General tab, ensure that the Authentication Level is set to
Defaultor toConnect.In the Security tab, choose Customize for the Launch and Activation Permissions, then click Edit. Ensure that the
opcuser is granted local Launch and Activation permissions.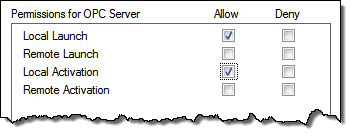
Click OK to close the Local Launch and Activation Permissions dialog box.
In the Security tab, choose Customize for the Access Permissions, then click Edit. Ensure that the
opcuser is granted Local Access permissions.
Click OK to close the Local Launch and Activation Permissions dialog box.
In the Identity tab, select This user and type the name and password for the
opcuser (created in step 1).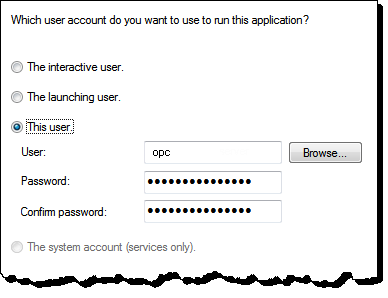
If the OPC server runs as a service, make sure that the service runs as the
opcuser (created in step 1) and not as the system account. Consult your system administrator for information on how to configure a service to run as a specific user.Repeat steps 4 through 10 for each of the servers you want to connect to.
Client Machine Configuration. On the machine(s) that will be running MATLAB and Industrial Communication Toolbox software, perform the following steps:
On the client machine(s), create the identical local user with the same name and password permissions as you set up in step 1 of OPC Server Machine Configuration.
Select Start > Control Panel. Double-click
Administrative Toolsand then double-clickComponent Services. The Component Services dialog box appears.Browse to
Component Services > Computers > My Computer. Right-clickMy Computerand select Properties.
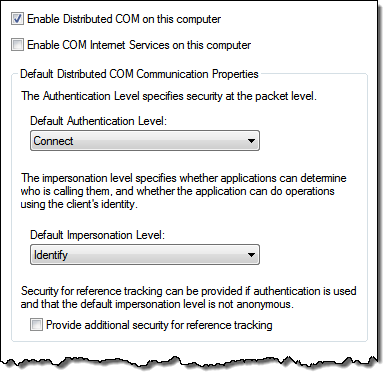
Click the Default Properties tab, and ensure that:
Enable Distributed COM is checked
Default Authentication Level is set to
ConnectDefault Impersonation Level is set to
Identify
Click the COM Security tab.
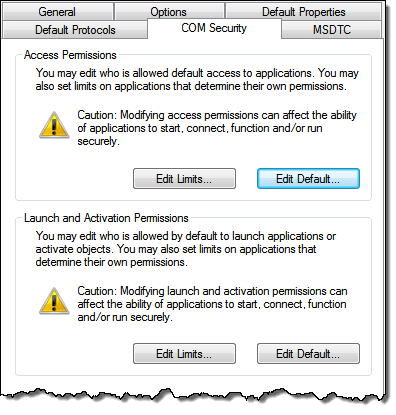
For the Access Permissions, click Edit Default and ensure that the
opcuser is included in the Default Security list, and is granted both Local Access and Remote Access permissions.
Click OK to close the Default Access Permissions dialog box.
Still under Access Permission", click Edit Limits and ensure that the
opcuser is included in the Security Limits list, and is granted both Local Access and Remote Access permissions.Click OK to close the Security Limits dialog box.
For the Launch and Activation permissions, click Edit Default and ensure that the
opcuser is included in the Default Security list, and is granted all rights (Local Launch, Remote Launch, Local Activation, and Remote Activation).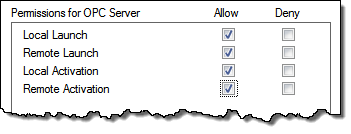
Click OK to close the Default Access Permissions dialog box.
Still under Launch and Activation Permission, click Edit Limits and ensure that the
opcuser is included in the Security Limits list, and is granted all rights (Local Launch, Remote Launch, Local Activation, and Remote Activation).Click OK to close the Security Limits dialog box.
Click OK. A dialog box warns you that you are modifying machine-wide DCOM settings.
Click Yes to accept the changes.
Your local client machine and server applications are now configured to use the same username when the server attempts to establish a connection back to the client.
Configure DCOM to Use No Security
Caution
You should not use this option if you are not in a completely trusted network. Turning off DCOM security means that any user on the network can launch any COM object on your local machine. Consult your network administrator before following these instructions.
You must complete the following steps on both the client and server machines.
Ensure that the
Guestuser account is enabled. (TheGuestaccount is disabled by default on Windows 7 machines). Consult your system administrator for information on how to enable theGuestaccount.Select Start > Control Panel. Double-click
Administrative Toolsand then double-clickComponent Services. The Component Services dialog box appears.Browse to
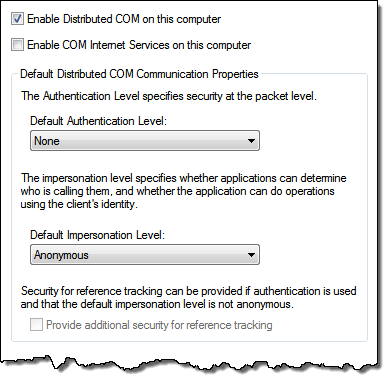
Component Services > Computers > My Computer. Right-clickMy Computerand select Properties.In the Default Properties tab, make sure that Enable Distributed COM On This Computer is selected. Select None as the Default Authentication Level, and Anonymous as the Default Impersonation Level.
In the COM Security tab, select Edit Limits from the Access Permissions and ensure that
EveryoneandANONYMOUS LOGONare both granted Local Access and Remote Access.
In the COM Security tab, select Edit Limits from the Launch and Activation Permissions and ensure that
EveryoneandANONYMOUS LOGONare both granted Local and Remote permissions (Local Launch, Remote Launch, Local Activation and Remote Activation).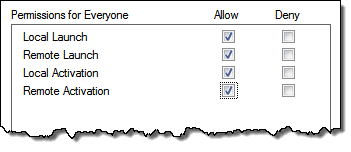
Both the client and the server are now configured so that anybody can access any COM object on either machine.
Caution
This configuration is potentially dangerous in terms of security, and is recommended for debugging purposes only.
Install an OPC HDA Simulation Server for OPC Classic Examples
OPC HDA examples in this guide and in the Industrial Communication Toolbox online help make use of a Matrikon OPC Simulation Server that you can download free of charge from https://www.matrikonopc.com.
Note
You do not need to install the Matrikon OPC Simulation Server to enable the OPC functionality of Industrial Communication Toolbox. The Simulation Server is used here only for showing examples of the capabilities and syntax of OPC commands, and for providing fully working examples.
To install the Matrikon OPC Simulation Server, follow the installation instructions with the software. The Industrial Communication Toolbox documentation and OPC examples assume a default installation of the Matrikon Simulation Server.