Leverage Built-In Ethernet on Zynq to Perform Memory Access Using AXI Manager
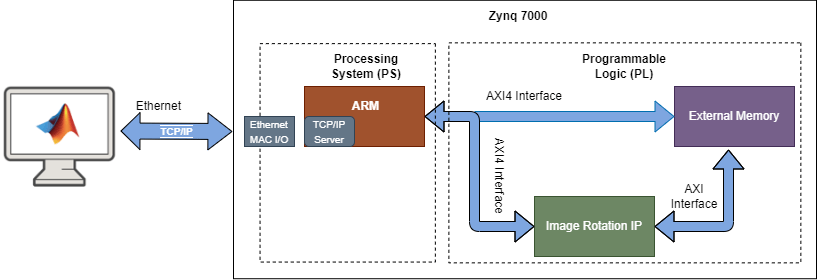
This example shows how to use an Ethernet-based AXI manager to access the external memory and FPGA IPs on the AMD® Zynq®-7000 ZC706 board over Ethernet. In AMD Zynq-based designs, MATLAB® acts as an AXI manager and communicates with the external memory controller and FPGA IPs through an AXI4 memory-mapped interface by using the transmission control protocol (TCP) server in the processing system (PS). This block diagram shows the communication between a host and an AMD Zynq-7000 board over Ethernet.
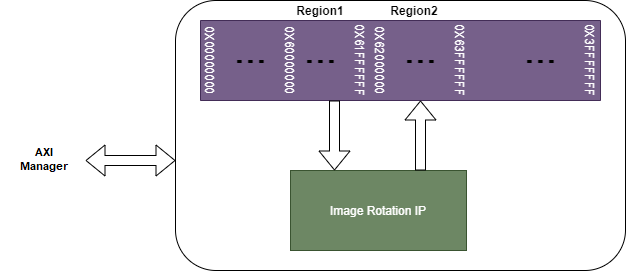
The example demonstrates operations as outlined in these steps and this figure.
Write an ASCII image of size 24-by-64 to Region1.
Configure Image Rotation IP to read the image from Region1, rotate the image, and write the rotated image to Region2.
Read the image from Region2.
Hardware and Software Requirements
To run this example, you must have this software and hardware installed and set up.
AMD Vivado® Design Suite, with a supported version listed in the HDL Language Support and Supported Third-Party Tools and Hardware (HDL Coder)
AMD Zynq ZC706 evaluation kit
Ethernet cable to connect the ZC706 FPGA
HDL Coder™ Support Package for Xilinx FPGA and SoC Devices
HDL Verifier™ Support Package for AMD FPGA and SoC Devices
SD card
Setup
Step 1: Set up the FPGA board
Verify that the AMD Zynq-7000 ZC706 board is connected to the host computer through an Ethernet cable. The Ethernet cable is used to program and communicate with the board.
Step 2: Set up the SD card
For details, see steps 1 through 4 in Ethernet AXI Manager for AMD Zynq SoC Devices.
Step 3: Create a Vivado project
Set up the AMD Vivado tool path. Use your AMD Vivado installation path when executing the command in MATLAB. For example, enter this command at the MATLAB command prompt.
hdlsetuptoolpath('ToolName','Xilinx Vivado','ToolPath', ...
           'C:\Xilinx\Vivado\2023.1\bin\vivado.bat');
Create a folder outside of the scope of your MATLAB installation folder into which you can copy the example files. The folder must be writable. This example assumes that the folder is located at C:\MyTests.
Unzip the imagerotation_ip.zip file to add the image rotation IP to the User Repository in your Vivado project.
unzip(fullfile('ipcore','imagerotation_ip_v1_0.zip'), ...
           fullfile('ipcore','imagerotation_ip_v1_0'));
Create a Vivado project using this command. This project contains an IP Integrator block diagram and a constraint file.
system('vivado -mode batch -source createproject.tcl')
This process completes in about a minute. A Vivado project named ethernetaximasterzynq.xpr is created in your current directory.
Open the generated Vivado project in GUI mode by double-clicking the project in a file browser or by entering this command at the MATLAB command prompt.
system('vivado ethernetaximasterzynq.xpr &')
Step 4: Open the block diagram and Address Editor window
In the Vivado GUI, open the block diagram design file design_1.bd. You can find this file in the source file subwindow.
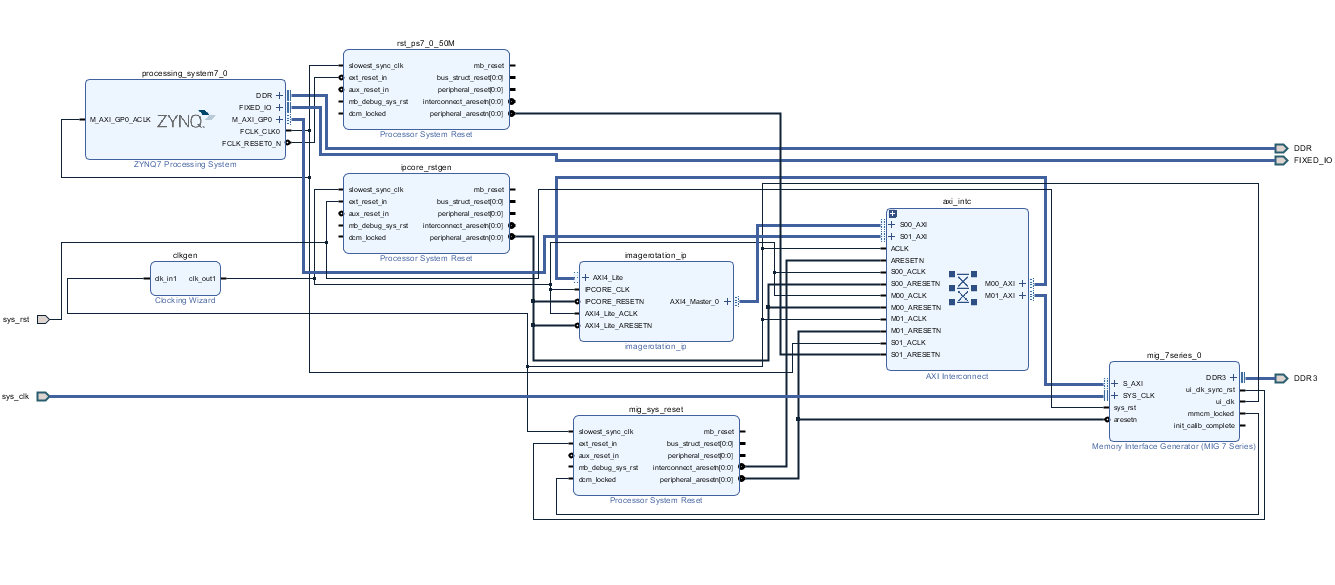
Open the Address Editor window to view the address mapping of the mig_7series_0 (memory controller) and imagerotation_ip IPs.
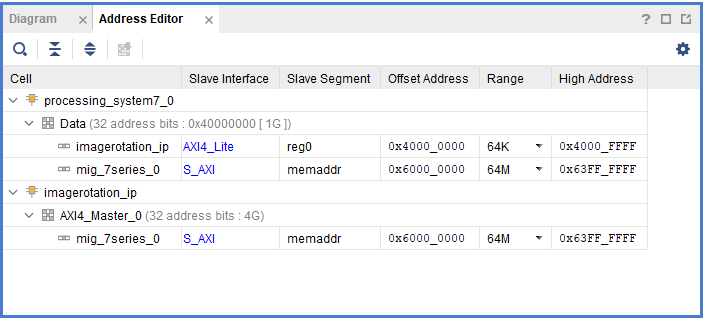
These are the imagerotation_ip registers and their corresponding physical locations.
IP Core reset register ['40000000'] — Write 1 to reset the image rotation IP.
IP Core enable register ['40000004'] — Write 1 to enable the image rotation IP.
Read base address register ['40000008'] — Contains starting address of Region1 (for example, 0X60000000).
Write base address register ['4000000C'] — Contains starting address of Region2 (for example, 0X62000000).
Start register ['40000100'] — Write 1 to start the image rotation operation.
Note: To use the pregenerated bitstream and the device tree blob (DTB) file copied to the current working directory, skip steps 5 and 6.
Step 5: Generate the FPGA programming file
To generate the FPGA programming file, click Generate Bitstream in the Vivado window. Vivado might prompt you to save the project before moving forward. Vivado generates the bitstream file in about 5 to 10 minutes.
Step 6: Generate the DTB file
To compile a DTB file, you need a device tree compiler (DTC) on a Linux® machine. If a DTC is not installed, execute these commands in a Linux console window.
sudo apt-get update -y
sudo apt-get install -y device-tree-compiler
After successful installation of a DTC, to generate a DTB file, open the board-specific DTS file and follow the steps provided in the Generate DTB File section.
Alternatively, you can use the DTS file provided for this example: C:\MyTests\devicetree_zc706_image_rotation.dts.
Generate a DTB file from the DTS file by executing this command in a Linux console window.
dtc -I dts -O dtb devicetree_zc706_image_rotation.dts -o
devicetree_zc706_image_rotation.dtb
Step 7: Program the FPGA
Program the FPGA in MATLAB by entering this command at the MATLAB command prompt.
loadBitstream('ZC706','ethernetaximaster_zynq_zc706.bit', ...
           'devicetree_zc706_image_rotation.dtb');
Run Design
To run the design, run the ethernetaximasterzynq_tb.m file from the current working folder at MATLAB command prompt.
ethernetaximasterzynq_tb
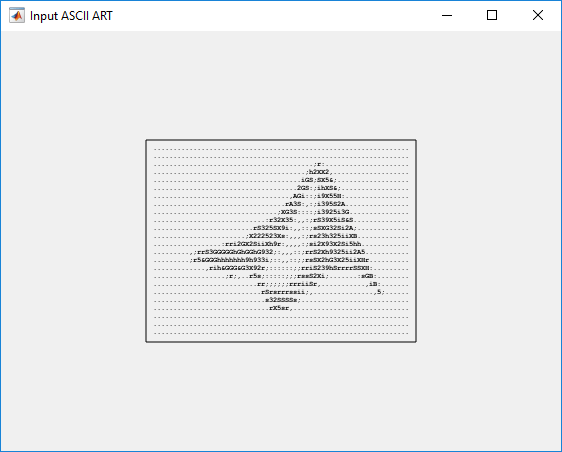
The script runs the design from MATLAB by creating an AXI manager object and plots the input and output images as these figures show.
