이 페이지는 기계 번역을 사용하여 번역되었습니다. 최신 내용을 영문으로 보려면 여기를 클릭하십시오.
Embedded Coder 빠른 시작을 사용하여 C++ 코드 생성
Embedded Coder® 빠른 시작 툴을 사용하여 임베디드 코드 생성을 위한 CppClassWorkflowKeyIgnition 모델을 준비합니다. 빠른 시작 툴은 사용자의 목표와 응용 사례를 기반으로 기본적인 코드 생성 설정을 선택합니다.
튜토리얼의 이 단계에서는 CppClassWorkflowKeyIgnition 모델에 대한 코드를 생성한 다음, 생성된 파일을 검사합니다. CppClassWorkflowKeyIgnition 모델은 차량의 점화 시스템을 나타냅니다.
빠른 시작 툴을 사용하여 C++ 코드 생성
CppClassWorkflowKeyIgnition모델을 엽니다.openExample("CppClassWorkflowKeyIgnition.slx")
MATLAB 검색 경로의 쓰기 가능한 위치에 모델 사본을 저장합니다.
C++ 코드 탭이 아직 열려 있지 않으면 앱 갤러리의 앱 탭에서 코드 생성 아래에 있는 Embedded Coder를 클릭하십시오.
C++ 코드 탭에서 설정을 클릭하고 C/C++ 코드 생성 설정을 선택합니다.
구성 파라미터 대화 상자가 열립니다.
구성 파라미터 대화 상자에서 코드 생성 창을 열고 타깃 선택 아래에서 언어 파라미터가
C++로 설정되어 있는지 확인합니다. 확인을 클릭하여 대화 상자를 닫습니다.C++ 코드 탭에서 빠른 시작을 클릭합니다.
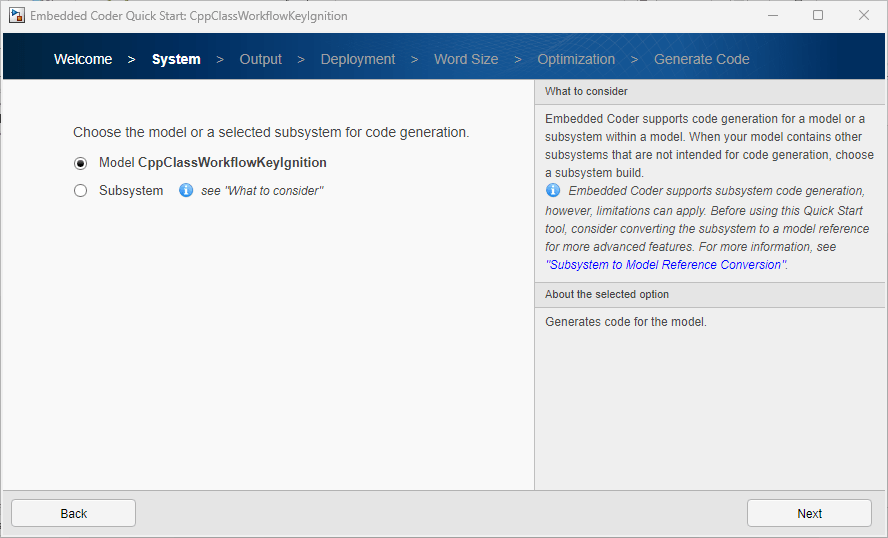
각 단계에서 다음을 클릭하여 빠른 시작 툴을 진행하십시오.
각 단계에서 사용자가 생성하려는 코드에 대한 질문이 제기됩니다. 이 튜토리얼에서는 디폴트 값을 사용하십시오. 이 툴은 모델에 대한 선택 사항을 검증하고 코드 생성에 필요한 파라미터 변경 사항을 제시합니다.
빠른 시작 툴의 마지막 단계(코드 생성 단계)에서 제안된 변경 사항을 적용하고 다음을 클릭하여
CppClassWorkflowKeyIgnition에서 코드를 생성합니다.마침을 클릭한 다음 C++ 코드 탭으로 돌아갑니다.

생성된 C++ 코드 검사
코드 생성기는 CppClassWorkflowKeyIgnition 모델을 C++ 클래스로 변환하고, 사용자는 이를 애플리케이션 코드에서 액세스할 수 있습니다. 모델 데이터 요소는 클래스 멤버로 나타납니다. Simulink® 함수는 클래스 메서드로 나타납니다.
CppClassWorkflowKeyIgnition 모델은 레이트 기반 모델링 및 함수 내보내기 모델링의 요소를 통합합니다. 레이트 기반 모델링의 경우, 애플리케이션 코드에서 호출하는 진입점 클래스 메서드에는 초기화 메서드, 실행 메서드, 종료 메서드, 그리고 선택적으로 재설정 메서드가 포함됩니다. 외부 코드나 인터페이스 요구 사항과 통합하기 위해, 생성된 클래스 인터페이스를 사용자 지정할 수 있습니다.
이 튜토리얼의 경우, 빠른 시작 툴을 사용하여 생성된 코드는 클래스 요소에 대해 디폴트 설정을 사용합니다. C++ 클래스의 디폴트 이름은 모델 이름 CppClassWorkflowKeyIgnition입니다.
모델에 대해 생성된 C++ 클래스 정보를 검사하려면:
Simulink 편집기 창의 오른쪽에 있는 코드 보기에서 검색 표시줄을 찾습니다.
검색 표시줄에 모델 클래스 이름
CppClassWorkflowKeyIgnition을 입력하여 생성 코드 전체에서 해당 클래스 이름의 각 인스턴스를 찾은 다음 강조 표시된 검색 제안을 클릭합니다.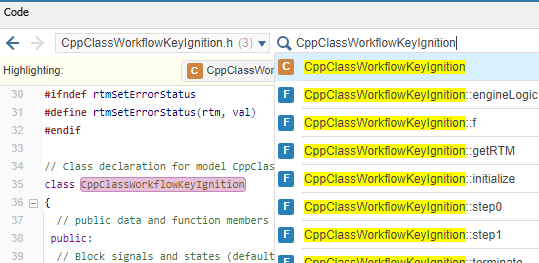
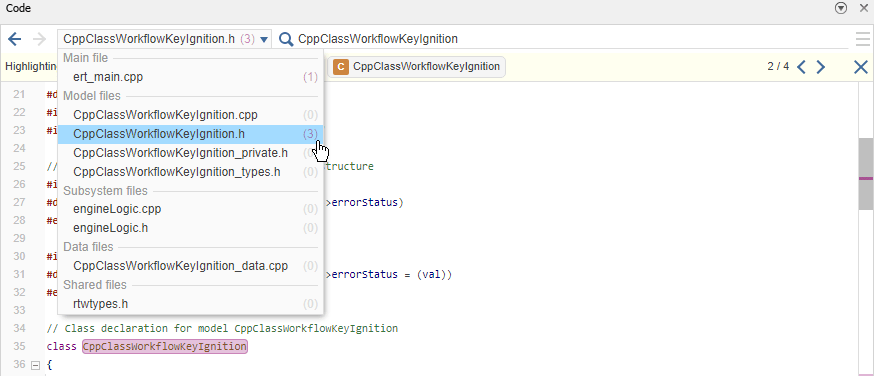
검색 표시줄 바로 아래에 있는 화살표를 사용하여
CppClassWorkflowKeyIgnition.h의 클래스 정의와ert_main.cpp의 클래스 인스턴스화를 포함하여 각 인스턴스를 단계별로 살펴봅니다.또한 왼쪽 상단 모서리에 있는 파일 메뉴에서 각 파일의 검색 결과 수를 볼 수 있습니다.
데이터와 함수 코드 매핑을 검토합니다.
Simulink 편집기 창에서 코드 인터페이스를 클릭하고 코드 매핑을 선택하여 코드 매핑 편집기를 엽니다.

데이터 탭을 클릭하면 클래스 멤버의 가시성과 액세스 방법을 볼 수 있습니다.
Simulink 데이터 요소는 모델링 요소 범주로 그룹화됩니다.
인포트: 모델의 루트 수준 데이터 입력 포트.
아웃포트: 모델의 루트 수준 데이터 출력 포트.
Model parameter arguments: 인스턴스(비정적) 클래스 데이터 멤버로 나타나는 작업 공간 변수입니다.
모델 파라미터: 모델 클래스의 인스턴스 간에 공유되는 작업 공간 변수로, 정적 클래스 데이터 멤버로 생성됩니다.
신호, 상태, 내부 데이터: 블록 출력 신호, 개별 블록 상태, 데이터 저장소, 영점교차 신호 등 모델 내부에 있는 데이터 요소입니다.
함수 탭을 클릭하여 클래스 메서드를 확인합니다.
생성된 클래스 메서드는 진입점 메서드이며 프로그램 제어가 전송되는 코드의 위치입니다.
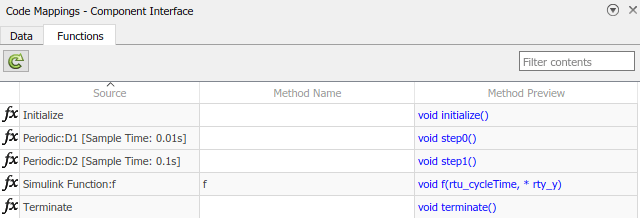
초기화 클래스 메서드의 디폴트 이름은
initialize이고, 실행(스텝) 메서드는step0과step1이며, 종료 메서드는terminate입니다.생성된 코드에서 클래스 메서드
initialize,step0,step1,f,terminate를 찾기 위해 검색 단계를 반복합니다.
다음으로, 코드 생성을 위한 사용자 지정 클래스 인터페이스를 구성하고 생성된 코드를 검토합니다.