Customize Tables for Masked Blocks
The Custom Table parameter allows you to add customized table with structured data on a mask dialog box without writing custom codes. As a mask parameter, the custom table widget supports parameter promotion unlike the tables created using custom block dialog code.
You can provide input to the Custom Table parameter as a string in the cell array format.
Adding a Custom Table Parameter
Open a Simulink® model.
Select any block and on the Block tab, in the Mask group, click Create Mask. The Mask Editor opens.
In the Parameters & Dialog tab, click Custom Table to add it to the mask as a parameter. Specify a name and prompt for the parameter, as required.
In the Property Editor pane, click the Columns field to enter the column properties, such as the name of each column, type of column, visibility and expression evaluation. The available column types are edit, checkbox, and popup. Use the Add button to add a column and Remove button to remove an existing column.

In the Property Editor pane, click the Value field and add the required number of rows by clicking
 . If required, enter default values in the newly added
rows. Click Save to save your changes.
. If required, enter default values in the newly added
rows. Click Save to save your changes. 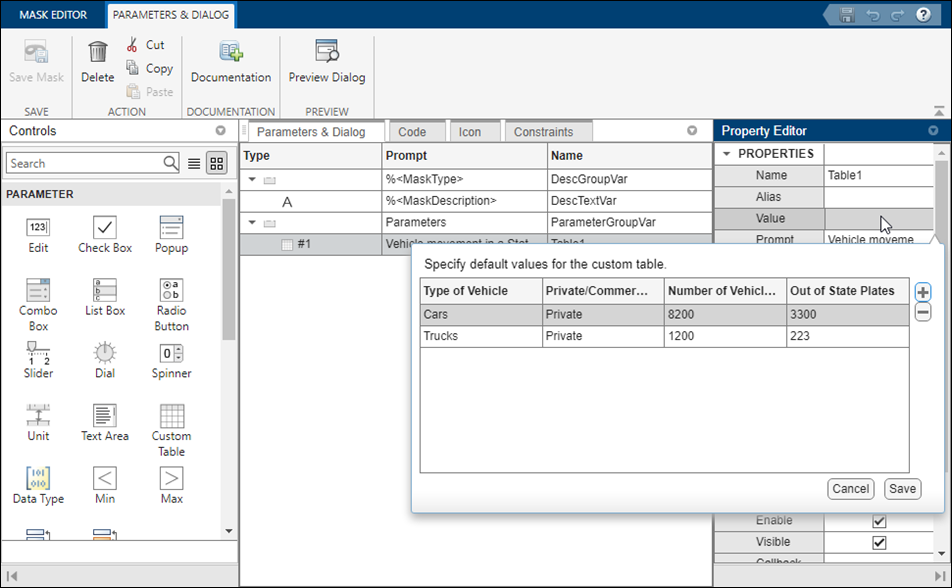
Click Save Mask to save the changes to the mask. Double-click the block to view this custom table.

If you want to edit the custom table, right-click the block and select Edit Mask.
You can filter, search, and sort contents of a custom table. Enable the option Show Filter
Search and Sort Custom Table Contents
Enable the Show Filter, Sortable, and Multiselect options in the Property Editor of the Mask Editor to allow filtering, sorting, and multi-selection of table contents within the mask dialog box.