Add C/C++ xUnit Tests to Projects in Polyspace Platform User Interface
Polyspace® Test™ allows you to author C/C++ tests using one of these approaches:
Author tests graphically in the Polyspace Platform user interface.
For more information, see Test Authoring in Polyspace Platform User Interface.
Author tests using the C/C++ Polyspace Test xUnit API.
For more information, see Test Authoring Using C/C++ xUnit API.
However, you can combine graphically authored tests and handwritten C/C++ tests in a project in the Polyspace Platform user interface. This topic shows how to add tests written as C/C++ code to a project in the Polyspace Platform user interface and run them along with graphically authored tests.
Example Files
To follow the steps in this tutorial, you can use the source and test files in one of these folders:
polyspaceroot\polyspace\examples\doc_pstest\getting_startedpolyspaceroot\polyspace\examples\doc_pstest\test_suites_setup_teardown
Here, polyspacerootC:\Program
Files\Polyspace\R2026a.
Alternatively, you can explore tests authored using the C/C++ xUnit API in a pre-configured project in the Polyspace Platform user interface. See Get Started with Polyspace Test Using Example Project.
Write Tests
Unit tests written using the C/C++ xUnit API consist of macros predefined in a
header pstunit.h. These macros encapsulate the test body, specify
test configurations (for instance, setup and teardown functions) and finally outline
the test assertions.
For instance, the following test code defines a test named
test_value_not_saturated that tests a function
saturate_and_cache():
#include <pstunit.h>

/* Tested function. */
extern int saturate_and_cache(int value);

PST_SIMPLE_TEST(test_value_not_saturated) {
    int value_not_saturated = 5;
    int actual_value;

    actual_value = saturate_and_cache(value_not_saturated);
    PST_VERIFY_EQ_INT(actual_value, value_not_saturated);
}

PST_REGFCN(myRegFcn) {
    PST_ADD_SIMPLE_TEST(test_value_not_saturated);
}

#ifndef PSTEST_BUILD
int main(int argc, char **argv) {
    PST_REGFCN_CALL(myRegFcn);
    return PST_MAIN(argc, argv);
}
#endif
PST_SIMPLE_TESTdefines the test body.PST_VERIFY_EQ_INTassesses whether its first argument is equal to its second argument.PST_REGFCNto register the test. Explicit test registration is not required if you build and run tests using Polyspace Platform projects. The test registration code is automatically added at the time of building the test.PSTEST_BUILDto hide themainfunction when building the test from within a Polyspace Platform project.If you build and run the test code at the command line, a
mainfunction is required in your test code. In the Polyspace Platform user interface, themainfunction required for test execution is automatically added. The automatically addedmainconflicts with any existingmainand you might see errors. The macroPSTEST_BUILDhelps work around the errors. See also Fix Multiple main Error in Polyspace Platform User Interface.
For more information on xUnit tests, see:
Add Tests to Project
In the Polyspace Platform user interface, after you create a project, add source files and perform an initial code analysis, you can add tests for functions in your sources. For more information on how to create a project and add sources, see Write C/C++ Unit Tests in Polyspace Platform User Interface.
To add a xUnit test:
On the Projects pane, right-click the top-level node of your project and select Add Polyspace xUnit Test Files.
Instead of adding individual files, you can also add a folder containing test files. On the Projects pane, right-click the top-level node of your project and select Add Polyspace xUnit Test Folder.
Navigate to the
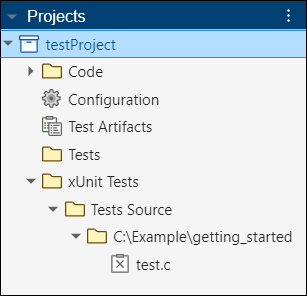
.cor.cppfile containing the test code and add the file.Tests written using the C/C++ xUnit API appear in the project under xUnit Tests > Tests Source.
To see all test files and folders added to the project, select the Project tab in the Configuration pane. You can see the test files and folders explicitly added to the project in the sections Polyspace xUnit Test Files and Polyspace xUnit Test Folders respectively.
Build and Run Tests
After adding test code, you can build and run the tests. Note that building tests from the user interface is supported only for specific compilers. If you do not have a supported compiler installed, you might see an error when building tests. If you see an error, install a supported compiler, reopen the user interface, and start building tests. See Specify C/C++ Compilers for Testing in Polyspace Platform User Interface.
To build the xUnit tests, on the Projects pane, right-click the node xUnit Tests and select Build Tests.
Alternatively, click Build Project in the toolstrip to build all tests in the project including graphical tests.
After build, each test appears as a separate node under xUnit Tests > Test Executable. For instance, the example below shows a test
test_value_not_saturated.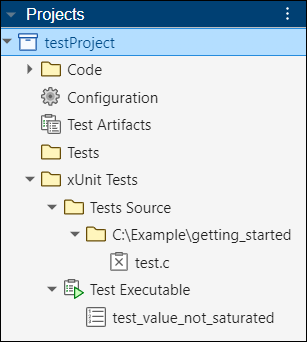
To run a test, right-click the node corresponding to the test and select Run Test. To run all tests, right-click the node xUnit Tests > Test Executable and select Run Tests.
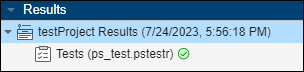
The results of test execution appear on the Results pane. To see details of test results, right-click the Tests node on this pane and select Open Review. See Open Polyspace Results in Polyspace Platform User Interface.
Troubleshoot Test Execution
If tests build and execute successfully via the command line but fail when running through a Polyspace Platform project, the issue can be traced to additional test code that is generated. For example, when you run tests through a Polyspace Platform project, the test registration function is automatically generated. If a test does not execute in this context, it might not have been registered in the first place. For instance, tests in an anonymous namespace (C++) are not added to the automatically generated registration function because this function is in a separate file from the tests and, at build time, cannot access the contents of an anonymous namespace, which only has internal linkage.
To locate the generated test code, note the folder specified for the option Artifacts directory. The generated test code is located in a subfolder of this folder.