이 페이지는 기계 번역을 사용하여 번역되었습니다. 영어 원문을 보려면 여기를 클릭하십시오.
TCP/IP 통신을 사용하여 Arduino에서 데이터 읽기
이 예제에서는 tcpserver 인터페이스를 사용하여 Arduino® Uno에서 사인파 데이터를 읽는 콜백을 활성화하는 방법을 보여줍니다. Arduino는 TCP/IP 클라이언트로 구성되고 tcpserver.를 사용하여 MATLAB®에서 생성된 TCP/IP 서버에 연결됩니다.
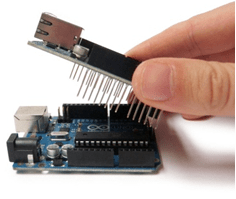
이더넷 쉴드를 Arduino Uno에 연결
컴퓨터에 Arduino Uno를 연결합니다. 다음 단계에 따라 W5100 이더넷 네트워크 실드를 Arduino Uno와 네트워크 라우터 또는 컴퓨터의 네트워크 어댑터에 연결하십시오.
이더넷 쉴드를 Arduino Uno에 단단히 고정합니다.

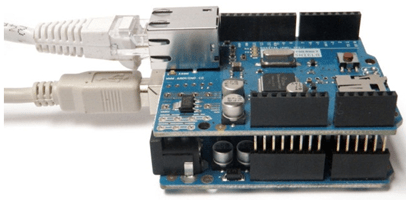
RJ45 케이블을 사용하여 Arduino 이더넷 실드를 다음 중 하나에 연결합니다.
컴퓨터에 인터넷을 제공하는 네트워크 라우터.
컴퓨터의 네트워크 어댑터.
Arduino 이더넷 실드가 연결된 라우터 또는 네트워크 어댑터의 IP 주소를 식별합니다. Arduino Uno에 프로그램 로드 섹션에서 Arduino 프로그램에 이 IP 주소를 지정하십시오. 서버 만들기섹션에서 이 IP 주소를 tcpserver의 입력 인수로 사용합니다.
Arduino Uno에 프로그램 로드
Arduino IDE를 사용하여 Arduino Uno에 다음 프로그램을 로드합니다. 이 프로그램은 사인파의 250개 부동 소수점 값을 씁니다.
/*
 TCPIPClient
 Write sine wave data values to the tcpserver object created in MATLAB.
 */

#include <SPI.h>
#include <Ethernet.h>

// Specify the MAC address printed on the Ethernet shield.
// If no MAC address is printed, then use the address shown below.
byte mac[] = {0xDE,0xAD,0xBE,0xEF,0xFE,0xED};

// Specify the server IP address that is used to create the tcpserver object in MATLAB.
// This is the IP address of the router or network adapter that the Arduino Ethernet Shield is connected to.
// In this example, 192.168.1.81 is the IP address for the server.
IPAddress server(192,168,1,81);

// Set the static IP address for the Arduino Ethernet Shield to act as a TCP/IP client.
// Choose an IP address that is in the same subnet or private network as the server IP address.
// In this example, 192.168.1.177 is the IP address for the Arduino Ethernet Shield. It is in the same subnet as the server IP address.
IPAddress ip(192,168,1,177);
IPAddress myDns(192,168,1,1);

// Ethernet client library.
EthernetClient client;

// Command sent by the server.
byte command;

// Sine wave data buffer.
float sineWaveBuffer[250];

// The setup routine runs once when you press reset.
void setup()
{
  // Initialize serial communication.
  Serial.begin(9600);
  while (!Serial)
  {
    ; // Wait for serial port to connect.
  }

  Ethernet.begin(mac,ip,myDns);
  Serial.print("Manually assigned the following IP address to the Arduino:");
  Serial.println();
  Serial.println(Ethernet.localIP());

  // Check for Ethernet hardware.
  if (Ethernet.hardwareStatus() == EthernetNoHardware)
  {
    Serial.println("Ethernet shield was not found.");
  }

  // Check for Ethernet cable connection.
  if (Ethernet.linkStatus() == LinkOFF)
  {
    Serial.println("Ethernet cable is not connected.");
  }

  Serial.print("Attempting connection to ");
  Serial.print(server);
  Serial.println("...");

  // Attempt to connect to the server running at IP address 192.168.1.81 and port 5000.
  if (client.connect(server,5000))
  {
    Serial.print("Connected to server running at ");
    Serial.println(client.remoteIP());
  }
  else
  {
    Serial.println("Connection to server failed.");
  }

  // Store sine wave data as 250 float values.
  for (int j = 0;j < 250;j++)
  {
    sineWaveBuffer[j] = sin(j*50.0/360.0);
  }
}

// Main processing loop
void loop()
{
  // Block until data is sent by server.
  if (client.available() > 0)
  {
    // Read the command sent by the server.
    command = client.read();

    // Print the command sent by the server.
    Serial.println("The server sent the following command:");
    Serial.println(command);

    if (client.connected() && command == 1)
    {
        // Write sine wave data to the server.
        client.write((const uint8_t *) & sineWaveBuffer, sizeof(sineWaveBuffer));
    }
  }
}
서버 생성
라우터나 네트워크 어댑터의 IP 주소를 사용하여 tcpserver 인스턴스를 생성합니다.
이 예에서 IP 주소는 192.168.1.81이고 포트 번호는 5000입니다. 이 IP 주소는 Arduino 프로그램에서 지정한 것과 동일해야 합니다.
server = tcpserver("192.168.1.81",5000)server =
TCPServer with properties:
ServerAddress: "192.168.1.81"
ServerPort: 5000
Connected: 0
ClientAddress: ""
ClientPort: []
NumBytesAvailable: 0
Show all properties, functions
데이터 수신을 위한 tcpserver 객체 준비
ConnectionChangedFcn 속성을 @requestDataCommand.로 설정합니다. Arduino가 tcpserver 객체에 연결되면 콜백 함수 requestDataCommand가 트리거됩니다.
server.ConnectionChangedFcn = @requestDataCommand;
Arduino에 데이터를 전송하도록 요청하는 명령으로 uint8 값 1을 전송하는 콜백 함수 requestDataCommand를 만듭니다.
function requestDataCommand(src,~)
if src.Connected
    % Display the server object to see that Arduino client has connected to it.
    disp("The Connected and ClientAddress properties of the tcpserver object show that the Arduino is connected.")
    disp(src)

    % Request the Arduino to send data.
    disp("Send the command: 1")
    write(src,1,"uint8");
end
end
BytesAvailableFcnMode 속성을 "byte"로, BytesAvailableFcn 속성을 @readArduinoData,로, BytesAvailableFcnCount 속성을 1000으로 설정합니다.
configureCallback(server,"byte",1000,@readArduinoData);250개의 사인파 부동 소수점 데이터 포인트(1000바이트)를 Arduino에서 읽을 수 있을 때 콜백 함수 readArduinoData가 트리거됩니다.
콜백 함수 읽기
250개의 사인파 데이터 포인트를 읽고 결과를 플로팅하는 콜백 함수 readArduinoData를 만듭니다.
function readArduinoData(src,~)
% Read the sine wave data sent to the tcpserver object.
src.UserData = read(src,src.BytesAvailableFcnCount/4,'single');

% Plot the data.
plot(src.UserData)
end