Spatialize Monaural Audio into 5.1 Channel Surround Sound Using Raspberry Pi
This example shows you how to spatialize a monaural audio signal into a 5.1 channel surround sound on Raspberry Pi® hardware by using a MATLAB Function block with the Simulink® Support Package for Raspberry Pi Hardware.
Audio spatialization is a sound panning technique of distributing a monaural source in a stereo or multichannel sound field. Spatialized audio gives an impression to the listener that the audio is being played in a three-dimensional space. Audio spatialization includes two key components: direction and distance. The direction determines the channel that is playing the audio. The distance determines the volume of the audio being played.
In this example, the audio source is a monaural recording of a helicopter. The spatializing algorithm mixes the sound of the helicopter into six channels: front left, front center, front right, surround left, surround right, and a channel for subwoofer. The algorithm then outputs a stereo signal that simulates the six-channel source.
Required Products
Required Hardware
Raspberry Pi hardware (Model 3B or 3B+ recommended)
A pair of headphones that can be plugged into the 3.5 mm headphone jack of the hardware
USB cable
Ethernet cable
A monitor connected to the Raspberry Pi hardware and an HDMI cable (optional)
Step 1: Connect Raspberry Pi Hardware for Audio Spatialization
Before you start this example, we recommend you complete the Get Started with Simulink Support Package for Raspberry Pi Hardware example.
Connect the micro-USB end of the USB cable to the Raspberry Pi and the regular USB end of the USB cable to the computer. Wait until the PWR LED on the hardware starts blinking.
Connect a pair of headphones to the 3.5 mm headphone jack of the hardware.
Using the Hardware Setup screen, configure the Raspberry Pi network.

Step 2: Open Audio Spatial Simulink Model
Open the raspberrypi_audiopositioning Simulink model.

The different parts of the model can be described based on the functionality of the blocks.
Audio Input
The Simulink model accepts the position of the helicopter in two ways:
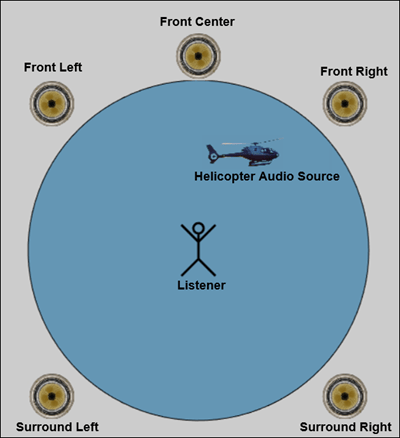
Drag the Helicopter to a Desired Position: When you run the model in External mode with the Set Position Visually block as an input to the computeVol block, the model launches a user interface. The user interface has five discrete channels on the circumference of the circle and a low-frequency output in the center of the circle. The listener occupies a location at the center of the circle and is represented by a stick figure. Using the interface, you can change the position of the helicopter by dragging the helicopter to different locations within the circle. On changing the helicopter position, the model output gives an impression to the listener that the audio is being played from the speaker that is nearest to the helicopter.
Compute Random Helicopter Positions: When you run the model in External mode with the Set Position Randomly block as an input to the computeVol block, the block calculates a random position of the helicopter within the circle at each sample time. The position is calculated by using a pair of Cartesian coordinates. The model output gives an impression to the listener that the audio is being played from random speakers at each sample time. Unlike the Set Position Visually block, you cannot control the position of the helicopter.
Spatial Algorithm
The monaural audio source from the Audio File Read block is mixed into six channels, each of which corresponds to a speaker. There is one low-frequency channel in the center of the circle and five speakers that lie on the circumference, as shown in the user interface. The following algorithm is used to determine the speaker amplitudes:
1. At the center of the circle, the amplitudes for each speaker are equal. The value for each speaker, including the low-frequency speaker, is set to 1/sqrt(5).
2. On the perimeter of the circle, the amplitudes of the speakers are determined using vector base amplitude panning (VBAP). This algorithm:
Determines the two speakers on either side of the source or, in the degenerate case, the single speaker.
Interprets the vectors determined by the speaker positions in (a) as basis vectors. These basis vectors to represent the normalized source position vector. The coefficients in this new basis represent the relative speaker amplitudes after normalization. For this part of the algorithm, the amplitude of the low-frequency channel is set to zero.
3. As the source moves from the center to the periphery, there is a transition from algorithm (1) to algorithm (2). This transition decays as a cubic function of the radial distance. The amplitude vectors are normalized so the power is constant independent of source location.
4. Finally, the amplitudes decay as the distance from the center increases according to an inverse square law, such that the amplitude at the perimeter of the circle is one-quarter of the amplitude in the center.
For more details about vector base amplitude panning, consult [1].
Audio Output
The ALSA Audio Playback block sends the six-channel audio output to the 3.5 mm headphone jack of the hardware. To output a stereo signal that simulates the six-channel source, the ALSA identifier, plughw, is prefixed to the device number in the ALSA Audio Playback block parameters dialog box. The output is a stereo signal that simulates the six-channel source.
Step 3: Configure Audio Spatial Simulink Model
1. To open the Model Configuration Parameters dialog box, click the gear icon on the Simulink model toolbar.
2. In the Configuration Parameters dialog box, select Hardware Implementation.
3. Set the Hardware board parameter to Raspberry Pi. This selection automatically populates the parameters in the Hardware board settings with the default values for Raspberry Pi.
4. In the Hardware board settings pane, expand Target hardware resources and select Board Parameters. Specify these parameter values:
Device Address: The IP address or host name of the hardware.
Username: Specify the root user name of the Linux® system running on the hardware. The default user name of the Raspbian Linux distribution is
pi.
Password: Specify the root password of the Linux system running on the hardware. The default password of the Raspbian Linux distribution is
raspberry.
5. Click Apply. Click OK to save your changes.
Step 4: Play Spatialized Audio from Random Positions
On the Hardware tab of the Simulink model, in the Mode section, select Run on board and then click Monitor & Tune. The lower-left corner of the model window displays status while the support package generates the code. After successfully generating the code, the support package loads and runs the code on the hardware. The executable positions the helicopter at random positions within the circle and plays the spatialized audio through the audio jack of the hardware. You can now hear the spatialized audio through the pair of headphones connected to the hardware. The audio appears to be played from random speakers at each sample time.
Step 5: Play Spatialized Audio from a Desired Position
1. In the model, double-click the switch to connect the Set Position Visually block to the computeVol block.
2. In the Simulation tab of the model toolbar, click Run. The lower-left corner of the model window displays status while support package generates the code. After successfully generating the code, the support package loads and runs the code on the hardware.
3. In the model, double-click the Set Position Visually block. The executable launches a user interface. The interface has five discrete channels on the circumference of the circle and a low-frequency output in the center of the circle. The listener occupies a location on the center of the circle and is represented by a stick figure. You can now hear the spatialized audio through the pair of headphones connected to the hardware. The audio appears to be played from the speaker that is located the nearest to the helicopter. Change the position of the helicopter by dragging the helicopter with the mouse. Observe the change in the location and the volume of the audio being played. Continue changing the position of the helicopter to observe the change in the volume of the audio at different helicopter positions.
References
Pulki, Ville. "Virtual Sound Source Positioning Using Vector Base Amplitude Panning." Journal Audio Engineering Society. Vol. 45, Number 6, June 1997.
You can also select a web site from the following list:
Americas
- América Latina (Español)
- Canada (English)
- United States (English)
Europe
- Belgium (English)
- Denmark (English)
- Deutschland (Deutsch)
- España (Español)
- Finland (English)
- France (Français)
- Ireland (English)
- Italia (Italiano)
- Luxembourg (English)
- Netherlands (English)
- Norway (English)
- Österreich (Deutsch)
- Portugal (English)
- Sweden (English)
- Switzerland
- United Kingdom (English)